3
F. OPERATING INSTRUCTIONS: CHARGING BATTERY OUT OF VEHICLE
When charging battery out of vehicle, take care to determine the battery type. To reduce risk of a spark near battery, follow these steps
when battery is outside vehicle. WARNING: A spark near the battery may cause battery explosion. WARNING: When removing battery
from vehicle or boat, disconnect grounded pole rst. When disconnecting, make sure all accessories are off, so as not to cause an arc.
(NOTE: A marine (boat) battery must be removed and charged on shore. (To charge on board requires special equipment designed for
marine use.) WARNING: When reinstalling battery, attach the ground post rst.
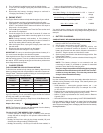
1. Arrange the power cord and charging cords carefully in order
to avoid damage that could be caused by the hood, door, or
moving engine parts.
2. Keep hands, hair, clothing and jewelry clear of the fan blades,
belts, pulleys, and other parts that can cause injury.
3. Check the polarity of the battery posts using the identication
marks on the battery case: POSITIVE (POS,P, +) and
NEGATIVE (NEG,N, –).
4. Identify which post of the battery is grounded or connected
to the chassis. The negative post is normally the one that is
grounded.
5. To charge a negative grounded post system: Connect the
red (POSITIVE) battery charger clamp to the ungrounded
POSITIVE (POS,P,+) post of the battery. Then connect the
black (NEGATIVE) clamp to a heavy metal part of the chassis
or engine block, away from the
battery. Do not connect clamp
to carburetor, fuel lines, or
sheet metal parts.
To charge a positive grounded
post system: Connect the black
(NEGATIVE) battery charger
clamp to the NEGATIVE
(NEG,N,–) ungrounded post
1. Remove battery from vehicle, making sure to disconnect
grounded terminal rst with all power turned off to the vehicle.
2. Check the polarity of the battery posts as indicated on the battery
case: POSITIVE (POS,P,+) and NEGATIVE (NEG,N,–).
NOTE: On top-post batteries, the positive battery terminal
usually has a larger diameter than the negative one.
3. Connect the red (POSITIVE) charger clamp to the POSITIVE
post of the battery. Be sure to rock the clamp back and forth
to make a solid connection.
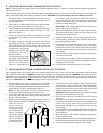
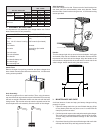
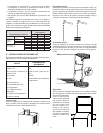
4. Attach at least a 6-gauge (AWG) insulated battery cable of at
least 24-inches in length to the NEGATIVE battery post. This
cable will provide
a safer connection
because any arcing
and sparking will not
occur directly over the
battery. (The battery
cable is not provided
with the charger but
may be purchased
at most automotive
accessory outlets.)
5. Take the other end of the 6-gauge (AWG) insulated battery
cable (at least 24-inches in length), and, standing as far away
from the battery as possible, connect the black (NEGATIVE)
charger clamp to the free end of the cable. Be sure to rock the
clamp back and forth to make a solid connection.
IMPORTANT: Wear safety glasses and face away from battery
while you are making the nal connection.
6. Plug the power cord into a grounded 3-prong AC electrical
wall outlet.
7. Press the timer to the desired charge time, from 5-135 minutes.
If more than 135 minutes of charging time is needed the hold
position can be used. When using the HOLD feature the
battery being charged must be monitored closely to avoid
over-charging.
8. Press the SELECT VOLT/CHARGE RATE button to the desired
charge position. (See “CHARGE RATE” chart on page 5 for
correct settings.)
9. When the battery is fully charged, unplug the charger power
cord from the wall outlet.
10. Face away from battery and remove the charger clamps from the
NEGATIVE end of the cable rst, then from the POSITIVE post.
11. Clean and store the battery charger in a dry location.
E. OPERATING INSTRUCTIONS: CHARGING BATTERY IN VEHICLE
NOTE: A marine (boat) boat battery must be removed and charged on shore. To charge it on board requires equipment specially de-
signed for marine use.
When charging battery in the vehicle, take care to determine the battery type and which post is grounded. To reduce risk of a spark near
battery, follow these steps when battery is installed in vehicle. WARNING: A spark near battery may cause battery explosion.
of the battery. Then connect the red (POSITIVE) clamp to a
heavy unpainted metal part of the chassis or engine block,
away from the battery. Do not connect clamp to carburetor,
fuel lines, or sheet metal parts.
IMPORTANT: Wear safety glasses and face away from the
battery while making connections.
6. Twist or rock clamps back and forth to make a solid connection.
This will help make better contact and help keep them from
slipping off and causing sparks.
7. Plug the power cord into a 3-prong AC electrical wall outlet.
8. Press the SELECT SWITCH and the CHARGE RATE button
to the desired charge position.
9. Press the timer to the desired charge time, from 5–135 minutes.
If more than 135 minutes of charging time is needed the
HOLD position can be used. When using the HOLD feature
the battery being charged must be monitored closely to avoid
over charging.
10. When the battery is fully charged, unplug the charger power
cord from the wall outlet.
11. Facing away from the battery, remove the charger clamps in
this order: (1) from the vehicle chassis or engine block (2) from
the battery post or terminal.
12. Clean and store the battery charger in a dry location.
Negative
(-)
Positive
(+)


