


It is important to understand your charger's requirements. This section will tell you
about your charger's electrical requirements and how to prepare a battery for
charging.
2
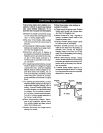
QUICK DISCONNECTHARNESS
To permanently attach to a small
battery (i.e. motorcycle), connect the red
POSITIVE harness wire eyelet to the
POSITIVE battery terminal. Then
connect the black NEGATIVE eye[et to
the NEGATIVE battery terminal.
Loosen and remove each nut from bolts
at battery terminal. One at a time, slip
the eyelets of the harness wires over the
bolt at battery terminal. Replace and
tighten nuts to secure.
ELECTRICAL INSTALLATION
Route and secure the output away from
gas line, carburetor, or other hot, sharp
or moving parts to avoid damaging the
wire insutation. Secure the wiring to the
frame or cable using a self locking cable
tie or equivalent.
PLUGGING IT IN
Your charger requires a 120V receptacle
installed according to all local cedes
and ordinances.
WARNING: Electrical Shock Hazard. Be
sure that the power cord fits properly
into the outlet, If not, have a qualified
technician install a proper outlet. Never
alter the AC cord or plug provided.
Improper connection can result in
electrical shock.
NEGATIVEGROUNDEDSYSTEM
USING AN EXTENSION CORD
The use of an extension cord is not
recommended. If you must use an
extension cord, please make sure
that you follow these guidelines:
• Make sure that the pins on charger's
power cord fit firmly into the extension
cord, and that the extension cord fits
firmly into the receptacle.
• Check that the extension cord is
properly wired and in good electrical
condition.
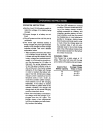
Make sure that the wire size is large
enough for its length and for the AC
ampere rating, as specified in the
chart below.
128 I
AWG* Size of COrd 18 18 16 14
*AWG=Amsfican W_e Gauge
5