


9
Sch 517
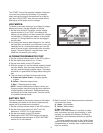
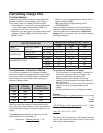
The “START” area of the ammeter indicates a high rate
of current being drawn by the battery. For example,
when cranking an engine, the needle will be at the far
right side of the “START” area since the starter will be
drawing up to 225 amps from the charger.
VOLTMETER:
To obtain an accurate reading of your battery’s voltage
before you charge, use the voltmeter as follows:
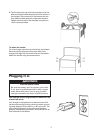
1. Set the timer to the OFF position, put the voltage
selector switch at 12 or 6 VOLT according to the
battery you are testing, and then connect the charger
as indicated in “Charging your battery in the vehicle”
on page 10. Charger does not have to be plugged
into an outlet.
2. If a battery has recently been charged or in a vehicle
that has been run recently, you may want to turn your
headlights on for a few minutes before you read the
meter so as not to get a false reading from a surface
charge. Then shut lights off, read the meter, and
follow the convenient color coding.
ALTERNATOR/GENERATOR TEST
1. Set the volt/amp selector switch to the OFF position.
2. Set the battery test switch to 6 or 12 volts.
3. Set the timer switch to the OFF position.
4. With the charger off, and the clamps properly hooked
up to the battery, start the engine and while it is at a
fast idle, read the charging system meter. The battery
should be in a good state of charge before doing this
test.
5. The volt meter is divided into three color zones:
A. Green and Lighter Green – Charging system
is good.
B. Yellow – Alternator output is low.
C. Red – Charging system is bad.
NOTE: If meter needle points to Red or Yellow, the
charging system may have loose fan belts, defective
voltage regulator or alternator. Additional tests may
be required to find the exact cause. Take the vehicle
to a qualified service center.
BATTERY TEST
This test is based on the terminal voltage of the battery.
If the battery is installed in the vehicle, make sure the
engine and all accessories are turned off.
1. Set the volt/amp selector switch to the OFF position.
2. Set the battery test switch to 6 VOLT for 6 volt
batteries or 12 VOLT for 12 volt batteries.
3. Set the timer switch to the OFF position.
4. Read lower 6 VOLT BATTERY section of meter for
6 volt batteries and read upper 12 VOLT BATTERY
section for 12 volt batteries.
5. Both 6 volt and 12 volt battery sections are divided
into three color zones:
A. Green - Good battery.
B. Yellow - Weak battery.
C. Red - Bad battery.
NOTE: If the meter needle is in the Red or Yellow
area, the battery may only need charging. If, after
charging, the needle still indicates in the Red or
Yellow area, have the battery tested by a qualified
technician.
The meter needle may point to the Lighter Green
section of the meter if this test is done on a recently
charged battery or a battery from a vehicle that has
been run recently.