OPERATING INSTRUCTIONS
Always turn youl hood on bet'on: yuu hegin cooking to c_mb-
_"'n air flow in the kitchen. Let the hood run for a few min-
eDc]€3r tt1€;fit"lit(:1" _U L*_z'nthe ran_= off. _ will l'mlp
' k_p the whole klt¢htmcleanerand brighter_
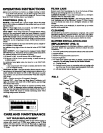
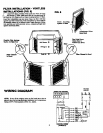
CONTROLS (FIG. I)
- The blower lkas 7 speed ranges. _:lcet the ran_:
w_hich Offers adequate _ for th_ glno_ _ld typ_ Of tOOk,
ing bring done.
-- ThrOe ]il_ht IL'vets are mllah|e, Use LOW for g 9JlIh[-
tight, Use MJ_Dor HIGH wtma cuoking.
AUTO TK_P - Your range hood has t unique feature which
monitors the teaxlperamr¢ Inside the hood whenever a speed
range has been sdi_ted. As the t_npcratus_ incrcas¢_, bio.g'(:r
speed will in_rca_within r.h=seloctcd specd range. The addl-
raonal air flow wi Uexhaust heat arid €ookil_ by-products more
€ffecu'vely, As the terapemture drops, blower speed wiU de-
_easc.
To manually increase or decrease the blower speed, simply se-
lect a higher or lower range,
An indicator lamp lighLs when the hood is tn tl_ AUTO TEMP
mode.
HI,AT SENTIk'Ym - Your range hood is equippcxi with a l-l_&T
_D_'KY_/eamre. Tim safety device xnses excess heat above
the ¢ookinl_ surface aad operates as follows:
101f blower is OFF - Rturns blower ON to HIGH speed
2.)If blower i_ ON at a lower speed setting - it turns blower up
to HIGH speed.
An indicator lamp lights when the hood is in the HFtAT5]iN.
TRYmmode.
" u th_ tcmptnmre level drops tO norln_l, the blower wiU
•_ Aa to its original setting.
_. I-RGHE0i_TAI.ARM- TMsspecial ta_'ty fcatta'esotmds a wam-
iag w_ncv_r aa cxce.e_ively hl_ temperature is detected. It ks
active crhethcr tlm blowcr is ON or OFF. The alarm is a puiso
ins, medium tom: and t't.sem autom:LtlC_lly when the tempera-
rare d_ps.
TEST - Checks opcradon of Auroraad¢ Features:
Depress TEST - Auto Temp a_l Heat Sentry m indictors will
light, the blower will come ON m HIGH spa'd, and the HiEh
Heat alar_ will sound.
Rr.lea.se TEST - Hood will ratllr11 to normal operating mock:.
Note: IfTF.ST is depraved when €ookin 8 ttmpctatur© is €l-
orated, sofa€ Automatic Features mzy remain ONafter TI_' is
released,Hood will return to normal operatingmode whoa
cooking temperature decreases.
FIG. I
CARE AND MAINTENANCE
;HT BULB REPLACEMENT
'ttcmov_ light lens by sotteczin_ sides of lens toward €¢11tcr to
release tabs, Install two 75 Watt max. b_bs, or one 75 Watt
bulb in left.hand .u3cket, arid one 2_ Watt bulb in dllht.hand
socket, for night-light nsc. DO not nse bulbs rated hishet titan
7_ Watts,
FILTER CARE
Remmm each filter by grasping the tab at d_ bottom of filter,
]iftinlJ up and swinging fitter out to the side.
HLT2BRS-- Clt=m flltt:_ frequently In a detergent
_oluttom T1my an: dishwasher safe.
DUCrleg_ MK_O'['J_k _ _ - Tt_ alunxinum filter is the
only w-athable part of the Microte.k "_Systema IV F_dter. Snap it
out of its frame and clean it in a detergetat solution or dish-
washer.
The particle filter is not _.shabl¢. It should last up to tw(:lv¢
moed_ with normal us_,
CLEANING
Do not allow _n czccssive accumulation of grease. Use a m;Id
deterS_t suitable for painted surfaces. DO NOT USE ABRA-
$1V_ _a.OTH, STEELWOOL PADS, OR SCO(rRING POWDERS.
Vacuum blower to clean. DO not immerse blower in water.
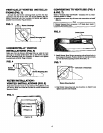
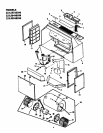
BLOWER INSTALLATION AND
REPLACEMENT (FIG. 2)
This hood is d,mi[gnedto he lnstaUed as either a vettted or vent-
less hood. Follow the appropriate directions belo_ for your
i_staI1atlon.
1. Set hood upside down and ttmov¢ bottom cover and sct_"ws.
2. Remove filters.
3. P.emove wiring box o_ver and screws.
4. Remove light kin.
5- To mak_ hood tighter and easier to handle, remove blower
a_acmbiy, Donor _ blm_er by the blower wheels.
a.) Onp_uSblower
b.) Loosen krmrled nuts on mounting rods and swing rods
out of the way_Do not ttttto_ nutscompletely from rods.
€0 Lift out blowerandset blower _side.
FIG. 2


