


Adirtyair fllterwillnotallowthe compressortooperateat full
capacity. Beforeyou usethecompressor, checkthe airfilter
to be sure it isclean.
tfitisdirty, mmovethescrewsand filter retainer. Pulloutthe
filter,mplacewith new.
Oil - Checking and Changing
5. Apply sealant tothe checkvalve threads.Reinstall
the check valve (turn clockwise). The valve stem
should still move freely- do not over tighten.
6. Replacethe outlet tube andtighten top and bottom
nuts.
Safety Valve - Inspection
Overfilling with oil will cause premature com-
pressor failure. Do not overfill.
Check oil level in the crankcase daily. The oil level should
beevenwiththetopofthefill hole and must not,beallowed
tobelowerthan3/8" fromthetop (6threads)at _nytime. It
isrecommendedthatthe oil bechanged afterevery 100hours
of operation.Todrainthe oil, removethe oildrain plug and
collecttheoilin asuitable container. Besureto replacethe
plug securelybeforeadding newoil. Useaspecialcompressor
oil such as Sears9-16426 or SAE-20-20W SFmotor oil.
(Crankcaseoil capacityis 16fluidounces.) Underextreme
winterconditionsuse 10weightoil.
Air Tank - Draining Water
IF THE SAFETY VALVE DOES NOT WORK PROP-
ERLY OVER-PRESSURIZATION MAY OCCUR,
CAUSING AIR TANK RUPTURE OR EXPLOSION.
OCCASIONALLY PULL THE RING ON THE
SAFETY VALVE TO MAKE SURE THAT THE
SAFETY VALVE OPERATES FREELY. IF THE
VALVE IS STUCK OR DOES NOT OPERATE
SMOOTHLY, IT MUST BE REPLACED WITH THE
SAME TYPE OF VALVE.
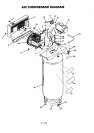
Motor
The motor hasathermal overload protector. If the motor
overheats for anyreason,theovedoad protectorwillshutoff
the motor.The motor mustbeallowedtocoeldown before
restarting.De-energizepower supply.To restart,depressthe
resetbuttonlocatedontheendofthemotorandenergizethe
powersupply.
WATER WILL CONDENSE IN THE AIR TANK. IF
NOT DRAINED, THE WATER WILL CORRODE
AND WEAKEN THE AIR TANK CAUSING A RISK
OF AIR TANK RUPTURE.
Watershould be drained from the airtankaftereach use.
Operatethe unittoapply 15-20PSIGand openthedraincock.
Continueoperating unit untilall moisture isremovedfrom
the airtank. Closethe drain cocktightly.
NOTE
If drain cock valve isclogged, release air pressure in
air tank. The drain cock valve can then be removed,
cleaned and reinstalled.
NOTE
If the overload protector shuts the motor off
frequently, checkfora possiblevoltage problem.
Low voltage can also be suspected when:
1. the motor does not get up to full power or
speed;
2. fuses blow out when the motor is started;
3. lightsdim when motor isstartecland remain
dim while itis running.
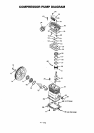
Belt - Replacement
Check Valve - Inspection and
Replacement
Remove the checkvalve for inspection or r_placement if
air tank pressure will not build up. Use the following
procedure to inspect,clean or replace the checkvalve.
1. Release air pressure fromthe air tank.
2. Loosen thetop and bottom nuts and removethe
outlettube.
3. Unscrewthe checkvalve (turn counterclockwise)
using a7/8" diameter 1/2" socketwrench.
4. Check that the valve discmoves freely inside the
checkvalve and thatthespring holdsthediscin the
upper, closed position. The check valve may be
cleaned with a solvent.
SERIOUS INJURY OR DAMAGE MAY OCCUR IF
PARTS OF THE BODY OR LOOSE ITEMS GET
CAUGHT IN MOVING PARTS. NEVER OPERATE
THE COMPRESSOR WITH THE BELT GUARD
REMOVED. THE BELT GUARD SHOULD BE RE-
MOVED ONLY WHEN THE POWER TOTHE COM-
PRESSOR IS DISCONNECTED.
The motor ismounted on an adjustable motor base.
To replace belt:
1. Turn offand lockout powersource.
2. Remove screwsfrom the back ofthe belt guard.
3. Loosenthe four motor mounting screws.
4. Slidethe motor toward the compressorpump.
5. Remove belt and replace.
g -- Eng