


9
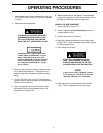
1. Before attaching air hose or accessories, make sure
the "AUTO/O" lever is set to “O” and the air regulator
is closed.
2. Attach hose and accessories.
OPERATING PROCEDURES
TOO MUCH AIR PRESSURE CREATES A
HAZARDOUS RISK OF BURSTING. CARE-
FULLY FOLLOW STEPS 3 AND 5 BELOW
EACH TIME THE COMPRESSOR IS USED.
Compressed air from the outfit may
contain water condensation. Do not
spray unfiltered air at an item that
could be damaged. Some air operated
tools or devices may require filtered
air. Read the instructions for the air
tool or device.
3. Check the manufacturer’s maximum pressure rating
for air tools and accessories. The regulator outlet
pressure must never exceed the maximum pressure
rating.
4. Turn the "AUTO/O" lever to “AUTO” and allow tank
pressure to build. Motor will stop when tank pressure
reaches “cut-out” pressure.
5. Open the regulator by turning it clockwise. Adjust
the regulator to the correct pressure setting. Your
compressor is ready for use.
6. Always operate the air compressor in well-ventilated
areas; free of gasoline or other solvent vapors. Do not
operate the compressor near the spray area.
WHEN YOU ARE FINISHED:
7. Set the “AUTO/O” lever to “O”.
8. Turn the regulator
counterclockwise
and set the
outlet pressure to zero.
9. Remove the air tool or accessory.
10.Open the regulator and allow the air to slowly bleed
from the tank. Close the regulator when tank pressure
is approximately 20 psi.
11. Drain water from air tank.
NOTE:
If drain cock valve is plugged, release
all air pressure. The valve can then be
removed, cleaned, then reinstalled.
12. After the water has been drained, close the drain
valve. The air compressor can now be stored.
WATER WILL CONDENSE IN THE AIR
TANK. IF NOT DRAINED, WATER WILL
CORRODE AND WEAKEN THE AIR TANK
CAUSING A RISK OF AIR TANK RUPTURE.