


8
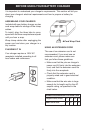
With the exception of AGM and gel cell
batteries, all other battery types may or
may not have vent caps.
Vent caps are
located on top of the battery and provide
a means to add distilled water when
needed.
Batteries should be marked
with their type. If charging a battery that
is not marked, check the manual of the
item that uses the battery. If the battery
type is unknown, use the Type 1
position. Make sure the battery complies
with the safety instructions on page 3.
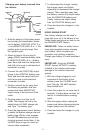
Engine cranking: When the 100A
Start rate is selected, the charger waits
until the engine is actually being
cranked before delivering 100 amps for
engine start. Note: The charger
delivers a charge of 3 to 7 amps while
waiting for the engine to be cranked and
will reset if the engine is not cranked
within 15 minutes. Cranking is allowed
for up to 3 seconds, then the charger
shuts down for a 4 minute cool down
period. During the cool down period the
Start LED will blink. After 4 minutes, the
Start LED will light continuously,
indicating that another crank cycle can
be performed.
Battery Status LEDs: The status of the
battery is indicated by a row of six
LED’s. The first LED is red; it will light
under the following conditions:
1. The charger is not connected to a bat-
tery.
Red LED lights continuously.
2. The charger is reverse-connected to a
battery.
Red LED lights continuously.
3. The charge cycle was not completed
within 24 hours.
Red LED blinks.
4. The battery could not be charged in a
normal manner. This could be due to a
battery with a partially shorted or open
cell, sulfated battery plates or electro-
lyte out of balance.
Red LED blinks.
The next four LEDs are amber. During a
normal charge, the leftmost amber LED
will light first. Then two, then three, and
eventually all four amber LEDs will light.
Refer to “Estimating Charge Time” on
page 12 for more information.
The sixth LED is green and lights to indi-
cate that charging is complete. When the
green LED lights, the amber LEDs will turn
off and the charger will start Maintain
Mode.
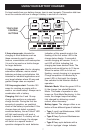
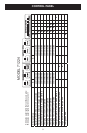
See the Control Panel table on the next
page.
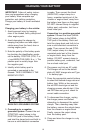
Setup and Operating: Follow all safety
and connecting procedures in this
manual. Located above each button on
the control pad is an amber LED that
lights to indicate that the selection is
active.
When first plugged in, the charger will
automatically default to the 2 AMP /
TYPE 1 position. You may then select
the charge rate and battery type. For
example, if you're charging a large 12-
volt deep cycle battery, press the
buttons labeled 15 AMP and TYPE 2.
Note: If you press a charge rate or
battery type button after charging has
started, the charger will restart the
charging process. Refer to “Estimating
Charge Time” on page 12 for more
information.
When selecting the Start position, you
do not have to select a battery type. All
indicator lights will turn off except for the
light above the Start button. The red
LED will also light if a properly con-
nected battery has not been detected.