


5
WARNING!
Remove all chemicals and wash before storing the
sprayer. Chemical products have different reactions and
can cause damage to the sprayer components and the
environment. Unidentified chemicals left in the sprayer
tank can pose a serious health threat to anyone servicing
the unit and unaware of its presence!
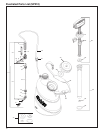
1. Unscrew the cylinder cap and remove
the pump chamber piston assembly
from the tank.
2. Pull the pump piston out of the pump
chamber.
3. Remove the piston cup from the pump
piston.
4. Remove the diaphragm valve from the
pump chamber.
5. Clean all parts and carefully inspect
for worn or damaged parts and replace
as necessary.
6. Reassemble in the reverse order.
NOTE:
Lubricating all moving parts with a high
quality lithium grease will ease assembly
and prolong the life of the unit.
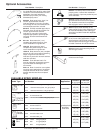
Troubleshooting
SYMPTOM CAUSE REMEDY
Lack of sprayer
pressure and/or
leakage at the
cylinder.
After pumping and
pressurizing the
tank, the pump
handle rises slowly
when released
prior to being
locked in place.
Sprayer will not
hold pressure.
Tank lid difficult to
remove.
Worn or damaged
diaphragm valve
and piston cup.
Diaphragm valve
not sealing properly
due to wear or
impurities.
Replace the dia-
phragm valve and
piston cup.
Clean or replace the
diaphragm valve.
Replace seals as
necessary.
Replace tank lid.
Maintenance
Cleaning the Sprayer
After finishing the spray application, empty the sprayer and
wash all equipment in an approved decontamination area.
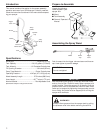
Pump Disassembly
Piston
Piston
Cup
Pump
Cylinder
Cylinder
Cap
Piston
Guides
Diaphragm
Valve
O-Ring
Hose seal, cap seal
or pump chamber
o-ring damaged.
Presure relief valve
inopperative.
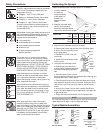
WARNING!
Always relieve pressure from the sprayer tank by pulling
the pressure relief valve before removing the tank lid.
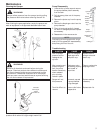
Periodically lubricate the pump handle, bushings and tank lid
pressure relief valve with a light-weight machine oil.
Lubricate
with a light-
weight
machine oil.
᭨
᭨