


17
Checking Knives
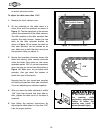
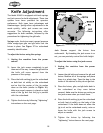
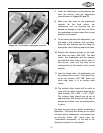
Figure 16. Correct jig position on cutterhead.
The Model W1683 features a 4 knife cutterhead.
These knives must be checked and adjusted
after regular use. Adjusting the knives is also an
important part of the maintenance process.
Correctly positioned knives act as a reference
point for adjusting the feed rollers, the chip
breaker and the pressure bar.
When checking/adjusting the knives, keep in
mind that the knife edge should be as precise as
possible at tolerances within .002" from one end
to the other. Improperly adjusted knives may
unbalance the cutterhead, reduce the sharpness
of knife edges prematurely, shorten bearing
life, and produce poor planing results.
To check the knives:
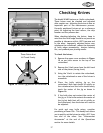
1. Remove the upper cover as shown in Figure
15 so you have access to the top of the
cutterhead.
2. Remove the V-belt cover from the left-hand
side of the planer (facing front).
3. Using the V-belt to rotate the cutterhead,
turn the cutterhead so one of the knives is
accessible.
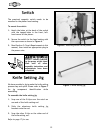
4. Place the knife setting jig on the
cutterhead. Both feet should sit solidly on
the cutterhead and the knife should barely
touch the center of the jig as shown in
Figure 16.
5. If the knife does not contact the center of
the jig, or if the knife contacts the center of
the jig but both feet will not sit solidly on
the cutterhead, then the knives will need to
be adjusted.
For quick and easy knife setup, consider
purchasing a Planer Pal
®
. This handy tool allows
you to quickly set the knives to within .001" from
one end to the other. See “Aftermarket
Accessories” at the end of the Operations
section for more details.
Figure 15. Cover removed from planer.
These Points Must
All Touch Evenly