


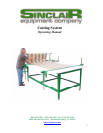


4
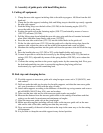
G. Assembly of guide parts with hand lifting device
I. Cutting off equipment:
1. Clamp the near-side support including slide to the table top approx. 40-50cm from the left
hand end.
2. Clamp the far-side support, including slide and lifting strap to the table top exactly opposite
the near-side support.
3. Feed the lifting strap over the belt rollers (555-286) in the fastening angles (550-273)
across the table to the front.
4. Position the guide rail on the fastening angles (550-273) and attach by means of screws
(550-227) and nuts (555-264).
5. Pull the lifting strap down behind the near side strap grip until the rail remains horizontal
when lifted, and then clamp firmly with screw (555-245).
6. Press the near side switch cam (512-135) into the drilled holes in the guide rail.
7. Fit the far-side switch cam (512-135) into the guide rail so that the rising slope faces the
operators side, adjust the cam to suit the width of the material and screw up tightly.
8. Introduce the cutting machine into the guide rail from the operators side and close the stop
bolt.
9. Press the handle tube assy (512-203 to 207) on the handle-holder and screw up.
10. It must be possible to raise the device easily by the lifting handle (550-275), the tension
springs (555-291), adjustable by means of the spring holders (550-290), act to reduce the
weight.
11. Connect the cutting machine to the power supply mains by the connecting lead. First, pass
the lead underneath the two pins to prevent the appliance plug being pulled out
inadvertently by a pull on the connecting lead.
II. End stop and clamping device.
12. Fix table supports to transverse guide rails using hexagon screws m6 x 35 (560-435), nuts
and washers.
13. Drill out under the table top location for the table supports, such that the transverse guide
rail, seen from above is flush with the edge of table.
14. Attach table supports according to the thickness of the table top, using counter sunk screws
m6 x45/60/80 (560-432 thru -434), nuts and washers.
15. Take care that near side and far side transverse guide tracks are parallel.
16. Measure the distance from the traverse guide tracks to the cutting off machine such that
settings can be made for maximum and minimum cut lengths.
17. Align the transverse guide rails at the given height.
18. Mount movable supports including end-rail slides on the traverse guide rails at the near
side and far side of the table, making sure that they run easily.
19. Carry out assembly of the end rail and tension the strap in the same way as for the cutting
off equipment.
20. It is possible to clamp the movable support in any desired position.