9
For adjusting the cutting pressure (the cutting pressure punches a hole in the material), you
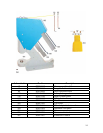
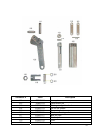
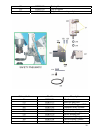
have to turn the bottom die # 219 to the right or to the left, so that when you start the machine
and press the foot pedal, the top set spindle # 218 barely touches the bottom die # 219.
With the machine disconnected from the compressor (and from the power source if it has any
electrical devices).
- Unscrew the threaded pin # 194 that holds the bottom die holder # 230,
- You must remember that the top set spindle # 218 always reaches the same point on its way
down and might hit the top of the bottom die # 219. Get a puncher in the side hole of the die
# 219, turn it to the right or to the left until the bottom die is in the right position.
If you want to know if the cutting pressure is correct, there is a simple way of checking it out:
you get a puncher in the side hole of the bottom die # 219 and by means of the puncher turn
the bottom die # 219 clockwise so it may come down a little bit, then get a piece of paper
(hold the piece of paper carefully, keeping you hands and fingers off the grommeting area) in
between the bottom die # 219 and the top set spindle # 218, then (with the machine
connected to the compressor and the air inlet # 260 in the open position) press the pneumatic
pedal while turning the bottom die # 219 counterclockwise until you manage to punch a hole
in the piece of paper.
- Disconnect the machine from the compressor and shut the air inlet #260,
- Screw up the threaded pin #194 so that it holds the bottom die holder # 230 and the bottom
die # 219.
- Check the ring guard adjustments, SEE PAGE 10.
If you wish to adjust the tightness of setting, you must turn the top die #217 to the right or to
the left. The top die is the die that does the grommeting.
With the machine disconnected from the compressor (and from the power source if it has any
electrical devices).
- Unscrew the nut nº 238 slightly counterclockwise,
- Get the puncher into the side hole of the die # 217, turn it to the right or left by causing the
top die # 217 to move downwards or upwards until it reaches an optimum position. The
higher the top die # 217, the lesser the pressure of the grommeting.
In order to achieve the correct pressure (with the machine connected to the compressor the
air inlet # 260 in the open position, and with your fingers and hands out the grommeting
area), press down the pedal and then adjust the dies so that the distance at its lowest point
between the top die # 217 and the bottom die # 219 should be the thickness of the material
that you wish to use.
- Disconnected the machine from the compressor and shut the air inlet nº 260,
- Screw back in the nut nº 238,
- Verify the ring guard adjustments.
After all the pressures and parts have been adjusted, you must verify that all the screws and
nuts are tight.


