


page 6
TOOL ASSEMBLY
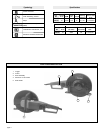
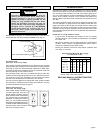
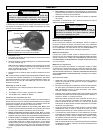
Installing Guard (Fig. 1)
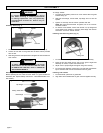
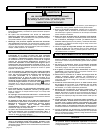
Removing and Installing Cut-Off Wheels (Fig. 2)
Before operating the tool, make sure the wheel is in good condition as
described (see Special Safety Instructions - Hand-Held Abrasive Cut-
Off Grinder).
WARNING!
To reduce the risk of injury, use only the proper
wheel made for this tool. DO NOT USE ANY TYPE
OF SAW BLADE. USE ONLY TYPE 1 ABRASIVE
AND DIAMOND WHEELS.
1. Place the tool on a firm surface with the spindle hub facing up.
2. Loosen the hex bolt on the guard with the allen wrench provided
with the tool.
3. Slide the guard over the spindle hub and tighten the hex bolt with the
allen wrench.
4. To remove cut-off wheels, loosen and remove nut, top flange and
cut-off wheel from spindle by securing back flange with wrench
and loosen nut with a second wrench.
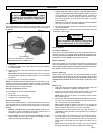
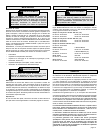
Installing and Removing Shoe (Fig. 3)
To change wheels:
1. To install cut-off wheels, place tool on a firm surface with the guard
surface facing up.
2. Slide the back flange, cut-off wheel, top flange and nut over the
spindle.
3. Tighten nut securely with the wrench provided with tool.
NOTE: Nut has a left hand thread. To tighten, turn nut in a counter-
clockwise rotation.
1. To install shoe assembly, loosen wing nuts on shoe assembly.
2. Place the first bolt head into the hole on the guard. Angle shoe
assembly as shown, to place the second bolt.
3. Adjust shoe to proper height and tighten wing nuts securely.
4. To remove shoe assembly, loosen wing nuts and slide shoe assem-
bly so that both bolts can be removed from holes in guard.
Installing Side Handle
1. To install handle, place tool on guard side.
2. Align bolts with threaded holes in gear case and tighten securely.
To reduce the risk of injury, always unplug
tool before attaching or removing accessories
or making adjustments. Use only specifically
recommended accessories. Others may be
hazardous.
WARNING!
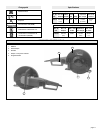
Spindle
Guard
Hex bolt
Fig. 1
Back flange
Cutting wheel
Top flange
Nut
Spindle
Fig. 2
Wing nuts
Fig. 3