


Operation
3. OPERATION (CONT)
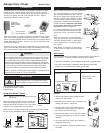
Push Button
Press the push button to open or close the garage door.
Lock Button
Lock feature is designed to prevent Skylink
®
handheld
remotes such as Skylink
®
Keychain Remote Model 4B-201
(sold separately) to operate the garage door opener.
To activate the lock feature
1. Press and hold the lock button for approx. 2 seconds, then release it.
2. When the lock feature is activated, the red LED underneath the push
button will flash rapidly.
Note: If a valid wireless remote signal is received while the lock feature is
activated, wall console will beep to remind you the wall console is locked.
To deactivate the lock feature (unlock)
1. Press and hold the lock button for approx. 2 seconds, then release it.
2. When the lock feature is deactivated, the red LED underneath the
push button will flash slowly indicating the wall console is in normal
operating mode and the lock feature is deactivated.
If you have a Chamberlain
®
, LiftMaster
®
, or Sears
®
Multi-Function Wall
Console, the lock button will lock/unlock both the Skylink
®
handheld
remote, as well as other Chamberlain
®
, Lift-Master
®
, Sears
®
remote
controls.
Learn Button
Skylink
®
Wall Console can be used as a garage door opener receiver. It
does not only operate as a garage door closer, additional handheld remote
controls can be added. Additional remote controls are sold separately.
To program Skylink’s remote control / sensor
1. Press the learn button for approx. 5 seconds.
2. The “Timer / Learn” red LED will be on, release the learn button.
3. Activate the Skylink
®
remote control. If the Skylink
®
remote control has
multiple buttons, press the button you would like to operate.
4. The “Timer / Learn” LED will be off after it has successfully programmed
the remote control.
5. You can now press the programmed remote to operate the garage
door opener.
AM-001G Control Panel can operate GC-433R, however, the programming
procedure is different.
To program AM-001G Control Panel to the GC-433R, GC-433R must already
be in lock mode before proceeding. Once the GC-433R is in lock mode,
follow the steps below to program the AM-001G.
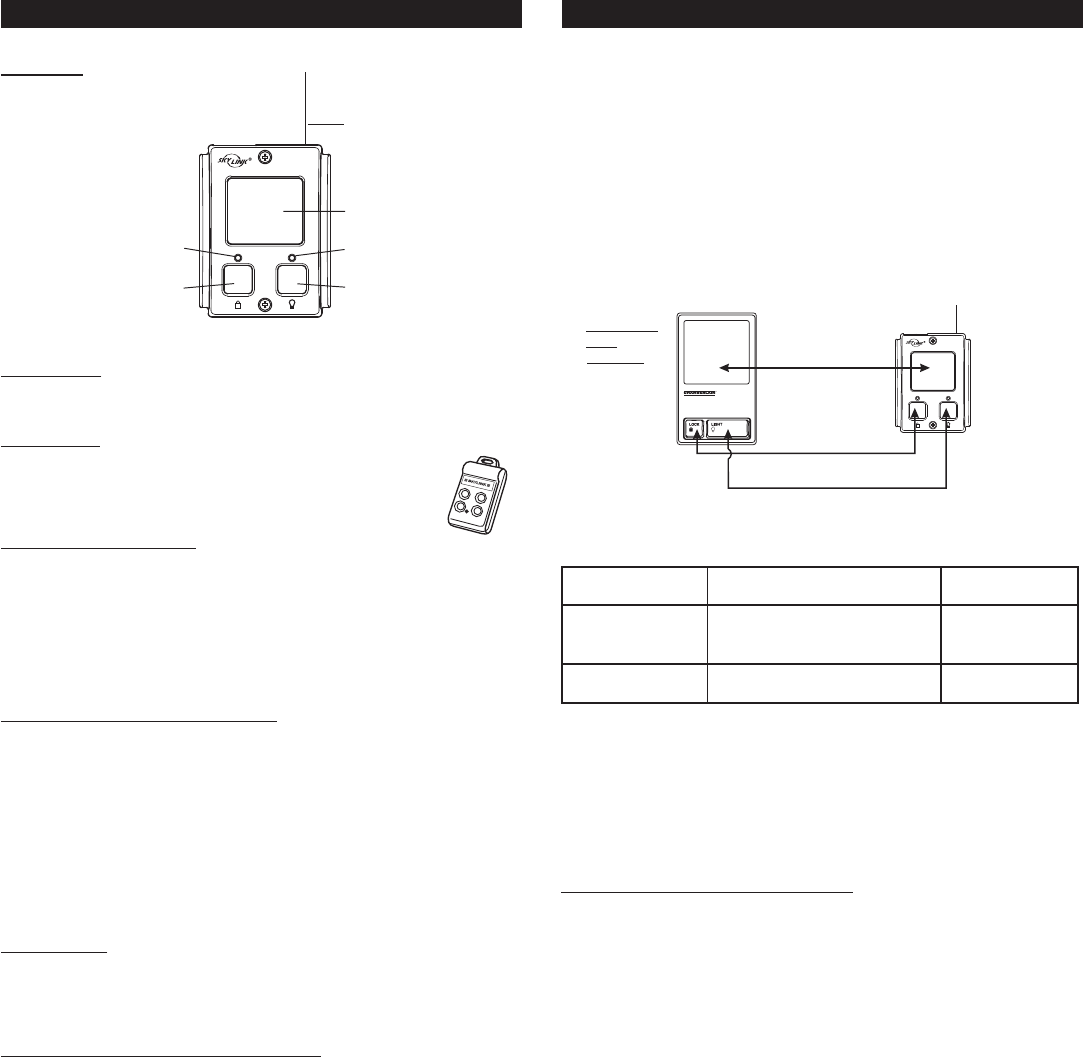
Push button
Timer / Learn LED
Loss of Signal LED
Learn buttonLock button
3. OPERATION (CONT)
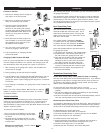
Antenna
Turn light on / off
Open / Close door
- Chamberlain
®
- Sears
®
- LiftMaster
®
–3–
Erase Skylink
®
remote controls / sensors
To erase unwanted remote control(s), first erase all remote controls and
sensors, then program the ones you would like to keep.
1. Press and hold the learn button for 15 seconds.
2. The “Timer / Learn” red LED will flash rapidly meaning all remotes have
been erased.
3. You have now successfully erased all the remote controls and sensors.
Follow the instructions “To program Skylink’s remote control/sensor”
to add the remote control(s) you would like to keep.
Important!
Ensure both the lock and light functions operate properly. Depends on
which mode you are in:
Lock Button Light Button
Full Function Mode* Lock /Unlock both GC-433R and Turn light on / off
Garage Door Opener
Simple Mode Only lock / unlock GC-433R No Function
* For Chamberlain
®
, LiftMaster
®
, Sears
®
Wall Console ONLY.
Pressing these buttons should result in functions mentioned in the chart
above. If some functions cannot be executed, or if you experience
unexpected functions, such as opening or closing of garage door when
pressing the lock button, you may need to change between Full
Function Mode and Simple Mode. Refer to “Garage Door Opener operating
Mode” below.
Lock / Unlock
Loss of Signal
Skylink
®
Wall Console also monitors the status of the garage door sensor.
If the garage door sensor fails to communicate with the wall console, the
loss of signal LED will flash indicating a trouble condition for the sensor.
There are 2 types of sensors. The flashing is different depending on the
type of sensor:
Garage Door Sensor: One flash at a time
Audio Sensor (Optional Accessory): Two flashes at a time
When the loss of signal is flashing, please check the following:
- Check the battery of the sensor.
- The LED on the sensor should flash when the sensor is triggered.
For details of how the Audio Sensor works, please refer to “Accessories”.
If you have a Chamberlain
®
, Lift-Master
®
, or Sears
®
Multi-Function Wall
Console, the learn button also works as a light button. Pressing this
button slightly will turn the light on the garage door opener on / off.
1. Press the learn button for approx. 5 seconds.
2. The “Timer / Learn” red LED will be on, release the learn button.
3. Select a remote location on the Control Panel AM-001G, press [6] to
[0] you would like to operate.
4. The “Timer / Learn” red LED will be off after it has successfully
programmed the Control Panel.
5. You can now activate the remote location on the Control Panel to
operate the garage door opener.
Note: Only allow one remote location to be learned in each Control Panel.