


-2-
Mfg. Since 6/10
Model SB1044
INSTRUCTIONS
Installation
During the installation process of your cutting
fluid kit, you'll need the following items:
For Power Connection
• Apowersourcethatmeetstheminimum
circuit requirements for this machine.
• Aqualifiedelectriciantoensureasafeand
code-compliant connection to the power
source.
For Assembly
• Phillips Screwdriver #2
• Cotton Rags and Silicone Sealant
• Hex Wrenches 3, 5mm
• Safety Goggles
• Wrench 27mm
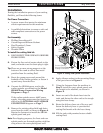
Spash
Por t
Tank
Trough
Power
Cord
Guard
Shield
Drain
Hose
Connect Delivery
Hose to Desired
Cutting Fluid Nozzle
SB1029
Chip
Cover
Drain
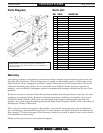
Figure 2. Cutting fluid system installation.
6. Apply silicone sealant to the mounting flange
of the port shown in Figure 2.
7. Using the fasteners from the machine in
Step 5, install the port, splash guard, and
the trough to the machine, as shown in
Figure 2.
8. Insert one end of the drain hose into the
tank, and fasten the other end to the trough
using the hose clamp.
9. Route the delivery hose out of the way and
fasten the delivery hose to your desired
cutting fluid nozzle with the hose clamp.
10. Fill the tank with premixed water soluble
cutting fluid.
To install the cutting fluid kit:
1. DISCONNECT THE SURFACE GRINDER
FROM POWER.
2. Fasten the four swivel caster wheels to the
tank, and make sure the drain plug is tight.
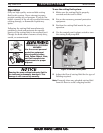
Tip: Place one or more strong magnets at the
bottom of the tank to collect fine metal
particles from the cutting fluid.
3. Route the pump power cord around the
backside of the surface grinder, or fasten it
up and away from the floor.
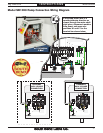
4. Connect the SB1044 power cord to the
surface grinder as outlined on the Model
SB1029 Pump Connection Wiring
Diagram on Page 7.
If the surface grinder uses a 440V power
supply, the pump motor must be rewired as
shown in the OPTIONAL 440V 3-PHASE
CONNECTION diagram on Page 7.
5. Remove the existing chip shield and drain
cover from the table, as shown in Figure 2.
Retain the fasteners to install the SB1044
splash guard and port.
Note: For shipping purposes, the front and rear
splash panels are fastened together with four
wing nuts on the rear splash guard wall.