


K I N G M A N G R O U P
WARRANTY STATEMENT
Kingman warranties to the original customer/purchaser that this product is
free from defects in material and workmanship under normal use and service
for a period of 12 months from the original date of purchase by the initial
owner/purchaser. For warranty to be effective, customer must return the
enclosed warranty registration card, along with a copy of the purchase
receipt, within fifteen days of purchase. Kingman agrees to repair or replace
(at its discretion) any product within a reasonable period of time. This
warranty does not cover o-rings, 9.6v rechargeable battery, charger,
scratches, nicks, normal wear and tear of parts, any modifications or normal
fading of anodizing or damage caused by dropping or hitting of products. This
warranty shall not apply if it is shown by Kingman that the consumer caused
the defect or malfunction because of misuse. This warranty only covers
original factory parts. Any modifications or tampering with original factory
parts will not be covered by this warranty. Any damage caused by water will
not be covered by this warranty. Warranty repair labor may only be conducted
by Kingman technicians or by technicians authorized by Kingman to perform
warranty repairs. If product needs repair, package it carefully and send
together with your name, address, phone number and a brief description of
the malfunction to:
14010 Live Oak Avenue
Baldwin Park, CA 91706 U.S.A.
Phone no.: 626.430.2300
Fax no.: 626.851.8530
www.kingman.com
OPERATION GUIDE
TROUBLESHOOTING
HELPFUL HINTS
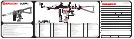
Always remove Air Tank before any disassembly of your marker. DO NOT remove the Valve Body (#14) unless
specific Valve Body repairs are needed. If needed, remove Valve Body with a long, soft-tipped object such as the
eraser end of a pencil. DO NOT remove the Valve Body with a screwdriver as it will damage the Valve Body and
cause air leaks. (Note: #15 screw must be removed prior to taking out the Valve Body).
Air leaks down the barrel are usually cause by a damaged or worn Cup Seal (#12). Replace with a new Cup Seal.
To assure marker is assembled properly, follow the schematic drawing or carefully arrange parts in order during
disassembly. Parts assembled backwards or placed in the wrong order will cause marker to malfunction.
1. To put the marker on SAFE, push the Safety Button from the PUSH SAFE side of the trigger frame. To
disengage the Safety, point the marker in a safe direction and push in the Safety Button from the right side
of the trigger frame.
2. Cock the marker by pulling the Pull Pin Cocking Knob (part #284) rearward until it latches. Caution: If
you let go before the knob latches, your marker may fire.
3. Tighten the air tank until it is snug. If a leak occurs between the air tank and the C/A Adapter, replace
the tank o-ring.
4. Install the Loader onto the Feed Adapter (part #54A). Tighten the Feed Adapter Screw to secure the
Loader, then you may fill the Loader with .68 caliber paintballs only.
5. With the Safety off, fire the marker by pulling the Trigger.
6. Routine lubrication of the marker does not require disassembly of the marker. Put 3-4 drops of paintball
marker oil into the Bottom Line ASA (part #261), screw in your air tank, point the marker in a safe direction
and dry fire (no paintballs in the chamber) 5-10 shots. This procedure will circulate oil through the markers
internal parts, thus extending the life of the marker.
7. It is good practice to lubricate your marker before and after each use, especially when storing the marker
for an extended period of time.
8. When you are finished shooting the marker, be sure to remove the Loader and all paintballs before
storing. NOTE: there may still be paintballs in the breach and neck of the marker, take a couple of shots in a
safe direction to make sure that the Barrel and breach are empty.
9. Place the Barrel Plug into the Barrel to avoid accidental discharge of the marker. Put the marker on
SAFE by pushing the Safety Button IN from the left side (labeled PUSH SAFE) then slowly unscrew the air
source tank. Caution: do not remove the Tank Valve from the Tank, doing so may cause serious injury or
death.
a. The pressure in the tank is too low. In some cases, the weather can affect the liquid in the CO2 tank
and cause it not to expand into gas (carbon dioxide) at a consistent rate.
b. Marker needs lubrication. (See OPERATION GUIDE in P4)
c. The Striker O-ring (#19A) is damaged. Replace with new Kingman or Kingman-approved O-ring. (NOTE:
the #19A O-ring cannot be substituted by a tank O-ring or a #9 O-ring).
d. Need to clean Barrel and upper chamber of the Receiver.
e. Paintballs may be defective (i.e. expired, odd shape, etc.)
f. After ball breaks in Barrel or chamber, remove all parts from UPPER chamber of Receiver, wipe parts
clean, and reassemble parts into Receiver. Also make sure to clean the Barrel with a squeegee
.
ONE OR MORE OF THE FOLLOWING MAY CAUSE RECOCKING RELATED PROBLEMS:
IMPORTANT
Firing velocity may vary according to altitude and climate conditions.
BEFORE using your marker in play, you must always first perform a SAFE VELOCITY TEST. This can only
be accomplished by using a testing device called a Velocity Chronograph and can be performed by the
dealership where you purchased this product or at a local paintball playing field.
NOTE: This product is intended to be used at a velocity no greater than 300 feet per second (FPS).
Recommended velocity is 280 FPS or less.
This product is NOT intended to be used at any distance less than 25 feet.
This paintball marker may have excess gas after removal of the C02 or Compressed Air tank. Please remove
all paintballs and discharge the remaining gas safely.
Always put marker on SAFE when marker is not in use.
CO2/HP AIR TANK WARNING
DANGER
VALVES MUST BE INSTALLED OR REMOVED ONLY BY QUALIFIED PERSONNEL.
BOTTLE MUST BE RETESTED PERIODICALY - SEE CO2/HP TANK LABEL FOR RETEST DATE!
Improper use, filling, storage or disposal of this cylinder may result in death, personal injury and/or property damage.
This cylinder must be filled only by properly trained personnel in accordance with CGA Pamphlets P.1 and G-6.3
available from the Compressed Gas Association - www.CGANET.COM.
Do not over pressurize. Do not expose pressurized cylinder to temperatures in excess of 130 degrees F.
Do not expose cylinder to corrosive materials and do not clean with caustic cleaners.
Do not alter this cylinder in any way.
Cylinders heated to a temperature of 250 degrees Fahrenheit or more must be condemned or requalified in accordance with
test defined in CFR-49.
Keep cylinder out of reach of children.
The valve should NEVER be detached from the canister. Should this occur, please seek assistance from a trained
airsmith immediately.
Any tank packaged with this marker is intended for paintball use only.
The CO2 or Compressed Air Tank can fly off with enough force to cause serious injury or death if the Valve unscrews
from the cylinder head. LOOK at the Valve when removing the cylinder from the marker. Be sure that the valve is
turning with the cylinder rather than remaining stationary with the marker. STOP if the Valve starts to unscrew from
the cylinder. If in doubt, screw the cylinder back onto the marker and contact a trained person for repair.