


GR29 User Manual ◄ 11
OPERATION
PREOPERATION PROCEDURES
CHECK THE POWER SOURCE
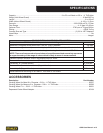
1. Using a calibrated owmeter and pressure gauge,
check that the hydraulic power source develops a
ow of 4-12 gpm/15-45 lpm at 950-2000 psi/67-140
bar.
2. Make certain that the hydraulic power source is
equipped with a relief valve set to open at 2100-
2250 psi/145-155 bar minimum.
3. Check that the hydraulic circuit matches the tool for
open-center (OC) or closed-center (CC) operation.
CHECK THE TOOL
1. Make sure all tool accessories are correctly in-
stalled. Failure to install tool properly can result in
damage to the tool or personal injury.
2. There should be no signs of leaks.
3. The tool should be clean, with all ttings and fasten-
ers tight.
CHECK TRIGGER MECHANISM
1. Check that the trigger operates smoothly and is free
to travel between the “ON” and “OFF” positions.
2. Check that the trigger is set to disengage the grinder
when released.
CHECK HANDLE
Check that the cross handle is securely screwed into the
handle bracket. Remove any oil from the handle.
CHECK AND ADJUST WHEEL GUARD
1. Inspect the wheel guard for cracks and other struc-
tural damage.
2. If necessary, adjust the position of the wheel guard
by loosening the two capscrews on the guard clamp.
Make sure the capscrews are tightened securely af-
ter adjustment.
INSTALLING AND REMOVING GRINDING
WHEEL
1. Remove and set aside the jam nut from the output
shaft.
2. Position the grinding wheel over the shaft.
3. Screw the jam nut down onto the spindle shaft.
Tighten the nut securely by using two open-end
wrenches, one wrench on the ats of the spindle
shaft, the other wrench on the jam nut.
4. Remove the grinding wheel by loosening the jam nut
as in Step 3.
IMPORTANT
Never over-tighten the grinding wheel jam nut by
impacting either wrench with a mallet or hammer.
Sufcient torque is attained by hand-tightening the
nut with two open-end wrenches.
USE OF DEPRESSED-CENTER WHEEL
ADAPTER
The Depressed-Center Wheel Adapter (part number
05194) must be used with wheels having a cupped or
depressed center.
CONNECT HOSES
1. Wipe all hose couplers with a clean lint-free cloth
before making connections.
2. Connect the hoses from the hydraulic power source
to the tool ttings or quick disconnects. It is good
practice to connect return hoses rst and discon-
nect them last to minimize or avoid trapped pressure
within the tool.
3. Observe the arrow on the couplers to ensure that
the ow is in the proper direction. The female cou-
pler on the tool is the inlet (pressure) coupler.
4. Move the hydraulic circuit control valve to the “ON”
position to operate the tool.
5. Squeeze the grinder trigger momentarily. If the
grinder does not operate, the hoses might be re-
versed. Verify correct connection of the hoses be-
fore continuing.
NOTE:
If uncoupled hoses are left in the sun, pressure in-
crease inside the hose may make them difcult to
connect. Whenever possible, connect the free ends
of the hoses together.