


-7-
TOOL OPERATION
EYE PROTECTION which conforms to ANSI specifications and provides protection against
flying particles both from the FRONT and SIDE should ALWAYS be worn by the operator and
others in the work area when connecting to air supply, loading, operating or servicing this
tool. Eye protection is required to guard against flying fasteners and debris, which could
cause severe eye injury.
The employer and/or user must ensure that proper eye protection is worn. Eye protection
equipment must conform to the requirements of the American National Standards Institute,
ANSI Z87.1 and provide both frontal and side protection. NOTE: Non-side shielded
spectacles and face shields alone do not provide adequate protection.
BEFORE HANDLING OR OPERATING THIS TOOL:
I. READ AND UNDERSTAND THE WARNINGS CONTAINED IN THIS MANUAL.
II. REFER TO “TOOL SPECIFICATIONS” IN THIS MANUAL TO IDENTIFY THE
OPERATING SYSTEM ON YOUR TOOL.
There are two available systems on BOSTITCH pneumatic tools. They are:
1. CONTACT TRIP OPERATION 2. SEQUENTIAL TRIP OPERATION
OPERATION
1. CONTACT TRIP OPERATION:
The CONTACT TRIP MODEL tool contains a contact trip that operates in conjunction with the trigger to
drive a fastener. There are two methods of operation to drive fasteners with a contact trip tool.
A. SINGLE FASTENER PLACEMENT: To operate the tool in this manner, first position the contact trip
on the work surface, WITHOUT PULLING THE TRIGGER. Depress the contact trip until the nose
touches the work surface and then pull the trigger to drive a fastener. Do not press the tool against
the work with extra force. Instead, allow the tool to recoil off the work surface to avoid a second
unwanted fastener. Remove your finger from the trigger after each operation.
B. RAPID FASTENER OPERATION: To operate the tool in this manner, hold the tool with the contact
trip pointing towards but not touching the work surface. Pull the trigger and then tap the contact trip
against the work surface using a bouncing motion. Each depression of the contact trip will cause a
fastener to be driven.
The operator must not hold the trigger pulled on contact trip tools except during fastening
operation, as serious injury could result if the trip accidentally contacted someone or
something, causing the tool to cycle.
Keep hands and body away from the discharge area of the tool. A contact trip tool may
bounce from the recoil of driving a fastener and an unwanted second fastener may be
driven, possibly causing injury.
2. SEQUENTIAL TRIP OPERATION:
The SEQUENTIAL TRIP MODEL contains a contact trip that operates in conjunction with the trigger to
drive a fastener. To operate a sequential trip tool, first position the contact trip on the work surface
WITHOUT PULLING THE TRIGGER. Depress the contact trip and then pull the trigger to drive a
fastener. As long as the contact trip is contacting the work and is held depressed, the tool will drive a
fastener each time the trigger is depressed. If the contact trip is allowed to leave the work surface, the
sequence described above must be repeated to drive another fastener.
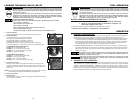
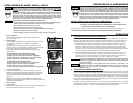
A
B
C
LOADING THE N400C, N401C, N512C
EYE PROTECTION which conforms to ANSI specifications and provides protection against
flying particles both from the FRONT and SIDE should ALWAYS be worn by the operator and
others in the work area when connecting to air supply, loading, operating or servicing this
tool. Eye protection is required to guard against flying fasteners and debris, which could
cause severe eye injury.
The employer and/or user must ensure that proper eye protection is worn. Eye protection
equipment must conform to the requirements of the American National Standards Institute,
ANSI Z87.1 and provide both frontal and side protection. NOTE: Non-side shielded
spectacles and face shields alone do not provide adequate protection.
TO PREVENT ACCIDENTAL INJURIES:
•Never place a hand or any other part of the body in nail discharge area of tool while
the air supply is connected.
•Never point the tool at anyone else.
• Never engage in horseplay.
•Never pull the trigger unless nose is directed at the work.
•Always handle the tool with care.
• Do not pull the trigger or depress the trip mechanism while loading the tool.
-6-
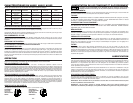
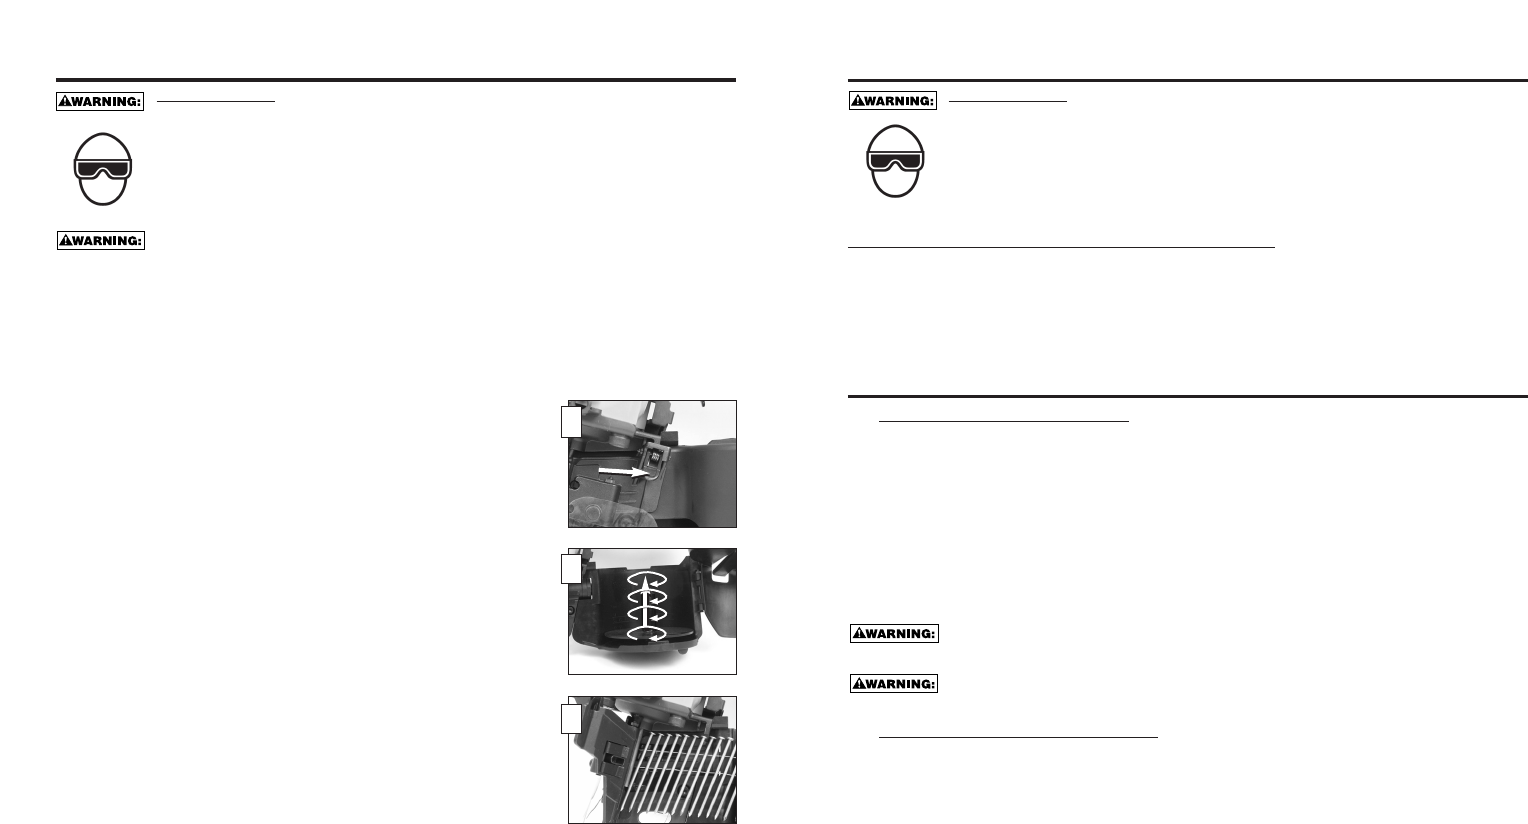
1. Open the canister:
Pull down door latch and swing door/canister cover outward. Fig.A
2. Check Adjustment:
The nailer must be set for the length of nail to be
used. Nails will not feed smoothly if the canister
is not correctly adjusted. The canister contains an
adjustable nail platform on which the nail coil rests.
The nail platform can be moved up and down to four nail settings.
To change setting pull up on the post and twist to the correct step. Fig.B
PLATFORM SETTINGS (N400C, N401C):
1st Step: 2-1/4” (55 mm) nail length
2nd Step: 2-1/2”– 3” (65-75 mm) nail length
3rd Step: 3-1/4”– 3-1/2” (80-90 mm) nail length
4th Step: 4” (100 mm) nail length
PLATFORM SETTINGS (N512C):
1st Step: 3”– 3-1/2” (75-90 mm) nail length
2nd Step: 4” (100 mm) nail length
3rd Step: 4-1/2” (115 mm) nail length
4th Step: 4-3/4 – 5-1/8” (120-130 mm) nail length
3. Load the coil of nails:
Place the coil of nails over the post in the canister. Uncoil enough nails
to reach the feed pawl. Place the first nail in front of the front tooth on the
feed pawl, in the driver channel. The nail heads must be in the slot in the
nose. Fig. C
NOTE: Use only nails recommended by BOSTITCH for N400C, N401C, N512C
series nailers or nails which meet BOSTITCH specifications.
4. Swing cover closed
5. Close the door:
Check that latch engages. (If it does not engage, check that the nail heads
are in the slot on the nose.)