


OPERATING INSTRUCTIONS
OPERA
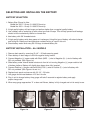
TING THE UNIT AS A JUMP STARTER
Warning: DO NOT JUMP START WHILE THE UNIT IS PLUGGED INTO 110 AC POWER SOURCE!
NEVER JUMP START A FROZEN BATTERY!
A SPARK NEAR BATTERY MAY CAUSE BATTERY EXPLOSION – FOLLOW INSTRUCTIONS
BELOW TO REDUCE RISK OF A SPARK NEAR BATTERY.
1. Position DC jumper cables to reduce risk of damage by hood, door, or moving engine part.
2. Stay clear of fan belts, pulleys, and other parts that can cause injury to persons.
3. Check polarity of battery posts. POSITIVE (POS, P, +) and NEGATIVE (NEG, N, –).
4. Determine which post of battery is grounded (connected) to the chassis. If negative post is grounded
to chassis (as in most vehicles) see step 5a. If positive post is grounded to the chassis, see step 5b.
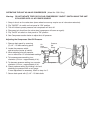
5. a) For negative-grounded vehicle, connect POSITIVE (RED) grip from unit to POSITIVE (POS, P, +)
ungrounded post of battery. Connect NEGATIVE (BLACK) grip from unit to vehicle chassis or engine
block away from battery.
b)
For positive-grounded vehicles only, connect NEGATIVE (BLACK) grip from unit to NEGATIVE
(NEG, N, –) ungrounded post of battery. Connect POSITIVE (RED) grip from unit to vehicle chassis or
engine block away from battery.
(This arrangement is usually found in pre-1970 foreign vehicles or
pre-1970 farm tractors. This is a rare occurrence.)
Note: Do not connect grip to carburetor, fuel lines, or sheet-metal body parts.
Connect to a heavy gauge metal part of the frame or engine block.
6. After jump starting vehicle, disconnect the unit from the vehicle. When disconnecting unit, ALWAYS
remove grip from vehicle chassis first, then remove grip from battery terminal second.
OPERATING THE UNIT AS A BATTERY CHARGER (USE ON LEAD-ACID BATTERIES ONLY)
Warning: DO NOT JUMP START WHILE THE UNIT IS PLUGGED INTO 110 AC POWER SOURCE!
NEVER JUMP START A FROZEN BATTERY!
A SPARK NEAR BATTERY MAY CAUSE BATTERY EXPLOSION – FOLLOW INSTRUCTIONS
BELOW TO REDUCE RISK OF A SPARK NEAR BATTERY.
1. Position DC jumper cables to reduce risk of damage by hood, door, or moving engine part.
2. Stay clear of fan belts, pulleys, and other parts that can cause injury to persons.
3.
Check polarity of battery posts: POSITIVE (POS, P, +) and NEGATIVE (NEG, N, –).
4.
Determine which post of battery is grounded (connected) to the chassis. If negative post is grounded
to chassis (as in most vehicles) see step 5a. If positive post is grounded to the chassis, see step 5b.
5. a) For negative-grounded vehicle, connect POSITIVE (RED) grip from unit to POSITIVE (POS, P, +)
ungrounded post of battery
. Connect NEGA
TIVE (BLACK) grip from unit to vehicle chassis or engine
block away from battery
.
b) For positive-grounded vehicles only, connect NEGATIVE (BLACK) grip from unit to NEGATIVE
(NEG, N, –) ungrounded post of battery. Connect POSITIVE (RED) from unit to vehicle chassis or
engine block away from battery
.
6.
Do not connect grip to carburetor
, fuel lines, or sheet-metal body parts. Connect to a heavy gauge metal
part of the frame or engine block.
7. Connect AC power cord to 110 AC outlet. When battery being charged is fully charged, the ampere gauge
(on front panel) will flicker on "0".
8. Upon completion of charging, disconnect unit from vehicle. When disconnecting unit, ALWAYS
remove grip from vehicle chassis first, then remove grip from battery terminal second.