9
tainer. When the priming knob is turned to (prime), paint
is drawn up the suction tube into the paint pump. The paint
pump then routes the paint through the return tube back to
the paint container. This primes the painting system. When
the priming knob is turned to (spray), flow is shut off
through the return tube and the sprayer can spray.
The outlet valve also contains a device to dislodge a stuck
valve. Simply push the plunger button located on the side
of the paint block before starting the pump.
You can see that the inlet valve and outlet valve work in
harmony with the diaphragm and piston. As a" team" they
pump paint.
CAUTION
The plunger button should never be pushed during
operation as this may cause premature failure of the
outlet valve.
PRIMING KNOB
The priming knob controls the priming valve. It is located on
the right front of the paint pump at the front of the sprayer
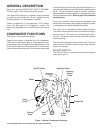
(see Figure 1). It can be manually turned to the or
position. When on (prime) it serves to rid the sprayer of
air by directing the initial air volume of the inlet valve back
into the paint container. It will continue to do this until paint
comes through and it is manually switched to the
(spray) position. It then directs the paint out the outlet fitting
to the spray hose and on to the spray gun.
The priming valve also serves to relieve pressure on the
system during shutdown and cleanup. The pressure is
relieved by turning the priming knob to .
CAUTION
CHANGE THE POSTION OF THE PRIMING KNOB
SLOWLY. THIS WILL PREVENT BREAKING ANY VALVE
PARTS. ALWAYS REDUCE THE PRESSURE WITH
THE PRESSURE CONTROL KNOB BEFORE TURNING
THE PRIMING KNOB.
SUCTION SET
The complete suction set consists of (1) the suction tube
with a suction filter on one end and (2) the return tube (see
Figure 1). Both suction and return tube are chemical and oil
resistant. One end of the suction tube and one end of the
return tube screw onto the paint pump (see Figure 1).
These two fittings need to be tight enough to keep air from
being drawn in. The other two ends go in the paint con-
WARNING
DO NOT IMMERSE THE PAINT HOSE IN ANY
SOLVENTS.
The paint hose and the electric cord should always be
protected from vehicle traffic and sharp cutting edges
or objects. If the paint hose is cut, worn, or damaged it
must be replaced with another high pressure grounded
hose.
The paint hose can develop leaks from wear, kinking,
abuse, etc. A leak is capable of injecting spray material
into the skin. Therefore, the paint hose should be
inspected periodically. Never repair a paint hose —
replace it with another high pressure grounded hose.
NOTE:
DO NOT USE THE SPRAYER UNLESS
THE SUCTION FILTER IS IN PLACE!
HIGH PRESSURE OUTLET FITTING
The high pressure outlet fitting is located on the front side
of the paint pump (see Figure 1). The paint hose is con-
nected to it. The outlet fitting connections must be very tight.
Otherwise, fluid will leak out the connections when pres-
sure builds up in the system.
PAINT HOSE
The high pressure paint hose (see Figure 1) has perma-
nently swaged fittings. It is grounded with a static conduc-
tor. This conductor serves to “drain off” any static charge,
preventing shock. The conductor is sandwiched between
two insulating sheaths which resist breaking and abrasion.


