


GB
22
W 867 E
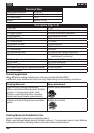
Thinning recommendation
Sprayed material
Interior wall paint (dispersions and latex paint) dilute by 10 %
If the feed rate is too low even at maximum flow setting, dilute in steps of 5 - 10 % until 2.
the feed rate meets your requirements.
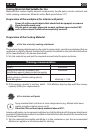
Start-up
Before connecting to the mains supply, be sure that the supply voltage is identical with
the value given on the rating plate.
ATTENTION: Do not sit or stand on the device. Danger of tilting/breaking!
Always lower the carry handle in the cover before opening the cover. Press the locking
1.
device on both sides to this purpose.
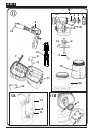
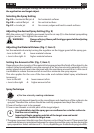
Open the closure (Fig. 1, item 15) and fold open the cover of the device. Open the
2.
air hose retainer (Fig. 2, item 28). Remove the air hose and connect it to the air hose
connection (Fig. 3). Close the air hose retainer again.
Unroll the power cable and slide the cable grommet into the provided recess
3.
(Fig. 4).
ATTENTION: Do not close the cover if the cable grommet is not positioned
correctly. The power cable could otherwise be damaged!
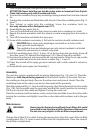
Remove the spray attachment from the deposition tray. Unscrew the container from 4.
the spray attachment.
Align the ascending tube. (Fig. 5) 5.
If the ascending tube is positioned correctly, the container contents can be sprayed
without almost any residue. When working on lying objects: Turn the ascending
tube forwards. (Fig. 5A)
Spraying work when working on overhead objects: Turn the ascending tube
rearwards. (Fig. 5B)
i
For easier coating of ceilings and lying objects, we recommend the 60 cm
HVLP handle extension. (Order no. 2307 678)
Place the container on a paper base and ll in the prepared coating material.
6.
Screw the container rmly onto the spray attachment.
Connect the front part of the gun and the gun handle to each other. (Fig. 6)7.
Close the device cover and pull the carry handle upwards. This makes the gun holder 8.
accessible.
Put the spray gun onto the gun holder at the device.9.
Place the device only on a plane and clean surface. Otherwise, the gun may suck in 10.
dust, etc.
Switch on the main switch at the device (Fig. 1, item 14).11.
Remove the spray gun from the gun holder and point it at the object to be coated.12.
Press the On/O switch at the gun handle (Fig. 7, item 2).13.