29
Disassembly
Disassembly of the dust collection system is only
required to replace the motor or the fan components.
The motor switch, if failed, can be replaced without
removal of the motor.
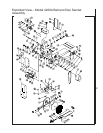
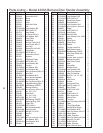
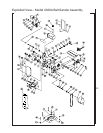
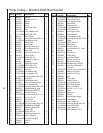
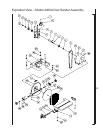
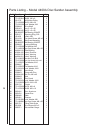
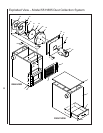
1. Remove the chip drawer (2) and cover (4) from the
base (1).
2. Remove the filter cover (5) and filter (6). Replace
the filter if required.
3. Remove five nuts (10) and lock washers (11) from
the studs at the rear of the base (1).
4. Remove four nuts (12) and lock washers (13) from
the screws (14). Remove the screws (14) from inside
the fan housings. Separate the motor support panel
(9) (with fan and motor still attached) from the base
(1).
5. Remove five nuts (17), lock washers (18) and the
screws (19) that secure the fan housings together.
6. Using a flat bladed tool, separate the outer fan
housing (16) from the inner fan housing (24).
7. Using an Allen wrench, loosen the set screw (22).
Remove the fan (21) from the shaft of the motor
(25). Remove the key (23) from the motor shaft.
8. Use a flat-bladed screwdriver to hold the flat head
screws (28) (in inner fan housing). Remove four nuts
(26) and lock washers (27) from the flat head screws
(28) in the motor mounting lugs.
Assembly
Assembly is the reverse of disassembly. Observe the
following during assembly:
1. Assemble the motor (25) and inner fan housing (24)
on the rear panel; make sure the fan duct is facing
downward.
2. Make sure the guard strap (20) is installed in the
recesses in the fan duct.
3. Mate the fan housings (16 and 24). Turn the fan
(21) by hand to check for rubbing. Adjust the fan as
required.
4. Use a spare screw or a Phillips screwdriver to align
the screw holes in the outer fan housing (16), spacer
(15), and in the internal panel of the base (1).
5. With the screw holes aligned, install the support
panel (9) on the five studs at the rear of the base
(1).
6. Connect the electrical power and check the opera-
tion of the dust collection system.


