


Troubleshooting
4–2 975-0012-01-02 Rev A
Troubleshooting the DR Inverter
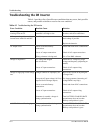
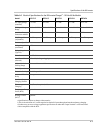
Table 4-1 provides a list of possible error conditions that may occur, their possible
causes, and possible solutions to resolve the error condition.
Table 4-1
Troubleshooting the DR Inverter
Error Condition Possible Cause Solution
No AC output voltage and no
warning LEDs on ON.
Battery voltage at the inverter
terminals is too high or low.
Check the battery voltage, fuses or
breakers, and cable connections.
AC output voltage is low and the
inverter turns loads ON and OFF.
Low Battery. Check the condition of the batteries
and recharge if possible.
Replace the batteries.
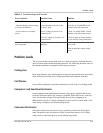
AC output is low. Loose or corroded battery
connections.
Loose AC output connections.
Wrong voltmeter is being used.
Check and clean all DC connections.
Check all AC output connections.
Use a True RMS voltmeter.
Charger is inoperative. AC voltage has dropped
out-of-tolerance
Loose AC input connections.
Check the AC voltage for proper
voltage and frequency (depending on
model).
Check all AC output wiring
connections
Charger is supplying a lower charge
rate.
Charger controls are improperly set.
Low peak AC input voltage (169 Vac
p
required for full charger output)
Loose or corroded battery
connections.
Loose AC input connections.
Generator is unstable - charger is
losing synchronization.
Refer to the section on adjusting the
“Charger Rate”.
Use larger generator (increasing AC
voltage/RPM’s may help).
Check and clean all DC connections.
Check all AC output wiring
connections.
Turn BATTERY CHARGER RATE
potentiometer down to less than
halfway until problem is gone.
AC LEDs flicker while charging. Generator is unstable and charger is
losing synchronization.
Turn BATTERY CHARGER RATE
potentiometer down to less than
halfway until problem is gone.