26
Basic Settings
Some of the following settings are required after connecting and positioning your speakers, while others will make
operations easier.
When performing the basic settings, it is recommended to use the remote control so that you can show the on-
screen display menu on the TV.
• When using the buttons on the unit, you can perform the same settings referring to the indications on the unit’s
display. (The following on-screen display menus cannot be shown if you use the buttons on the unit.)
Note:
When performing the basic settings viewing the indications on the
main unit’s display, the indications are slightly different from what is
shown on the on-screen display.
This is because of the limited number of characters shown on the
main unit’s display.
Ex. • “SPEAKER SETTING” is shown as “SP SETTING” on the main
unit’s display.
• “SPEAKER DISTANCE” is shown as “SP DISTANCE” on the
main unit’s display.
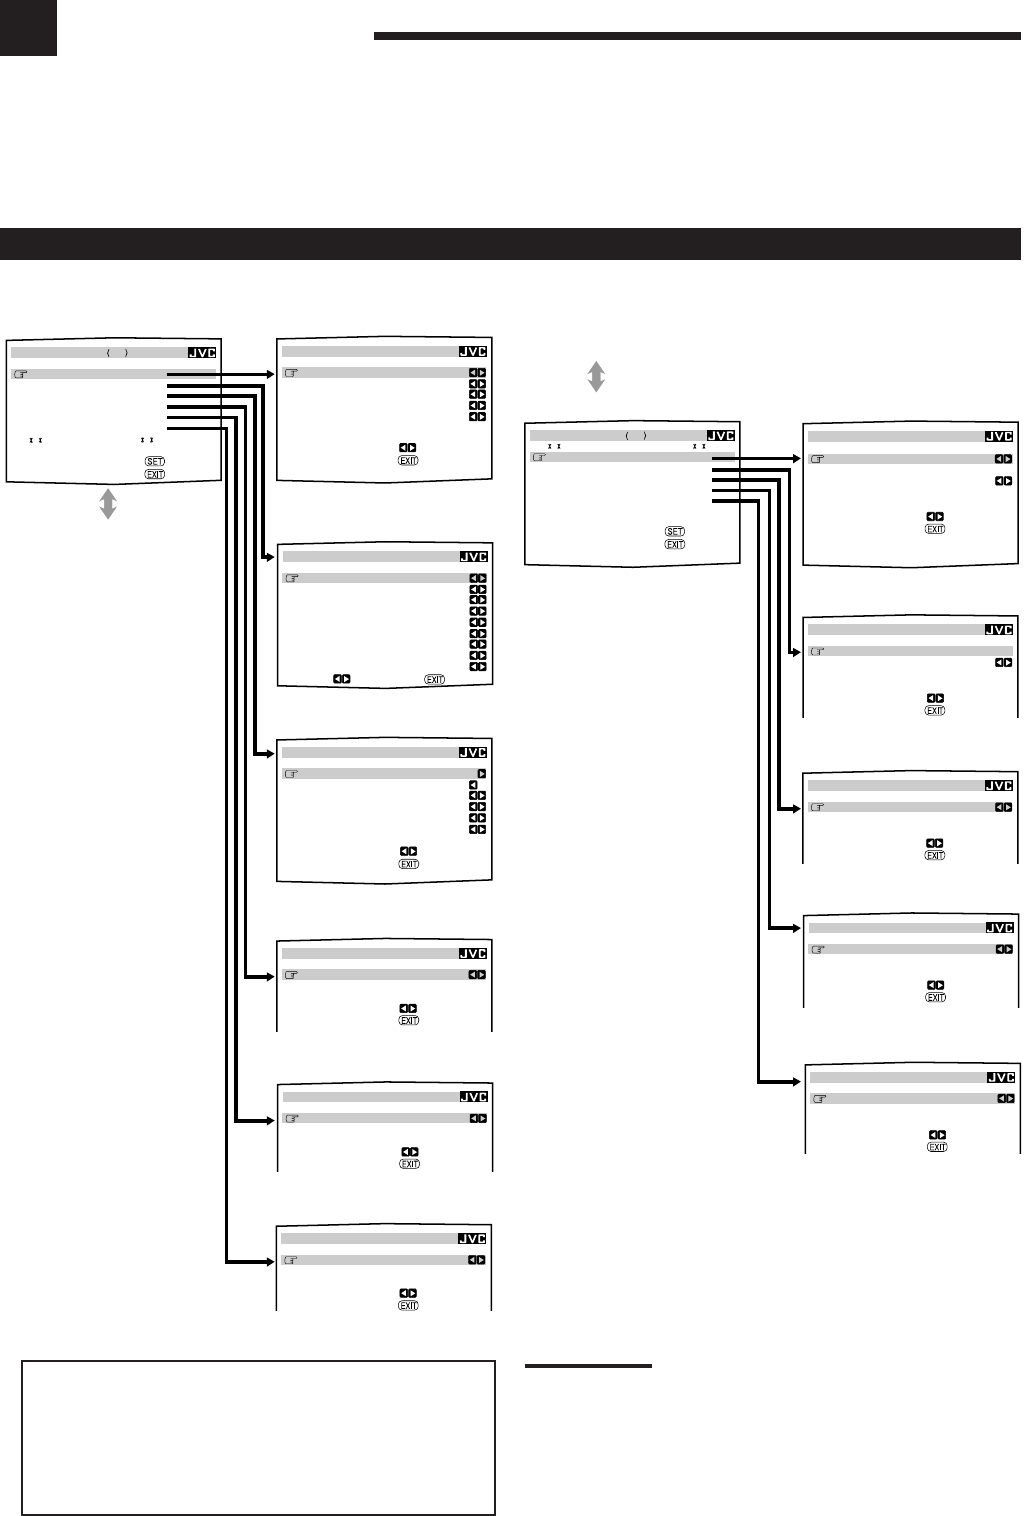
Setup Menu Configuration
DYNAMIC RANGE
MIDNIGHT MODE : OFF
:OPERATE
:BACK
THX
THX SURR EX : AUTO
:OPERATE
:BACK
:ENTER
:EXIT
SETUP MENU 1
SPEAKER SETTING
SPEAKER DISTANCE
SUBWOOFER
DYNAMIC RANGE
THX
SURROUND SPEAKER
NEXT PAGE
SETUP MENU (1)
SETUP MENU (2)
1 SPEAKER SETTING
(See page 29.)
3 SUBWOOFER
(See page 30.)
2 SPEAKER DISTANCE
(See page 29.)
4 DYNAMIC RANGE
(See page 31.)
5 THX
(See page 31.)
6 SURROUND SPEAKER
(See page 31.)
:OPERATE :BACK
SPEAKER DISTANCE
UNIT : meter
SUBWOOFER : 3.00m
FRONT L SP : 3.00m
FRONT R SP : 3.00m
CENTER SP : 3.00m
SURR L SP : 3.00m
SURR R SP : 3.00m
SBACK L SP : 3.00m
SBACK R SP : 3.00m
SUBWOOFER
CROSSOVER : 80Hz
LFE LEVEL : 0dB
PHASE :NORMAL
BASS PEAK LIMIT: ON
BASS TEST TONE : OFF
BASS PEAK LVL: 0dB
:OPERATE
:BACK
:OPERATE
:BACK
SPEAKER SETTING
SUBWOOFER : NO
FRONT SP : LARGE
CENTER SP : SMALL
SURROUND SP : SMALL
SURR BACK SP : SMALL
SURROUND SPEAKER
SURROUND SP:L/R
:OPERATE
:BACK
NOTICE—
• Items on the menus shown above are all set to the initial
values when shipped from the factory.
• Some of the menus or some items on the menu cannot be
shown or cannot be adjusted. (For details, see the
respective explanation in this section.)
VIDEO POWER
VIDEO POWER : ON
:OPERATE
:BACK
FL DISPLAY
FL DISPLAY : TEXT
:OPERATE
:BACK
:ENTER
:EXIT
SETUP MENU 2
PREVIOUS PAGE
DIGITAL IN
COMPONENT IN
VIDEO POWER
FL DISPLAY
ONE TOUCH OPERATION
SETUP MENU (1)
SETUP MENU (2)
7 DIGITAL IN
(See page 32.)
8 COMPONENT IN
(See page 32.)
DIGITAL IN
COAXIAL INPUT: 1DVD
OPTICAL INPUT:
2CD 3TV 4CDR
:OPERATE
:BACK
COMPONENT IN
COMPONENT INPUT:
1DVD 2–––
:OPERATE
:BACK
9 VIDEO POWER
(See page 33.)
p FL DISPLAY
(See page 33.)
q ONE TOUCH OPE(ration)
(See page 33.)
ONE TOUCH OPE
ONE TOUCH OPE : OFF
:OPERATE
:BACK
EN26-33_RX-DP9VBK[J]_f 01.6.21, 4:52 PM26


