- 11 -
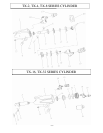
unscrew and remove the piston head from the shaft
with the Piston O-ring (17).
7. Pull the Piston shaft out of the Housing.
8. If the Sliders (5) must be replaced, position the Slider
Pin (14) over a clearance opening in a soft block and
use a small drift to tap the Pin out of the Sliders and
shaft.
9. If the Rod Seal (16) needs replacement, use a hooked
tool to pull it out of the Housing.
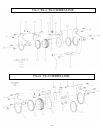
Disassembly of the Ratchet Link
1. Lay the Ratchet Link flat on a workbench with the
Left Side Plate (1) downward and using a hex wrench,
unscrew and remove the two Lower Spacer Screws
(16).
2. Using a hex wrench, unscrew and remove the two
Upper Spacer Screws (15).
3. For Series TX-16 and TX-32, use a roll pin punch to
tap the Spacer Roll Pin (19) out of the Right Side Plate
(2).
4. While applying thumb pressure to the edge of the
Ratchet (6), carefully lift the Side Plate off the
Assembly.
5. Grasp the Ratchet and Drive Plate (3) and, while
maintaining their relationship, lift them both off the
Left Side Plate.
6. Push the Ratchet out of the Drive Plate and Remove
the Drive Segment (7) and the Segment Spring (14)
from the Drive Plate Recess.
7. If the Drive Pin (4) or Drive Pin Spring (5) must be
replaced, use a roll pin punch to push the Drive Pin
Spring Roll Pin (18) out of the Drive Plate. Once the
Pin Spring is removed, the Drive Pin (4) will drop
down to the large opening at the bottom of the slot for
easy removal.
8. Lift the Lower Spacer (10) off the Lower Spacer Pins
(11). If the Pins must be replaced, use a hex wrench to
remove the two Lower Spacer Screws from the Right
Side Plate. Pull the Pins out of the holes on the inner
face of the Right Side Plate.
9.
For Series TX-2, TX-4, and TX-8
, unscrew the two
Spacer Screws and remove the Middle Spacer (9) from
the Right Side Plate.
For Series TX-16 and TX-32,
use a roll pin punch to remove the Spacer Roll Pin
(19) from the Right Side Plate. Unscrew the two
Spacer Screws and remove the Middle Spacer (9) and
Upper Spacer (8) from the Right Side Plate.
10. If the Side Plate Sleeves (12) must be replaced,
press the Sleeves out toward the inner face of the Side
Plate.
ASSEMBLY
General Instructions
1. Use extra care not to score, nick or damage surfaces
that will contain hydraulic oil under pressure.
2. Whenever grasping a tool in a vise, always use
leather-covered or copper-covered vise jaws to protect
the surface of the part and help prevent distortion. This
is particularly true if threaded members and housings.
3. Apply o-ring lubricant to all o-rings before final
assembly.
Assembly of the Ratchet Link
1. If the Side Plate Sleeves (12) were removed, press
new sleeves, shoulder end trailing, into the Right and
Left Side Plates (1 & 2) from the inner face of the side
Plates. Make certain the Sleeves are square with the
side plate faces and the shoulder of the Sleeves enters
the recesses in the Side Plates and are pressed flush
with the faces.
2.
For Series TX-2, TX-4, and TX-8,
position the
Middle Spacer (9) against the inside face of the Right
Side Plate Apply a non-permanent thread-locking
compound to the threads of the two Upper Spacer
Screws (15) and secure the Spacer with the Screws
through the Side Plate.
For Series TX-16 and TX-32,
press the Spacer Roll Pin (19) into the Right Side Plate
with one end of the Pin flush with the external face of
the Side Plate. Insert the tab of the Upper Spacer (8)
into the slot in the Middle Spacer (9), and after
aligning the holes in both pieces, install them on the
Spacer Roll Pin (19). When they are correctly
positioned, apply a non-permanent thread-locking
compound to the threads of the two Upper Spacer
Screws (15) and secure the Spacers with the Screws
through the side plate.
3. Insert the two Lower Spacer Pins (11) into the holes in
the lower edge of the Right Side Plate. Apply a non-
permanent thread-locking compound to the threads of
the Lower Spacer Screws (16) and secure the Pins
with the Screws through the Side Plate.
4. Place the Lower Spacer (10) over the Pins against the
Side Plate. Make certain it is correctly oriented so that
no part of the Spacer extends beyond the edge of the
Side Plate.
5. Insert the Drive Pin (4) into the small cross-hole and
slot in the Drive Plate (3). Invert the Plate causing the
ends of the Pin to enter the slot and move the Pin to
the narrow end.
6. Position the Drive Pin Spring (5) in the drive plate slot
with the two non-connected ends between the Drive
Pin and the large hole in the slot. Position the closed
end of the Spring on the opposite side of the Pin and
then apply pressure on the Spring to align the hole
through it with the hole in the Drive Plate for the
Drive Pin Spring Roll Pin (18). Insert the Spring Roll
Pin into the Drive Plate, through the Spring and into
the far wall of the Drive Plate.
NOTICE
In the following step, when the Ratchet is removed
from the Drive Plate, the Drive Segment and Segment
Spring will be free to fall from the Drive Plate recess.
Do not allow the Drive Segment to fall on a hard
surface that might chip the teeth.


