


USE OF EXTENSION CORDS
Make sure the extension cord is in good condition before using. Always use the proper size
extension cords with the tool – that is, proper wire size for various lengths of cord and heavy
enough to carry the current the tool will draw. Use of an undersized cord will cause a drop in
line voltage resulting in loss of power and overheating. For proper size cords see chart
below.
MOTOR
Be sure your power supply agrees with nameplate marking. 120 Volts AC only means your
tool will operate on standard 60 Hz household power. Do not operate AC tools on DC. A
rating of 120 volts AC/DC means that you tool will operate on standard 60 Hz AC or DC
power. This information is printed on the nameplate. Lower voltage will cause loss of power
and can result in over-heating. All Black & Decker tools are factory-tested; if this tool does
not operate, check the power supply.
SAVE THESE INSTRUCTIONS
Assembly/Adjustment Set-up
INSTALLING BLADES
WARNING: Before attempting any of the following operations, make sure that the tool is
switched off and unplugged and that the saw blade has stopped. Used saw blades can be
hot.
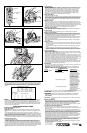
Using a flat blade screwdriver, loosen (do not remove) the two screws "A" in Figure B.
Ensure the blade teeth are facing forward and insert the saw blade shank fully into the blade
clamp. Slightly tighten screws alternately to position the blade, then fully tighten screws. To
release, turn both screws one turn counterclockwise.
Note: To improve cutting performance, ensure back of blade is touching blade support roller.
See "Roller Support Guide"for instructions on how to change position of blade support roller.
BLADE SUPPORT ROLLER
TURN OFF AND UNPLUG TOOL.
The blade support roller on your jigsaw improves its performance when cutting tough
materials by adding support to the blade. This support should be adjusted so that the roller
touches the back of the blade when cutting. Ensure the blade is aligned with the groove in
the roller. Adjust the support roller by loosening the screw on the bottom of the shoe (Fig.B)
and moving the shoe so that the roller touches the back edge of the blade. Retighten screw.
Lubricating the guide roller from time to time with a drop of oil will extend the life of the roller.
NOTE: Roller support guide not applicable when shoe is beveled to 45 degrees.
Minimum Gage for Cord Sets
Volts Total Length of Cord in Feet
120V 0-25 26-50 51-100 101-150
(0-7,6m) (7,6-15,2m) (15,2-30,4m) (30,4-45,7m)
240V 0-50 51-100 101-200 201-300
(0-15,2m) (15,2-30,4m) (30,4-60,9m) (60,9-91,4m)
Ampere Rating
More Not more American Wire Gage
Than Than
0-6 18 16 16 14
6 - 10 18 16 14 12
10 - 12 16 16 14 12
12 - 16 14 12 Not Recommended
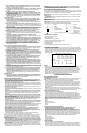
ON/OFF SWITCH
BEFORE PLUGGING YOUR JIGSAW IN, ENSURE THAT THE TRIGGER SWITCH IS IN
THE OFF POSITION.
To turn the saw on, squeeze the trigger switch, as shown in Figure C. To turn the tool off,
release the trigger switch. The tool can be locked on for continuous operation by fully
squeezing and holding the trigger switch while you depress the lock-on button shown in
Fig. C. With the lock-on button depressed, release the trigger switch and the tool will
continue to run. To release from lock position, squeeze and release the trigger. Always
disengage the lock before disconnecting from the power supply.
BEVEL ADJUSTMENT
TURN OFF AND UNPLUG TOOL.
To adjust the bevel angle, loosen the screw (approximately 3 full turns) on the bottom of the
shoe, as shown in Figure B. Lift the shoe slightly and pull backward, then set the shoe at
45° and retighten screw. To reset the shoe for a square cut, loosen the screw and move the
shoe until it is approximately 90° to the blade. Adjust the blade support roller to the blade
and retighten the screw.
GENERAL CUTTING
Be sure board is firmly secured. Hold jigsaw by the handle and operate switch to turn the
unit on. Don’t attempt to turn on the unit when blade is against material to be cut. This could
stall the motor. Place front of shoe on material to be cut and hold jigsaw shoe down firmly
against the work surface while cutting. Don’t force the tool; let the blade cut at its own speed.
Whenever possible, clamp or support work close to the line of cut; when the cut is
completed, shut off power and lay the saw aside before loosening the work.
AUTOMATIC DUST BLOWER
To aid visibility when cutting, your jigsaw is equipped with an automatic dust blower (Fig. C)
which will keep the work area clear of dust as you saw.
BLADE STORAGE
A convenient blade storage compartment (Fig. D) is provided at the rear of the saw.
METAL & PLASTIC CUTTING
In cutting thin gauge sheet metals, it is best to clamp wood or plywood to the bottom of the
metal sheet; this will insure a clean cut without the danger of vibration or tearing of metal.
Use a fine-tooth blade for ferrous metals (for those that have an iron content); and use a
coarser blade for nonferrous metals (those that do not have an iron content).
Cutting thin metal will take longer than cutting relatively thick wood so do not be tempted to
speed up the process by forcing the saw. Spread a thin film of cutting lubricant along the
cutting line (any light weight oil).
When cutting laminated plastic, place the finished side down and use a fine tooth hollow
ground blade.
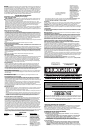
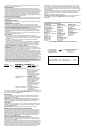
POCKET CUTTING
• Measure the surface to be cut and mark clearly with a pencil. Next tip the saw forward
until the front edge of the shoe sits firmly on the work surface, but with the blade well
clear of it Figure E.
• Turn the tool on and allow it to attain maximum speed by fully depressing the trigger
switch.
• Grip the handle firmly and slowly lower the back edge of tool until the blade cuts
smoothly into material. Do not move the jigsaw forward along the cut line until the saw
blade has completely entered the material and shoe comes to rest flat on its surface.
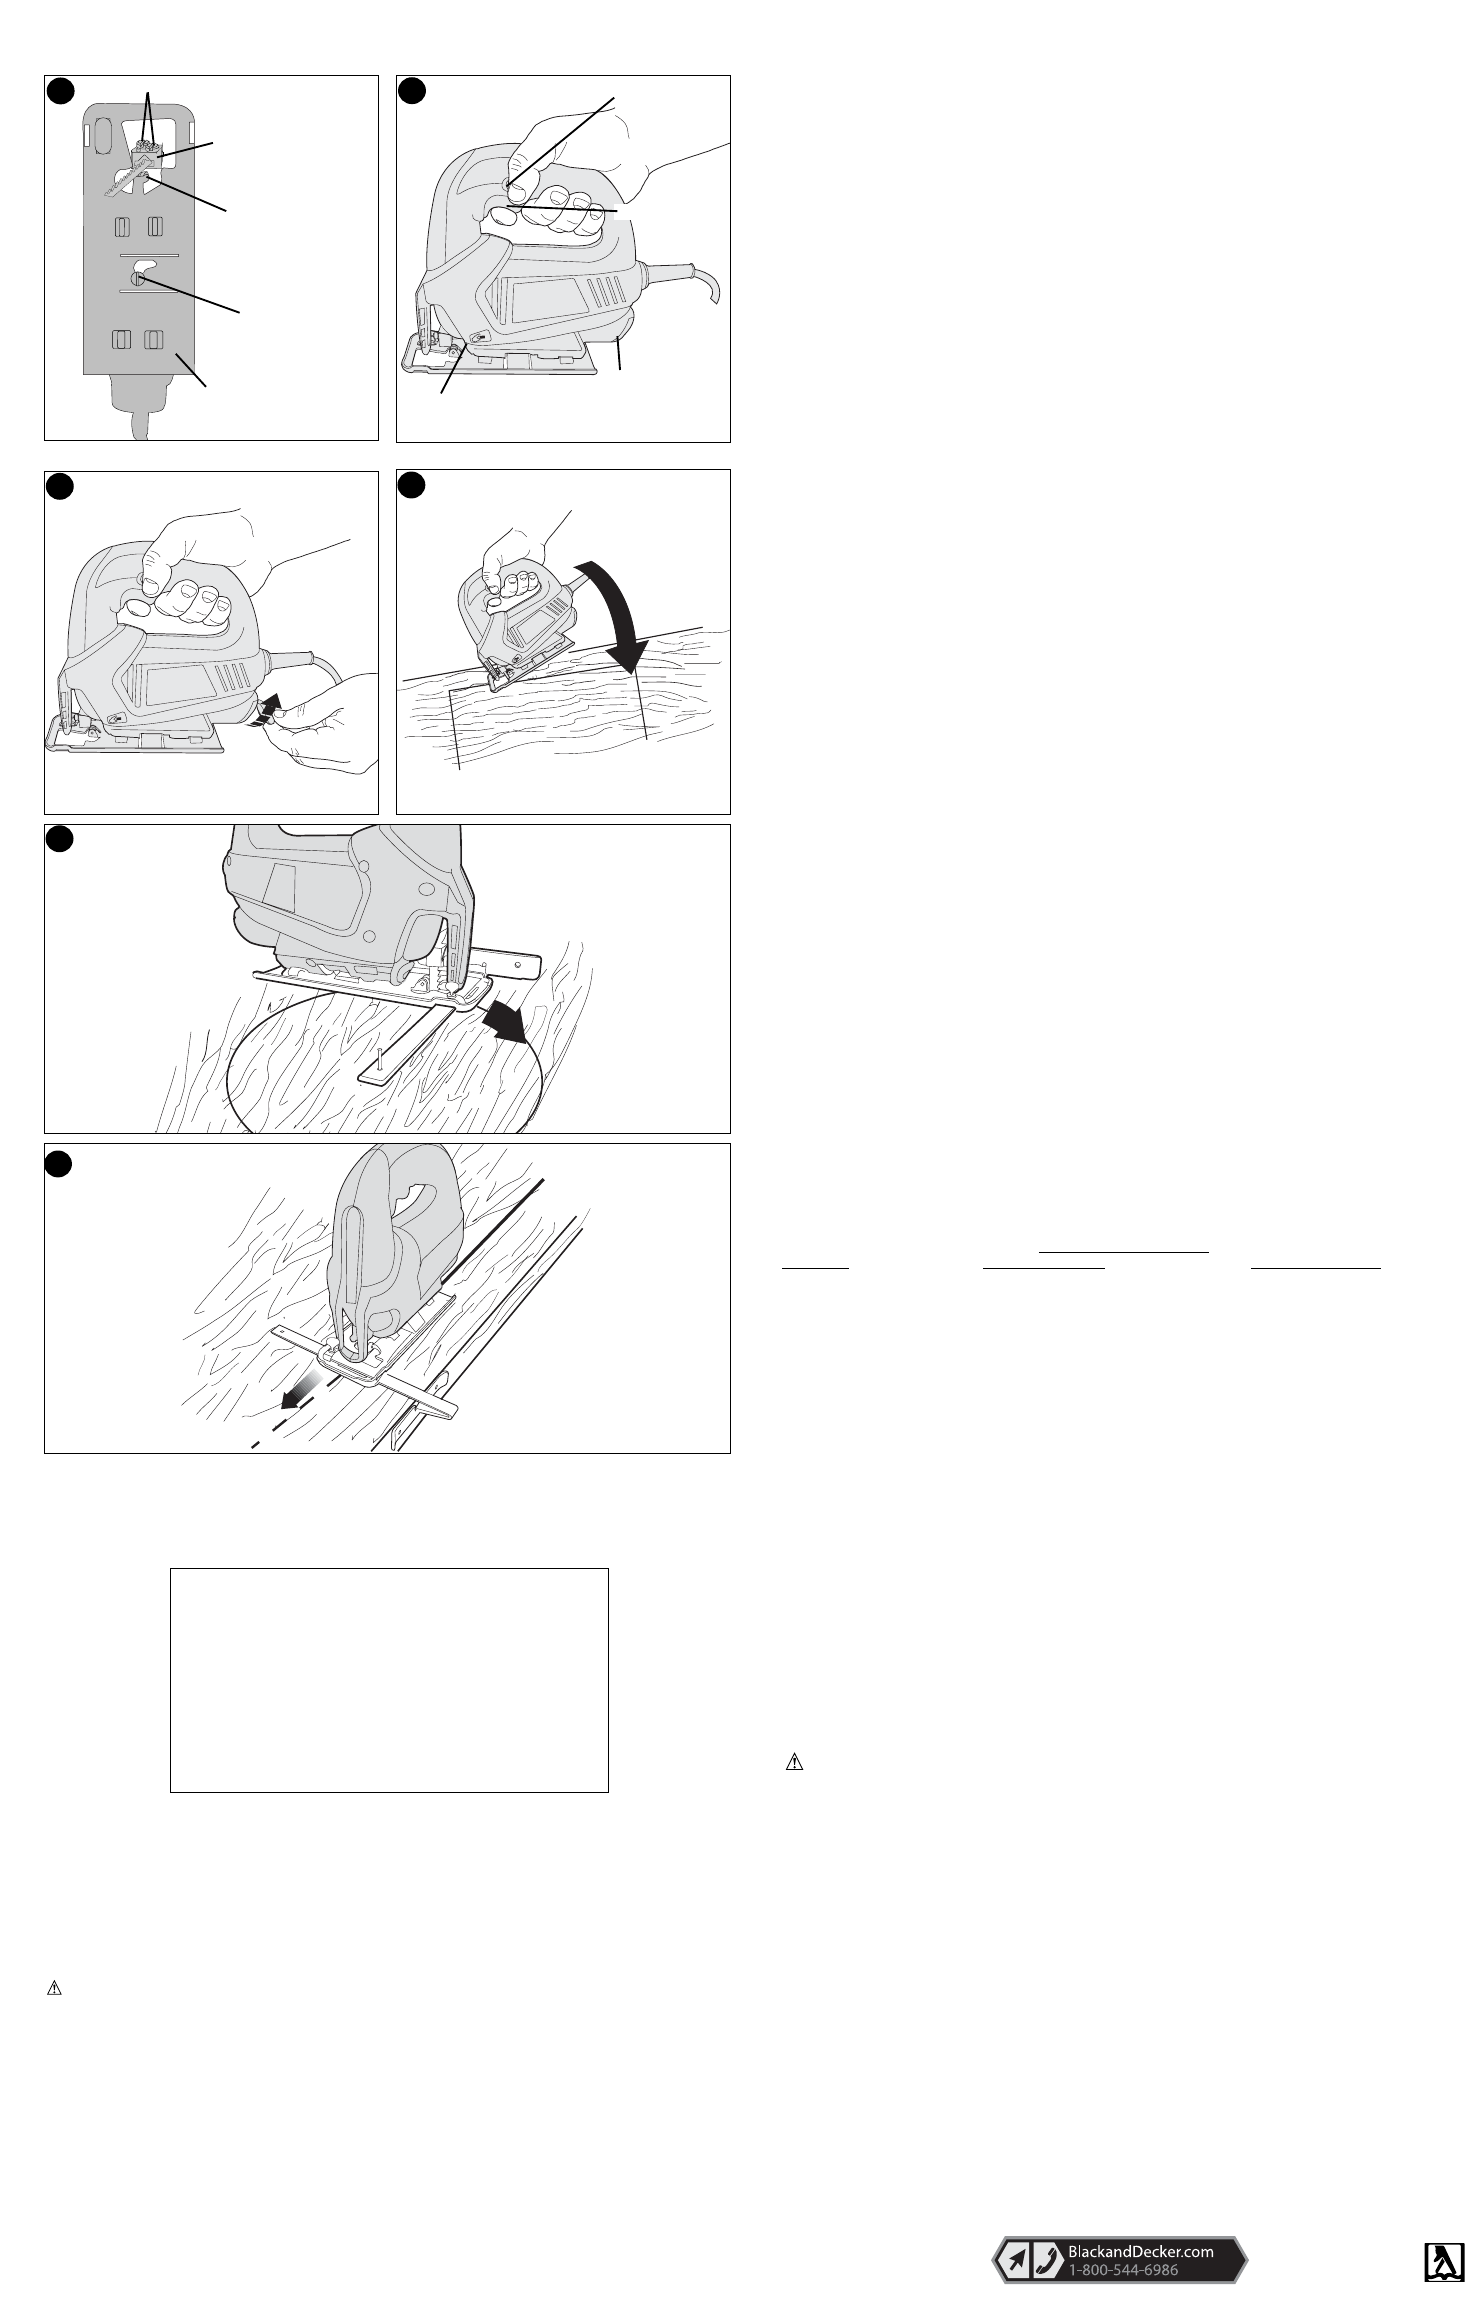
RIP & CIRCLE CUTTING
Ripping and circle cutting without a pencil line are easily done with the rip fence and circle
guide (available at extra cost).
Using the screw supplied with the accessory guide, position as shown in Figure F and thread
the screw into the shoe to clamp the fence securely.
When circle cutting, adjust rip fence so that distance from blade to hole in cross bar is at the
desired radius and tighten screw (use hole which lines up best with saw blade). Place saw
so that hole in cross bar is over center of circle to be cut (make pocket cut, drill hole for blade
or cut inward from edge of material to get blade into position). When saw is properly
positioned, drive a small nail through hole in cross bar. Using rip fence as a pivot arm, begin
cutting circle. For circle cutting, the cross bar should be up, as shown in Figure F.
When ripping, slide the rip fence under the screw from either side of the saw. Set the cross
bar at desired distance from blade and tighten screw. For ripping, the cross bar should be
down and against the straight edge of the workpiece.
MAINTENANCE
Use only mild soap and damp cloth to clean the tool. Never let any liquid get inside the tool;
never immerse any part of the tool into a liquid.
IMPORTANT: To assure product SAFETY and RELIABILITY, repairs, maintenance and
adjustment should be performed by authorized service centers or other qualified service
organizations, always using identical replacement parts.
TROUBLESHOOTING
Problem
Possible Cause Possible
Solution
• Unit will not start. • Cord not plugged in. • Plug tool into a working
outlet.
• Circuit fuse is blown. • Replace circuit fuse.
(If the product repeatedly
causes the circuit fuse to
blow, discontinue use
immediately and have it
serviced at a Black &
Decker service center or
authorized servicer.)
• Circuit breaker is tripped. • Reset circuit breaker.
(If the product repeatedly
causes the circuit breaker
to trip, discontinue use
immediately and have it
serviced at a Black &
Decker service center or
authorized servicer.)
• Cord or switch is damaged. • Have cord or switch
replaced at Black &
Decker Service Center or
Authorized Servicer.
For assistance with your product, visit our website www.blackanddecker.com for the loca-
tion of the service center nearest you or call the BLACK & DECKER help line at
1-800-544-6986.
ACCESSORIES
Recommended accessories for use with your tool are available from your local dealer or
authorized service center. If you need assistance regarding accessories, please call:
1-800-544-6986
WARNING: The use of any accessory not recommended for use with this tool could be
hazardous.
SERVICE INFORMATION
Black & Decker offers a full network of company-owned and authorized service locations
throughout North America. All Black & Decker Service Centers are staffed with trained
personnel to provide customers with efficient and reliable power tool service. Whether you
need technical advice, repair, or genuine factory replacement parts, contact the
Black & Decker location nearest you. To find your local service location, refer to the yellow
page directory under "Tools—Electric" or call: 1-800-544-6986.
FULL TWO-YEAR HOME USE WARRANTY
Black & Decker (U.S.) Inc. warrants this product for two years against any defects in
material or workmanship. The defective product will be replaced or repaired at no charge in
either of two ways.
The first, which will result in exchanges only, is to return the product to the retailer from
whom it was purchased (provided that the store is a participating retailer). Returns should
be made within the time period of the retailer’s policy for exchanges (usually 30 to 90 days
after the sale). Proof of purchase may be required. Please check with the retailer for their
specific return policy regarding returns that are beyond the time set for exchanges.
The second option is to take or send the product (prepaid) to a Black & Decker owned or
authorized Service Center for repair or replacement at our option. Proof of purchase may
be required. Black & Decker owned and authorized Service Centers are listed under
"Tools–Electric" in the yellow pages of the phone directory.
This warranty does not apply to accessories. This warranty gives you specific legal rights
and you may have other rights which vary from state to state. Should you have any
questions, contact the manager of your nearest Black & Decker Service Center. This
product is not intended for commercial use.
Free warning label replacement: If your warning labels become illegible or are missing,
call 1-800-544-6986 for a free replacement.
F
G
E
D
See ‘Tools-Electric’
– Yellow Pages –
for Service & Sales
Black & Decker (U.S.) Inc.,
701 E. Joppa Rd.
Towson, MD 21286 U.S.A.
B
C
BLADE CLAMP
ROLLER SUPPORT
GUIDE
A
SHOE
SCREW
TRIGGER SWITCH
LOCK ON BUTTON
BLADE STORAGE
DUST BLOWER