


• SUPPORT AND SECURE THE WORK PROPERLY. Insure that the material to be cut is
clamped (Fig. 3) and solidly supported and balanced on a strong, stable and level wor
surface. Support the work so that the wide portion of the saw shoe is on the portion of the
material that doesn’t fall after the cut is made. Never hold cut off piece by hand (Fig. 4 ).
KICKBACK from blade pinch can result. Keep both hands on saw at all times.
• S TAY ALERT AND EXERCISE CONTROL. Keep body positioned to one side of blade.
Always maintain a firm grip and control of saw with both hands. Do not change hand grip or
body position while saw is running. Take precaution to avoid injury from cut off pieces and
other falling material during operation.
• VIEWING WINDOW MUST BE IN PLACE AT A L L TIMES and it must stay closed against
the upper guard of the saw at all times when operating the saw.
D A N G E R : RELEASE SWITCH IMMEDIAT E LY IF BLADE BINDS OR SAW STA L L S.
• TURN OFF AND REMOVE BAT T E RY before attempting to clean the viewing window.
WA R N I N G : Do not operate your saw if window becomes damaged or fails to stay in place
as noted above. Take your saw to your closest Black & Decker Service Center or authorized
service facility.
GUARD AGAINST KICKBACK
• KICKBACK CAN BE CAUSED BY the saw blade becoming pinched, twisted or bound while
cutting, or when the saw stalls. When the blade becomes twisted or misaligned in the cut, the
teeth at the back edge of the blade can dig into the top surface of the wood causing the
blade to climb out of the cut and move suddenly back toward the operator.
TO REDUCE THE RISK OF KICKBACK
• Keep a firm grip on saw with both hands at all times.
• Stay alert – exercise control.
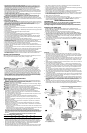
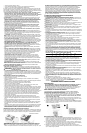
• Support long overhanging materials. As the material is cut and weakens, it will sag, causing
a pinched blade.
• Support large panels as shown (Fig. 1). Material supported only at the ends (Fig. 2) will lead
to blade pinching.
• Avoid sawing overhead. Material can sag and will pinch blade.
• Keep blades sharp and clean.
• Use fence or straight edge guide when ripping. Be careful as the cut off strip can sag or
twist, closing the cut and pinching the blade, leading to KICKBACK.
• Don’t force tool. Wood variables such as knots, hardness, toughness, wetness, pressure
treated and freshly cut green lumber can heavily load the saw which can lead to stalling.
Push the saw slower when this occurs.
• Don’t remove saw from work during a cut while the blade is moving.
• Allow saw to reach full speed before blade contacts material to be cut. Starting the saw with
the blade against the work or pushed forward into cut can lead to stalling or sudden
backward movement of saw.
• Never attempt to lift saw when making a bevel cut. This leads to blade binding and stalling.
• Always secure work to prevent workpiece movement during cut.
• Do not try to force saw back on line if your cut begins to go off line. This can cause
KICKBACK. Stop saw and allow blade to coast down to a stop. Withdraw from cut and start
a new cut on the line.
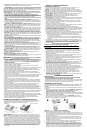
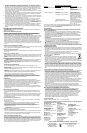
• Set depth adjustment of saw such that one tooth of the blade projects below the workpiece
as shown in (Fig. 6 ) .
• Do not back up a rotating blade in the cut. Twisting the saw can cause the back edge of the
blade to dig into the material, climb out of the work and run back toward the operator.
• Avoid cutting nails. Inspect for and remove all nails from lumber before cutting.
• Some wood contains preservatives such as copper chromium arsenate (CCA) which can be
toxic. When cutting these materials, extra care should be taken to avoid inhalation and
minimize skin contact.
BATTERY CAP INFORMATION
Battery storage and carrying caps are provided for use whenever the battery is out of the
tool or charger. Remove cap before placing battery in charger or tool.
WARNING: Do not store or carry battery so that metal objects can contact exposed
battery terminals. For example, do not place battery in aprons, pockets, tool boxes,
product kit boxes, drawers, etc. with loose nails, screws, keys, etc. without battery cap.
Transporting batteries can possibly cause fires if the battery terminals inadvertently come
in contact with conductive materials such as keys, coins, hand tools and the like. The US
Department of Transportation Hazardous Material Regulations (HMR) actually prohibit
transporting batteries in commerce or on airplanes (i.e. packed in suitcases and carryon
luggage) UNLESS they are properly protected from short circuits. So when transporting
individual batteries, make sure that the battery terminals are protected and well insulated
from materials that could contact them and cause a short circuit.
IMPORTANT SAFETY INSTRUCTIONS
• S AVE THESE INSTRUCTIONS.
• Before using charger, read and understand all instructions and cautionary markings on
(1) charger, (2) battery pack, and (3) product using battery pack.
D A N G E R : 120 volts present at charging terminals. Do not probe with conductive objects.
Danger of electric shock or electrocution.
D A N G E R : If battery pack case is cracked or damaged, do not insert into charger. Danger
of electric shock or electrocution.
D A N G E R : Never attempt to open the battery pack for any reason. If the plastic housing of
the battery pack breaks or cracks, return to a service center for recycling.
WA R N I N G : Don’t allow any liquid to get inside charger. Electric shock may result.
CAUTION: To reduce risk of injury, charge only Black & Decker rechargeable batteries.
Other types of batteries may burst, causing personal injury and damage.
• To facilitate the cooling of the battery pack after use, avoid placing the charger or
battery pack in a warm environment such as in a metal shed, or an uninsulated trailer.
• Do not expose charger to rain or snow.
• Use of an attachment not recommended or sold by Black & Decker may result in risk of
fire, electric shock, or injury to persons.
• This charger is not intended for any uses other than charging Black & Decker
rechargeable batteries. Any other uses may result in risk of fire, electric shock or
e l e c t r o c u t i o n .
• To reduce risk of damage to electric plug and cord, pull by plug rather than cord when
disconnecting charger.
• Make sure cord is located so that it will not be stepped on, tripped over, or otherwise
subjected to damage or stress.
• An extension cord should not be used unless absolutely necessary. Use of improper
extension cord could result in risk of fire, electric shock, or electrocution. If an extension
cord must be used, make sure:
• That the pins on plug of extension cord are the same number, size and shape of those
of plug on charger.
• That extension cord is properly wired and in good electrical condition and the wire size
is large enough for A C ampere rating of charger as specified below.
An extension cord must have adequate wire size (AWG or American Wire Gauge) for
s a f e t y. The smaller the gauge number of the wire, the greater the capacity of the cable, that
is, 16 gauge has more capacity than 18 gauge. When using more than one extension to
make up the total length, be sure each individual extension contains at least the minimum
wire size.
RECOMMENDED MINIMUM AWG SIZE FOR EXTENSION CORDS
TO TA L EXTENSION CORD LENGTH (FEET)
2 5 5 0 7 5 1 0 0 1 2 5 150 1 7 5
WIRE GAUGE
1 8 1 8 1 6 1 6 1 4 1 4 1 2
• The charger is ventilated through slots in the housing. Do not place any object on top of
charger or place the charger on a soft surface that might block the ventilation slots and
result in excessive internal heat. Place the charger in a position away from any heat source.
• Do not operate charger with damaged cord or plug — have them replaced immediately.
• Do not operate charger if it has received a sharp blow, been dropped, or otherwise
damaged in any way; take it to an authorized service center.
• Do not disassemble charger; take it to an authorized service center when service or repair
is required. Incorrect reassembly may result in risk of electric shock, electrocution or fire.
• The charger is designed to operate on standard120 VAC, 60Hz household electrical
p o w e r. Do not attempt to use it on any other voltage.
• To reduce risk of electric shock, unplug charger from outlet before attempting any cleaning.
Removing the battery pack will not reduce this risk.
• NEVER attempt to connect 2 chargers together.
• DO NOT store or use the tool and battery pack in locations where the temperature may
reach or exceed 105°F (such as outside sheds or metal buildings in summer).
• A small leakage of liquid from the battery cells may occur under extreme usage, charging
or temperature conditions. This does not indicate a failure. However, if the outer seal is
broken and this leakage gets on your skin:
a. Wash quickly with soap and water.
b. Neutralize with a mild acid such as lemon juice or vinegar.
c. If the battery liquid gets in your eyes, flush them with clean water for a minimum of 10
minutes and seek immediate medical attention. MEDICAL NOTE: The liquid is a
25-35% solution of potassium hydroxide.
SAVE THESE INSTRUCTIONS
INTRODUCTION
READ A N D U N D E R S TA N D A L L OF THE INSTRUCTIONS IN THIS MANUAL BEFORE
ATTEMPTING TO CHARGE THE B AT T E RY PACK FOR YOUR TO O L .
Your charger is designed to use standard 120 volt AC, 60 Hz power. Do not use DC or any
other voltage. Charge time is 3 to 6 hours depending on battery pack type and condition.
CHARGING THE POWER PACK
THE BATTERIES IN YOUR POWER PACK ARE NOT F U L LY CHARGED AT T H E
FA C TO R Y. BEFORE ATTEMPTING TO CHARGE THEM, T H O R O U G H LY READ A L L O F
THE SAFETY I N S T R U C T I O N S .
The charger is designed to use standard household 120 volt 60 Hz power.
1. Plug the charger into any standard 120 Volt 60 Hz electrical outlet. NOTE: Do not
charge by means of an engine generator or DC power source. Use only 120V AC.
2. Slide the charger onto the battery pack as shown in Figure A and let it charge initially
for 9 hours. After the initial charge, under normal usage, your power pack should be
fully charged in 3 to 6 hours.
3. Unplug charger. Remove pack from the charger and place in tool. NOTE: To remove
the battery from the saw, press down on the release button on the back of the battery
(Figure B) and pull out.
I M P O RTANT CHARGING NOTES
1. After normal usage, your power pack should be fully charged in 3 to 6 hours. If the
power pack is run-down completely, it may take up to 6 hours to become fully charged.
Your power pack was sent from the factory in an uncharged condition. Before attempt-
ing to use it, it must be charged for at least 9 hours.
2. DO NOT charge the power pack in an air temperature below 40°F or above 105°F. This
is important and will prevent serious damage to the power pack. Longest life and best
performance can be obtained if power pack is charged when air temperature is about
75°F.
3. While charging, the charger may hum and become warm to touch. This is a normal con-
dition and does not indicate a problem.
4. If the power pack does not charge properly—(1) Check current at receptacle by plug-
ging in a lamp or other appliance. (2) Check to see if receptacle is connected to a light
switch which turns power off when you turn out the lights. (3) Move charger and power
pack to a surrounding air temperature of 40°F to 105°F. (4) If the receptacle and tem-
perature are
OK, and you do not get proper charging, take or send the power pack and charger to
your local Black & Decker service center. See Tools Electric in yellow pages.
5. The power pack should be recharged when it fails to produce sufficient power on jobs
which were easily done previously. DO NOT CONTINUE using saw with its power pack
in a depleted condition.
6. To prolong power pack life, avoid leaving the power pack on charge for extended periods
of time (over 30 days without use). Although overcharging is not a safety concern, it can
significantly reduce overall power pack life.
7. When the battery is inserted into the charger, the red “Charging Indicator” light will come
on indicating that there is contact between the battery and charger. The light will stay on
as long as the battery is in the charger and the charger is plugged into a working outlet. It
WILL NOT flash, go out or change to a different color when the charging cycle is
complete.
8. The power pack will reach optimum performance after being cycled 5 times during
normal usage. There is no need to run the batteries down completely before recharging.
Normal usage is the best method of discharging and recharging the batteries.
1
2
Correct
Correct
Correcto
Wrong
Incorrect
Incorrecto
Material bends on blade causing heavy loads or kickback
Le matériau plie au contact de la lame causant de lourdes surcharges ou
des rebonds.
El material oprime el disco ocasionando sobrecarga o contragolpe
Support work near cut
Soutenir la pièce près de la ligne de
coupe.
Apoye la pieza cerca del corte
3
4
Correct
Correct
Correcto
Wrong
Incorrect
Incorrecto
5
6
Depth adjustment lever
Bouton de réglage de la
profondeur
Perilla de ajuste de profundidad
Tip of tooth
Bout de la
dent
Punta del
diente
Surface of wood
Surface du bois
Superficie de
madera
Proper depth: one tooth below surface of wood
Profondeur appropriée : une dent sous la surface du bois.
Profundidad correcta: un diente debajo de la superficie de
madera
Battery Cap
B
A