


8
OPERATING INSTRUCTIONS
Prior to operation:
• Make sure your screwdriver is (fully) charged.
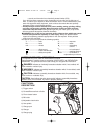
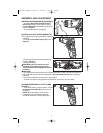
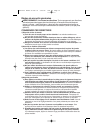
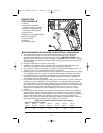
SWITCHING ON AND OFF (FIGURE G)
• To turn the tool ON in a forward direction,
move the forward/reverse slider (2) upward.
• Squeeze the trigger switch (1) and the tool
will run.
• Release pressure from the trigger and the
tool will stop.
• To turn the tool ON in a reverse direction,
move the forward/reverse slider (2)
downward.
• Squeeze the trigger switch (1) and the tool
will run.
• Release pressure from the trigger and the
tool will stop.
• To lock the tool in the off position, move the
forward/reverse slider (2) to the central position.
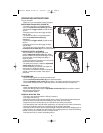
TORQUE CONTROL (FIGURE H)
Your screwdriver is equipped with a six
position adjustable clutch collar (5). When
the tool reaches the preselected torque setting
the clutch slips, thus limiting how tightly a
screw is driven.
• The tool’s motor will continue to run as long as
the switch button is depressed.
• To set the tool’s torque, rotate the adjustable
clutch collar (5) clockwise or
counterclockwise as required. The larger the
screw icon, the higher the torque.
• Each click in a clockwise direction (facing the
spindle ) means an increase in the torque
produced.
SCREWDRIVING
• Insert the appropriate hex shank screwdriver bit.
• Set the forward/reverse slider (2) to the desired rotation.
• Set the adjustable clutch collar (5) to position 1 and begin screwdriving (low torque).
• If the clutch ratchets too soon, adjust the collar to increase the torque as required.
DRILLING
• Insert the appropriate hex shank drill bit.
• Select the drilling mode using the adjustable clutch collar (5) to the position marked
with the largest screw icon.
• Select forward rotation.
GENERAL DRILLING TIPS
• This tool is not recommended for drilling in masonry.
• Use sharp drill bits only
• Drill bits for metal can be used for drilling holes in wood. These bits must be sharp and
should be pulled out frequently when drilling to clear chips from the flutes.
• Support and secure work properly, as instructed in the safety Instructions.
• Use appropriate and required safety equipment, as instructed in the safety instructions.
• Secure and maintain work area, as instructed in the safety instructions.
• Use light pressure until the hole is started enough to keep the drill bit from slipping out of it.
• Apply pressure in a straight line with the bit. Use enough pressure to keep the bit biting
but not so much as to stall the motor or deflect the bit.
• Hold the tool firmly to control its twisting action.
H
5
1
G
2
1
90544571 PD400 clutch sc 5/22/09 7:46 AM Page 8