


8
5. The power pack should be recharged when it fails to produce sufficient power on jobs
which were easily done previously. DO NOT CONTINUE using product with its power
pack in a depleted condition.
6. To prolong power pack life, avoid leaving the power pack on charge for extended
periods of time (over 30 days without use). Although overcharging is not a safety
concern, it can significantly reduce overall power pack life.
7. When the battery pack is inserted into the charger, the red “Charging Indicator” light will
come on (cup charger only) indicating that there is contact between the battery pack
and charger. The light will stay on as long as the battery pack is in the charger and the
charger is plugged into a working outlet. It WILL NOT flash, go out or change to a
different color when the charging cycle is complete.
8. The power pack will reach optimum performance after being cycled 5 times during
normal usage. There is no need to run the batteries down completely before recharging.
Normal usage is the best method of discharging and recharging the batteries.
SAFETY WARNINGS AND INSTRUCTIONS: DRILLS
1. Hold drill firmly with one hand on the grip and the other hand on the bottom of the
battery pack.
2. When attaching accessories in the drill chuck, hand tighten the keyless chuck firmly.
WARNING: Drill may stall (if overloaded or improperly used) causing a twist. Always
expect the stall. Grip the drill firmly with both hands to control the twisting action and
prevent loss of control which could cause personal injury. If a stall does occur, release
the trigger immediately and determine the reason for the stall before re-starting.
OPERATING INSTRUCTIONS
TRIGGER SWITCH & REVERSING BUTTON (FIGURE D)
• The drill is turned ON and OFF by pulling and releasing the trigger switch (1). The
farther the trigger is depressed, the higher the speed of the drill.
• A forward/reverse control button (2) determines the direction of the tool and also
serves as a lock off button.
• To select forward rotation, release the trigger switch and depress the forward/reverse
control button to the left.
• To select reverse, depress the forward/reverse control button the opposite direction.
NOTE: The center position of the control button locks the tool in the off position.
When changing the position of the control button, be sure the trigger is released.
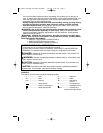
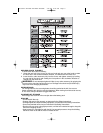
TORQUE CONTROL (SMART SELECT TECHNOLOGY) (FIGURE E)
This tool is fitted with a collar (3) which depicts various drilling and screwdriving
applications. They are used to select the operating mode and to set the torque for
tightening screws. Large screws and hard workpiece materials require a higher torque
setting than small screws and soft workpiece materials.
When the optimal performance selector collar (3) is rotated to any of the images shown in
the chart below, the tool shifts to deliver either the recommended torque or speed for that
application.
90536242 BD12PSK BD14PSK BD18PSK 5/8/08 8:22 AM Page 8