


8
OPERATING INSTRUCTIONS
WARNING: To reduce the risk of
disconnect tool from power source before
making any adjustments or removing/
installing attachments or accessories.
TRIGGER SWITCH & REVERSING
BUTTON
pulling and releasing the trigger switch
the higher the speed of the drill.
determines the direction of the tool and
also serves as a lock off button.
trigger switch and depress the forward/
reverse control button to the left.
reverse control button the opposite direction.
NOTE: The center position of the control
button locks the tool in the off position.
When changing the position of the control
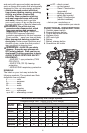
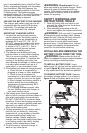
TORQUE CONTROL (FIGURE D)
This tool is fitted with a torque adjustment
collar (3) to select the operating mode and
to set the torque for tightening screws.
Large screws and hard workpiece materials
require a higher torque setting than small
screws and soft workpiece materials.
set the collar to the drilling position
symbol
desired setting. If you do not yet know the
setting and continue tightening the screw.
Repeat until you reach the correct setting.
Use this setting for the remaining screws.
D
3
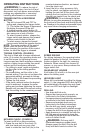
KEYLESS CHUCK (FIGURE E)
To insert a drill bit or other accessory:
1. Grasp the rear half of the chuck (4)
with one hand and use your other
hand to rotate the front half (4a) in the
from the chuck end.
2. Insert the bit or other accessory fully
holding the rear half of the chuck and
rotating the front portion in the clockwise
direction as viewed from the chuck end.
WARNING: Do not attempt to tighten
drill bits (or any other accessory) by gripping
the front part of the chuck and turning the tool
on. Damage to the chuck and personal injury
may occur when changing accessories.
E
4a
4
SCREW DRIVING
should be pushed to the left. Use reverse
(button pushed to the right) for removing
fasteners. When moving from forward to
trigger switch first.
ON BOARD BIT HOLDER
A bit holder
above the battery pack.
LED WORK LIGHT
When drill is activated by pulling the trigger
will automatically illuminate the work area.
Do not use LED work light as flashlight.
DRILLING
instructed in the Safety Instructions.
as instructed in the Safety Instructions.
instructed in the Safety Instructions.
to keep the drill bit from slipping out of it.
bit. Use enough pressure to keep the
bit biting but not so much as to stall the
motor or deflect the bit.
WARNING: Drill may stall if
overloaded causing a sudden twist.
Always expect the stall. Grip the drill
firmly with both hands to control the