


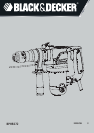


5
ENGLISH
Safety of others
u This appliance is not intended for use by per-
sons (including children) with reduced physical,
sensory or mental capabilities, or lack of experi-
ence and knowledge, unless they have been
given supervision or instruction concerning use
of the appliance by a person responsible for
their safety.
u Children should be supervised to ensure that
they do not play with the appliance.
Residual risks
Additional residual risks may arise when using the
tool which may not be included in the enclosed
safety warnings. These risks can arise from mis-
use, prolonged use etc. Even with the application
of the relevant safety regulations and the imple-
mentation of safety devices, certain residual risks
can not be avoided. These include:
u Injuries caused by touching any rotating/moving
parts.
u Injuries caused when changing any parts,
blades or accessories.
u Injuries caused by prolonged use of a tool.
When using any tool for prolonged periods
ensure you take regular breaks.
u Impairment of hearing.
u Health hazards caused by breathing dust devel-
oped when using your tool (example:- working
with wood, especially oak, beech and MDF.)
Label on the tool
The following symbols are shown on the tool:
Warning! In order to reduce the risk of
injury, the user must read the manual.
Date code position (Fig. D)
The date code (12) is printed on the housing of the
tool, which also contains the year of manufacture.
For example: 2013 XX JN
Year of manufacture
Electrical safety
Double insulation measures are taken in
this power tool, so no grounding is needed.
Please check whether the voltage of power
supplied is consistent with the voltage on
the nameplate or not.
u If the wire is damaged, it should be replaced by
the manufacturer or a service center authorized
by Black & Decker, to avoid danger.
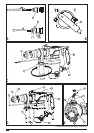
Part name
The power tool includes some or all of the following
parts:
1. Switch
2. Oil-injection inlet cap
3. Modes selector
4. Tool chuck (tool holder)
5. Sleeve
6. Side handle
7. Depth stop
8. Bottom cover
Assembly
Warning! Before assembly, please ensure that the
power tool is powered off and the power plug of the
tool is unplugged from the power source.
Install the side handle
Warning! When holes are drilled in the concrete,
bricks and other surfaces, please grip the side han-
dle to ensure safe operation.
u The side handle (6) can be rotated to any side,
which can facilitate the use of the power tool in
any position.
u Rotate the side handle (6) counterclockwise, to
unlock and release the power tool, rotate it to
the desired position.
u Rotate the side handle clockwise to tighten it
adequately.
Fitting an accessory (Fig. A)
u Please clean the drill shank and lubricate the
drill bit before installing it.
u Pull back and hold the slide-sleeve(5), and
then screw the drill bit into the chuck, press it
internally until it is fastened, the drilling bit can
be automatically locked in situ. Pull the drill bit
outwards to test whether it has been adequately
locked in the correct position or not.
u Pull back and hold the drill sleeve(5) clamp, you
can remove the drill bit.
Use
Warning! Please use the power tool under normal
load; no overloading is permitted.
Warning! Before drilling holes in the wall, oor or
ceiling, please check the positions of the wire and