


Guard Actuation and Visibility
The blade guard on your saw has been designed to
automatically raise when the arm is brought down and to
lower over the blade when the arm is raised. The guard
can be raised by hand when installing or removing saw
blades or for inspection of the saw. NEVER RAISE THE
BLADE GUARD MANUALLY UNLESS THE SAW IS
TURNED OFF.
NOTE: Certain special cuts will require that you manu-
ally raise the guard. To do this, simply place your right
thumb on the upper side of the guard and roll the guard
up just enough to clear the workpiece. Never tie up or
otherwise prevent the guard from operating normally.
OPERATION
Plug the saw into any power source. Refer to the name-
plate for voltage. Be sure the cord will not interfere with
your work.
Switch
To turn the saw on, depress the trigger switch (16). To
turn the tool off, release the switch. There is no provision
for locking the switch on.
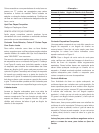
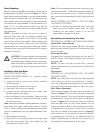
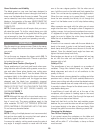
Body and Hand Position (See figure 7)
Proper positioning of your body and hands when oper-
ating the miter saw will make cutting easier, more accu-
rate and safer. Never place hands near cutting area.
Place hands no closer than 6" from the blade. Hold the
workpiece tightly to the table and the fence when cut-
ting. Keep hands in position until the trigger has been
released and the blade has completely stopped.
ALWAYS MAKE DRY RUNS (UNPOWERED) BEFORE
FINISH CUTS SO THAT YOU CAN CHECK THE PATH
OF THE BLADE. DO NOT CROSS HANDS, AS
SHOWN IN FIGURE 7.
Cutting With Your Saw
NOTE: Although this saw will cut wood and many non-
ferrous materials, we will limit our discussion to the cut-
ting of wood only. The same guidelines apply to the
other materials. DO NOT CUT FERROUS (IRON AND
STEEL) MATERIALS OR MASONRY WITH THIS SAW.
Do not use any abrasive blades.
Crosscuts
NOTE: Cutting of multiple pieces is not recommended,
but can be done safely by ensuring that each piece is
held firmly against the table and fence.
A crosscut is made by cutting wood across the grain at
any angle. A straight crosscut is made with the miter
arm at the zero degree position. Set the miter arm at
zero, hold the wood on the table and firmly against the
fence. Turn on the saw by squeezing the trigger switch.
When the saw comes up to speed (about 1 second)
lower the arm smoothly and slowly to cut through the
wood. Let the blade come to a full stop before raising
arm.
Miter crosscuts are made with the miter arm at some
angle other than zero. This angle is often 45 degrees for
making corners, but can be set anywhere from zero to
47 degrees left or right. After selecting the desired miter
angle, be sure to tighten the miter clamp handle (4).
Make the cut as described above.
Bevel Cuts
A bevel cut is a crosscut made with the saw blade at a
bevel to the wood. In order to set the bevel, loosen the
bevel clamp knob (17) and move the saw to the left as
desired. Once the desired bevel angle has been set,
tighten the bevel clamp knob firmly.
Bevel angles can be set up to 45 degrees left and can
be cut with the miter arm set between zero and 47
degrees right or left.
Quality of Cut
The smoothness of any cut depends on a number of
variables. Things like material being cut, blade type,
blade sharpness and rate of cut all contribute to the
quality of the cut.
When smoothest cuts are desired for molding and other
precision work, a sharp (60 tooth carbide) blade and a
slower, even cutting rate will produce the desired results.
Ensure that material does not creep while cutting, clamp
it securely in place. Always let the blade come to a full
stop before raising arm.
If small fibers of wood still split out at the rear of the
workpiece, stick a piece of masking tape on the wood
where the cut will be made. Saw through the tape and
carefully remove tape when finished.
Keep both feet firmly on the floor and maintain proper
balance. As you move the miter arm left and right, follow
it and stand slightly to the side of the saw blade. Sight
through the guard louvers when following a pencil line
Clamping the Workpiece
Turn Off and Unplug Saw
If you cannot secure the workpiece on the table and
against the fence by hand (irregular shape, etc.) or your
hand will be within 6” of the blade, a clamp or fixture
must be used.
29