


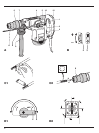


Assembling and fitting the side handle (fig. E1 - E4)
The side handle (8) can be mounted in front or in rear
position on either side of the machine to suit both RH-
and LH-users.
Always operate the tool with the side handle
properly assembled.
Mounting in front position (fig. E1 & E2)
• Snap the steel ring (16) over the collar (7) behind the
tool holder (6). Squeeze both ends together, mount
the bush (14) and insert the pin (15).
• Place the side handle clamp (13) and screw on the
clamp wheel (9). Do not tighten.
• Screw the side handle (8) into the clamp wheel and
tighten it.
• Rotate the side handle mounting assembly to the
desired position. For drilling horizontally with a heavy
drill bit, we recommend to place the side handle at
an angle of approx. 20° for optimum control (fig. E2).
• Lock the side handle mounting assembly in place by
tightening the clamp wheel (9).
Mounting in rear position (fig. E3 & E4)
The rear position is particularly useful when drilling
overhead or down into a floor. Refer to fig. D4.
• Unscrew the side handle (8) and remove it from the
front position. Leave the side handle mounting
assembly in front position so that the depth adjust
ment rod can still be used.
• Screw the side handle directly into one of the rear
side handle positions (10) on either side of the tool.
Setting the drilling depth (fig. F)
• Insert the required drill bit.
• Loosen the clamp nut (17) and fit the depth adjustment
rod (11) through the hole in the side handle clamp.
• Push the drill bit into a surface at a right angle and
adjust the depth adjustment rod (11) as shown.
•Tighten the clamp nut (17).
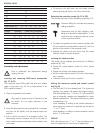
Instructions for use
• Always observe the safety instructions and
applicable regulations.
• For your own safety, always use the tool
with both hands.
• Be aware of the location of pipework and
wiring.
• Apply only a gentle pressure to the tool
(approx. 20 kg). Excessive force does not
speed up drilling or chiselling but
decreases tool performance and may
shorten tool life.
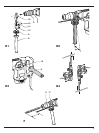
Switching on and off (fig. A)
•To switch on the tool, press the on/off switch (1).
•To stop the tool, release the switch.
Drilling with a solid bit (fig. A)
• Insert the appropriate drill bit.
• Set the mode selector switch (4) to the “hammer
drilling” position.
• Set the electronic speed and impact control dial (2).
• Fit and adjust the side handle (8).
• If necessary, set the drilling depth.
• Mark the spot where the hole is to be drilled.
• Place the drill bit on the spot and switch on the tool.
• Always switch off the tool when work is finished and
before unplugging.
Drilling with a core bit (fig. A)
• Insert the appropriate core bit.
• Assemble the centerdrill into the core bit.
• Set the mode selector switch (4) to the “hammer
drilling” position.
•Turn the electronic speed and impact control dial (2)
to a medium or high speed setting.
• Fit and adjust the side handle (8).
• Place the centerdrill on the spot and switch on the
tool. Drill until the core penetrates into the concrete
approx. 1 cm.
• Stop the tool and remove the centerdrill. Place the
core bit back into the hole and continue drilling.
When drilling through a structure thicker than the
depth of the core bit, break away the round cylinder
of concrete or core inside the bit at regular intervals.
•To avoid unwanted breaking away of concrete
around the hole, first drill a hole the diameter of the
centerdrill completely through the structure. Then
drill the cored hole halfway from each side.
• Always switch off the tool when work is finished and
before unplugging.
ENGLISH
8