


IMPORTANT SAFETY INSTRUCTIONS
• SAVE THESE INSTRUCTIONS.
• Before using charger, read and understand all instructions and cautionary markings on
(1) charger, (2) battery pack, and (3) product using battery pack.
DANGER: 120 volts present at charging terminals. Do not probe with conductive objects.
Danger of electric shock or electrocution.
DANGER: If battery pack case is cracked or damaged, do not insert into charger. Danger
of electric shock or electrocution.
DANGER: Never attempt to open the battery pack for any reason. If the plastic housing of
the battery pack breaks or cracks, return to a service center for recycling.
WARNING: Don’t allow any liquid to get inside charger. Electric shock may result.
CAUTION: To reduce risk of injury, charge only Black & Decker rechargeable batteries.
Other types of batteries may burst, causing personal injury and damage.
• To facilitate the cooling of the battery pack after use, avoid placing the charger or
battery pack in a warm environment such as in a metal shed, or an uninsulated trailer.
• Do not expose charger to rain or snow.
• Use of an attachment not recommended or sold by Black & Decker may result in risk of
fire, electric shock, or injury to persons.
• This charger is not intended for any uses other than charging Black & Decker
rechargeable batteries. Any other uses may result in risk of fire, electric shock or
electrocution.
• To reduce risk of damage to electric plug and cord, pull by plug rather than cord when
disconnecting charger.
• Make sure cord is located so that it will not be stepped on, tripped over, or otherwise
subjected to damage or stress.
• An extension cord should not be used unless absolutely necessary. Use of improper
extension cord could result in risk of fire, electric shock, or electrocution. If an extension
cord must be used, make sure:
• That the pins on plug of extension cord are the same number, size and shape of
those of plug on charger.
• That extension cord is properly wired and in good electrical condition and the wire
size is large enough for AC ampere rating of charger as specified below.
An extension cord must have adequate wire size (AWG or American Wire Gauge) for
safety. The smaller the gauge number of the wire, the greater the capacity of the cable,
that is, 16 gauge has more capacity than 18 gauge. When using more than one extension
to make up the total length, be sure each individual extension contains at least the
minimum wire size.
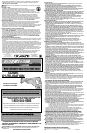
RECOMMENDED MINIMUM AWG SIZE FOR EXTENSION CORDS
TOTAL EXTENSION CORD LENGTH (FEET)
25 50 75 100 125 150 175
WIRE GAUGE
18 18 16 16 14 14 12
• The charger is ventilated through slots in the housing. Do not place any object on top of
charger or place the charger on a soft surface that might block the ventilation slots and
result in excessive internal heat. Place the charger in a position away from any heat source.
• Do not operate charger with damaged cord or plug — have them replaced immediately.
• Do not operate charger if it has received a sharp blow, been dropped, or otherwise
damaged in any way; take it to an authorized service center.
• Do not disassemble charger; take it to an authorized service center when service or repair
is required. Incorrect reassembly may result in risk of electric shock, electrocution or fire.
• The charger is designed to operate on standard120 VAC, 60Hz household electrical
power. Do not attempt to use it on any other voltage.
• To reduce risk of electric shock, unplug charger from outlet before attempting any cleaning.
Removing the battery pack will not reduce this risk.
• NEVER attempt to connect 2 chargers together.
• DO NOT store or use the tool and battery pack in locations where the temperature may
reach or exceed 105°F (such as outside sheds or metal buildings in summer).
• A small leakage of liquid from the battery cells may occur under extreme usage, charging
or temperature conditions. This does not indicate a failure. However, if the outer seal is
broken and this leakage gets on your skin:
a. Wash quickly with soap and water.
b. Neutralize with a mild acid such as lemon juice or vinegar.
c. If the battery liquid gets in your eyes, flush them with clean water for a minimum of 10
minutes and seek immediate medical attention. MEDICAL NOTE: The liquid is a
25-35% solution of potassium hydroxide.
SAVE THESE INSTRUCTIONS
INTRODUCTION
READ AND UNDERSTAND ALL OF THE INSTRUCTIONS IN THIS MANUAL BEFORE
ATTEMPTING TO CHARGE THE BATTERY PACK FOR YOUR TOOL.
Your charger is designed to use standard 120 volt AC, 60 Hz power. Do not use DC or any
other voltage. Charge time is 3 to 6 hours depending on battery pack type and condition.
CHARGING PROCEDURE
1. Plug the charger into an appropriate outlet.
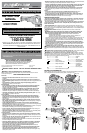
2. Insert 1 or 2 batteries into the charger (Figure 1).
NOTE: Charge time is the same for multiple batteries. Be sure the battery is fully
seated in the charger. The red “Charging Indicator” light will come on indicating that
there is contact between the battery and charger. The light will stay on as long as the
battery is in the charger and the charger is plugged into a working outlet. It WILL NOT
flash, go out or change to a different color when the charging cycle is complete.
Remove pack from the charger and place in tool. NOTE: To remove the battery from
the tool, press down on the release button on the back of the battery (Figure 2) and pull
out.
LEAVING THE BATTERY PACK IN THE CHARGER
The charger and battery pack can be left connected with the red light glowing indefinitely. The
charger will keep the battery pack fresh and fully charged.
NOTE: Abattery pack will slowly lose its charge when kept out of the charger. If the battery
pack has not been kept on maintenance charge, it may need to be recharged before use. A
battery pack may also slowly lose its charge if left in a charger that is not plugged into an
appropriate AC source.
IMPORTANT CHARGING NOTES
1. Longest life and best performance can be obtained if the battery pack is charged when
the air temperature is between 65°F and 75°F (18°- 24°C). DO NOT charge the battery
pack in an air temperature below +40°F(+4.5°C), or above +105°F (+40.5°C). This is
important and will prevent serious damage to the battery pack.
2. The charger and battery pack may become warm to touch while charging. This is a
normal condition, and does not indicate a problem.
3. If the battery pack does not charge properly — (1) Check power at receptacle by
plugging in a lamp or other appliance. (2) Check to see if receptacle is connected to a
light switch which turns power off when you turn out the lights. (3) Move charger and bat-
tery pack to a location where the surrounding air temperature is approximately
65°F - 75°F (18°- 24°C). (4) If charging problems persist, take or send the tool, battery
pack and charger to your local service center.
4. The battery pack should be recharged when it does not produce sufficient power on jobs
which were easily done previously. DO NOT CONTINUE use under these
conditions. Follow the charging procedures. You may also charge a partially used pack
whenever you desire with no adverse affect on the battery pack.
5. Black & Decker battery packs that are labeled “NiMH” should only be used with
chargers labeled “NiMH“ or “NiCd/NiMH.”
6. Under certain conditions, with the charger plugged into the power supply, the exposed
charging contacts inside the charger can be shorted by foreign material. Foreign
materials of a conductive nature such as, but not limited to, steel wool, aluminum foil, or
any buildup of metallic particles should be kept away from charger cavities. Always
unplug the charger from the power supply when there is no battery pack in the cavity.
Unplug charger before attempting to clean.
7. Do not immerse charger in water or any other liquid.
OPERATION
CAUTION: Always wear eye protection while operating this power tool.
NOTE: Before cutting any type of material, be sure it is firmly anchored or clamped to pre-
vent slipping.
• Place blade and shoe lightly against work to be cut.
• Switch on saw motor and allow it to obtain maximum speed before applying pressure.
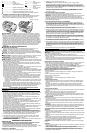
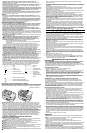
• Always hold saw firmly with both hands while cutting as shown in Figure 3. Whenever
possible, the saw shoe must be held firmly against the material being cut. This will prevent
the saw from jumping or vibrating and minimize blade breakage.
TRIGGER SWITCH (FIGURE 4)
Release lock-off by switching to the unlocked position shown in Fig. 4 from either side of the
saw. Pull the trigger switch to turn the motor ON. Releasing the trigger turns the motor OFF.
NOTE: This tool has no provision to lock the switch in the ON position, and should never be
locked in the ON position by any other means.
BLADE CLAMP RELEASE LEVER (FIGURE 5)
CAUTION: TURN OFF AND REMOVE BATTERY FROM TOOL.
To install blade into saw:
1. Open blade clamp release lever to its full open position as shown in Figure 5.
2. Insert blade shank from the front.
3. Close blade clamp release lever.
To remove blade from saw:
1. Open blade clamp release lever to its full open position.
2. Remove blade.
FLUSH CUTTING (FIGURE 6)
• The compact design of the reciprocating saw motor housing and pivoting shoe permit
close cutting to floors, corners and other difficult areas.
• To maximize flush cutting capabilities, insert the blade shaft into the blade clamp with the
teeth of the blade facing up.
• Turn the saw upside down so you are as close to the work surface as possible.
WOOD CUTTING (FIGURE 7)
• Before cutting any type of wood, be sure the work piece is firmly anchored or clamped to
prevent slipping.
• Place blade and shoe lightly against work to be cut.
• Switch on saw motor before applying pressure.
• Always hold saw firmly with both hands while cutting. Whenever possible, the shoe must
be held firmly against the material being cut. This will prevent the saw from jumping or
vibrating and minimize blade breakage.
METAL CUTTING
• Use a finer blade for ferrous metals and a coarse blade for non-ferrous materials.
• In thin gauge sheet metals it is best to clamp wood to both sides of sheet. This will ensure
a clean cut without excess vibration or tearing of metal.
• Avoid forcing cutting blade as this reduces blade life and causes costly blade breakage.
NOTE: You should spread a thin film of oil or other coolant along the line ahead of the saw
cut for easier operation and longer blade life. For cutting aluminum, kerosene is preferred.
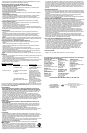
POCKET CUTTING - WOOD ONLY (FIGURE 8)
• Measure the surface area to be cut and mark clearly with a pencil, chalk or scriber.
• Insert pocket cutting blade in blade clamp and tighten blade clamp securely.
• Tip the saw backward until the back edge of the shoe is resting on the work surface.
• Switch motor on, permitting blade to attain maximum speed.
• Grip handle steadily and begin a slow, deliberate upward swing with the handle of the
saw.
• The blade will begin to feed into material. Always be sure blade is completely through
material before continuing with pocket cut.
NOTE: In areas where blade visibility is limited, use the edge of the shoe as a guide.
PROJECT TIPS
• Cut only with sharp blades; they cut cleaner, faster and put less strain on the motor while
cutting.
• When cutting, always ensure that the shoe is resting against the workpiece. This will
improve operator control and minimize vibration.
• For longer blade life, use bi-metal blades. These utilize a carbon steel back welded to high
speed steel teeth making the blade more flexible and less prone to breaking.
T
roubleshooting
Problem Possible Cause Possible Solution
• Unit will not start. • Battery not installed properly. • Check battery installation.
• Battery not charged. • Check battery charging
requirements.
• Battery will not charge. • Battery not inserted into charger. • Insert battery into charger
until red LED appears.
• Charger not plugged in. • Plug charger into a
working outlet. Refer to
“Important Charging Notes”
for more details.
• Surrounding air temperature • Move charger and tool to
too hot or too cold. a surrounding air
temperature of above 40
degree F(4,5°C) or below
105 degree F (+40,5°C).
For assistance with your product, visit our website www.blackanddecker.com for the
location of the service center nearest you or call the BLACK & DECKER help line at
1-800-544-6986.
MAINTENANCE
REMOVE BATTERY FROM SAW WHEN PERFORMING ANY CLEANING OR OTHER
MAINTENANCE. WHEN SERVICING USE ONLY IDENTICAL REPLACEMENT PARTS.
• Avoid using solvents when cleaning plastic parts. Most plastics are susceptible to various
types of commercial solvents and may be damaged by their use. Use clean cloths to
remove dirt, carbon dust etc.
• When electric tools are used on fiberglass boats, sports cars, drywall etc.,they are subject
to accelerated wear and possible premature failure, as the fiberglass chips and grindings
and drywall dust are highly abrasive to bearings, brushes, commutator, etc. During any
use on fiberglass or drywall it is extremely important that the tool be cleaned frequently by
blowing with an air jet.
LUBRICATION
Your tool was properly lubricated before leaving the factory. Once every year take or send
your tool to a Black & Decker service center, or authorized service station, for a complete
cleaning, inspection and lubrication. Tools "out of service" for long periods should be
relubricated before being put back to work.
IMPORTANT: To assure product SAFETY and RELIABILITY, repairs, maintenance and
adjustment should be performed by authorized service centers or other qualified service
organizations, always using identical replacement parts
ACCESSORIES
The FS1800RS / FS2400RS FIRESTORM
TM
reciprocating saw will accept up to a 12 inch
long blade. Always use the shortest blade suitable for your project. Longer blades are more
likely to be bent or damaged during use. During operation some longer blades may vibrate
or shake if the saw is not kept in contact with the workpiece.
ROCK TOOL UP TO NORMAL CUTTING POSITION
AFTER BLADE HAS CUT THROUGH MATERIAL
BERCER L’OUTIL EN POSITION NORMALE DE
COUPE ÁPRES AVOIR TRAVERSÉ MATÉRIAU AVEC
LA LAME.
BALANCEE LA HERRAMIENTAHASTALA POSICION
DE CORTE NORMAL DESPUES DE HACER EL
CORTE A TRAVES DEL MATERIAL
STARTING POSITION FOR POCKET CUTTING
POSITION DE DÉPART POUR LES COUPES EN RETRAIT
POSICION DE INICIO PARAEL CORTE DE BOLSILLO
8