


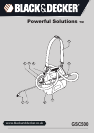


9
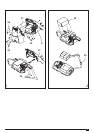
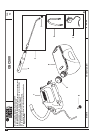
Features
1. On/off switch
2. Carrying strap
3. Wand
4. Wand handle
5. Tank cap
6. Suction tube
7. Nozzle
8. Power head
9. Tank
Assembly and adjustment
Warning! Make sure that the sprayer is switched off.
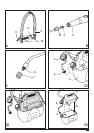
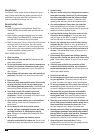
Attaching the carrying strap (g. A)
u Attach the clips (10) of the strap (2) to the openings (11)
on the power head.
Assembling the spray wand (g. B)
u Insert the wand (3) into the wand handle (4) until it locks
into place.
u Tighten the cap (12) onto the handle.
Fitting the nozzle (g. C)
u Screw the nozzle (7) onto the handle tip (13).
Adjusting the cone type nozzle
u Turn the nozzle (7) clockwise for narrow misting applications.
u Turn the nozzle (7) counterclockwise for wide misting
applications.
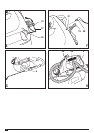
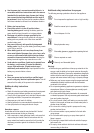
Removing and replacing the power head (g. D & E)
u Unscrew the tank cap (5) (fig. D1).
u Remove the suction tube (6) from the tank (9).
u Release the latch (14) by pressing it downward (fig. E).
u Raise the back of the power head (8) and move it forward
(fig. D2).
u Pull off the power head (8).
u To attach the power head (8), align the slots (15) in the power
head with the tabs (16) on top of the tank (9) (fig. D2 & D3).
u Move the power head (8) backward until it locks into place.
u Fit the bracket (17) over the latch attachment (18) (fig. E).
u Push the latch (14) upward until it locks into place.
u Place the suction tube (6) in the tank.
u Replace the tank cap (5) and tighten it.
Use
Warning!
u Use safety equipment.
u Only spray in well-ventilated areas.
u Only use recommended chemicals as described in the
safety instructions.
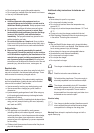
Charging the battery (g. F)
The battery needs to be charged before rst use and
whenever it fails to produce sufcient power on jobs that were
easily done before. When charging the battery for the rst
time, or after prolonged storage, it will only accept an 80%
charge. After several charge and discharge cycles, the battery
will attain full capacity. The battery may become warm while
charging; this is normal and does not indicate a problem.
Warning! Do not charge the battery at ambient temperatures
below 10 °C or above 40 °C. Recommended charging
temperature: approx. 24 °C.
u Pull out the socket cover (19).
u Insert the charger plug (20) into the charger connector (21) at
the rear of the appliance.
u Plug in the charger.
u Switch on at the mains.
u Leave the appliance connected to the charger for 14-18 hours.
Whilst charging, the charger may become warm. This is
normal and does not indicate a problem. The appliance can
be left connected to the charger indenitely.
u Before using the appliance, unplug the charger and
disconnect the appliance from the charger.
u Replace the socket cover (19).
Warning! The appliance does not operate while it is
connected to the charger.
Filling the tank (g. D1)
u Unscrew the tank cap (5).
u Remove the suction tube (6) from the tank (9).
u Fill the tank with an appropriate liquid.
Warning! Only use appropriate chemicals as described in the
safety instructions.
Switching on and off
u To switch on, press the button (1).
u To switch off, release the button (1).
Warning!
u Always spray downwind, away from people and animals.
u Only use nozzles specified by the manufacturer.
u If the nozzle clogs, switch off the appliance immediately.