


6
Operating Instructions
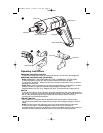
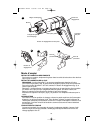
REMOVING AND INSTALLING BITS
To install a bit simply insert it into the cavity in the spindle. To remove bit, pull straight out.
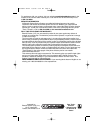
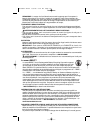
REMOVING AND INSTALLING THE BATTERY
NOTE: VERSAPAK™ BATTERIES ARE NOT FULLY CHARGED AT THE FACTORY.
To install the battery into the tool, slide it into the handle until it clicks into place.
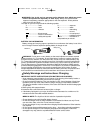
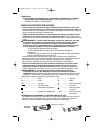
To remove the VersaPak™ battery from the tool, press the release button, (Fig. 3), and pull
the battery out of the tool.
NOTE: Battery caps are provided for use when carrying batteries or while battery is stored in
a pocket, tool box, etc. Remove cap before placing battery in charger or tool.
Install the battery cap, (Fig. 2), by snapping it in place. To remove the cap, simply pull it off.
SWITCH
To turn the tool ON in a forward direction, press the top section of the rocker switch and the
tool will run. To operate in reverse, press the bottom section of the rocker switch and the tool
will run. Without depressing the rocker switch the tool is locked and will act as any
conventional, non-powered screwdriver.
TORQUE CONTROL
Your screwdriver is equipped with an adjustable clutch control feature. When the tool
reaches the preselected torque setting the clutch slips, thus limiting how tightly a screw is
driven.
NOTE: The tool’s motor will continue to run as long as the switch button is depressed.
To set the tool’s torque, rotate the adjustable clutch collar (Fig. 3) clockwise or
counterclockwise as required. The higher the number, the higher the torque. Each click in a
clockwise direction (facing the spindle) means an increase in the torque produced.
4
Release button
Clutch collar
Switch
Spindle
Clutch Locator (triangle)
Release button
3
5
6
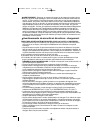
Pinch Point
Pinch Point
Battery Cavity
Battery Release Button
90538644 VP810 6/6/08 8:31 AM Page 6