


When removing the bit from
the tool avoid contact with
skin and use proper protective gloves when
grasping the bit or accessory. Accessories
may be hot after prolonged use.
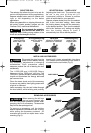
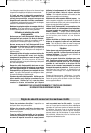
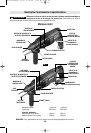
To remove an accessory, pull the locking
sleeve backwards (towards the rear of tool),
while pulling the accessory outward. All
accessories should be wiped clean after
removing (Fig. 6).
Disconnect the plug from the
power source before making
any assembly, adjustments or changing
accessories. Such preventive safety
measures reduce the risk of starting the tool
accidentally.
The 11253VSR and 11255VSR Rotary
Hammers utilize “SDS-plus” drill bits. The
“SDS-plus” system efficiently transfers drilling
torque and maximizes the energy delivered
per hammer blow.
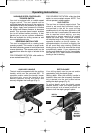
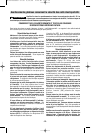
Clean the insert shank end of the accessory
to remove any debris, then lightly grease with
a light oil or lubricant.
Insert accessory into the tool holder through
the dust shield, while twisting and pushing
inward until it locks automatically into place.
Pull outward on the accessory to be certain it
is locked into the tool holder (Fig. 5).
DUST SHIELD
-8-
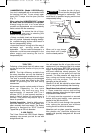
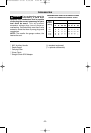
SELECTOR DIAL
The selector dial allows the tool to be set for
various drilling/hammer drilling applications.
Depress release button and turn selector dial
right or left depending on the below
applications.
When using demolition or chipping bits such as
bull points, chisels, spades, gouges, etc. the
“Hammer Only” mode must be selected.
Do not operate the selection
dial until the tool come to a
complete stop.
Shifting during rotation of the
chuck can cause damage to the tool.
SELECTOR DIAL - “VARIO-LOCK”
Adjusting the Vario-Lock: The vario-lock can
be set in any one of thirty-six (10˚
increments) positions. Choose a position
which is best suited for your operation.
Depress release button and turn the selector
dial, to the “vario-lock” setting. Next, rotate
the locking sleeve, along with the accessory,
to the desired position. Then turn the selector
dial to the “hammer only” setting and slightly
turn the locking sleeve to have it
automatically lock into a definite position.
INSTALLING ACCESSORIES
!
CAUTION
!
WARNING
REMOVING ACCESSORIES
LOCKING
SLEEVE
!
WARNING
FIG. 5
FIG. 6
Drilling only: Drilling/hammering: Vario-lock Hammering only:
used for drilling used for drilling allows for 36 desired used for light
wood, steel, etc. concrete positions of “hammer” chipping work
FIG. 4
BM 2610958557 07-08 6/30/08 2:24 PM Page 8