


-8-
6+8':/4-49:8;):/549
"
# # BC
Your tool is equipped with a variable speed
paddle switch with “Lock-OFF” feature. The tool
speed can be controlled from minimum to
maximum nameplate rated RPM by the
pressure you apply to the paddle. Apply more
pressure to increase the speed and release
pressure to decrease speed.
TO UNLOCK SWITCH AND TURN TOOL
“ON”: Pull the front portion of the paddle lever
BACKWARD (toward the cord) then squeeze
the paddle lever.
TO SWITCH TOOL “OFF”: Release pressure
on the paddle lever. The switch is spring loaded
and will return to “OFF” position automatically.
!
This feature enables you to preset the paddle
at desired speeds by rotating the dial to a
higher or lower setting. Regardless of the
pressure applied on paddle, the tool will not
operate any faster than the maximum speed
setting selected on dial.
"# "
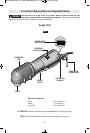
The reversing switch lever is used to reverse
rotation of the bit.
To use drill in "Forward" rotation move lever to
left side of tool. To "Reverse" the rotation of the
bit move the lever to the right side of the tool.
Do not change direction of
rotation until the tool comes to
a complete stop. Shifting during rotation of the
chuck can cause damage to the tool.
!%
Keyed models are equipped with a chuck key
that is conveniently located on the cord
protector where it is always handy and unlikely
to get lost or misplaced.
!
To prevent personal injury,
always disconnect tool from
power source before installing or removing
accessories.
"!
This drill is equipped with a special chuck that
is internally attached to the drilling spindle and
can only be removed and replaced by a
BOSCH Service Center, as special tools are
needed to disassemble the tool.
"
When installing a drill bit, insert the shank of the
bit well within the jaws of the chuck, but not
further than the beginning of the drill bit flutes.
Tighten the chuck collar by hand until the shank
is firmly gripped in the jaws.
Continue tightening by inserting the chuck key
provided into each of the three holes in the
chuck body and turn key clockwise until secure.
To remove bit, reverse foregoing procedure.
Use only the chuck key provided or identical
replacement key to tighten or loosen the chuck
jaws.
!
WARNING
!
CAUTION
You will extend the life of your bits and do
neater work if you always put the bit in contact
with the work before pulling the trigger. During
the oper a tion, hold the tool firmly and exert
light, steady pressure. Too much pressure at
low speed will stall the tool. Too little pressure
will keep the bit from cutting and cause excess
friction by sliding over the surface. This can be
damaging to both tool and bit.
# "
The trigger controlled variable speed feature
will eliminate the need for center punches in
hard materials. The variable speed trigger
allows you to slowly increase RPM. By using a
slow starting speed, you are able to keep the
bit from “wander ing”. You can increase the
speed as the bit “bites” into the work by
squeezing the trigger.
"# "
Variable speed drills will double as a power
screwdriver by using a screwdriver bit in the
drill mode. The technique is to start slowly,
increasing the speed as the screw runs down.
Set the screw snug ly by slowing to a stop. Prior
to driving screws, pilot and clearance holes
should be drilled.
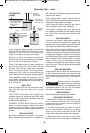
# #
The procedure shown in (Fig. 2) will enable
you to fasten materials together with your
hammer drill in the drill mode without
stripping, splitting or sepa rating the material.
6+8':/4- /69
BM 1609929Y00 05-12_BM 1609929Y00 05-12 5/11/12 2:20 PM Page 8