


-7-
Operating Instructions
VARIABLE SPEED CONTROLLED
TRIGGER SWITCH
Your tool is equipped with a variable speed
trigger switch. The tool can be turned "ON" or
"OFF" by squeezing or releasing the trigger. The
speed can be adjusted from the minimum to
maximum nameplate RPM by the pressure you
apply to the trigger. Apply more pressure to
increase the speed and release pressure to
decrease speed.
"LOCK-ON" BUTTON
The "Lock-ON" button, located near the
trigger allows for continuous operation at
maximum RPM without holding the trigger.
TO LOCK TRIGGER "ON": squeeze trigger,
depress button and release trigger.
TO UNLOCK THE TRIGGER: squeeze trigger
and release it without depressing the "Lock-
ON" button.
If the “Lock-ON” button is
continuously being de-
pressed, the trigger can not be released.
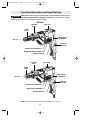
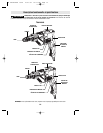
REVERSING SWITCH LEVER
The reversing switch lever is located above the
trigger switch and is used to reverse rotation of
the bit.
To use driver in "Forward" rotation, move lever
to left side of tool. To "Reverse" the rotation of
the bit move the lever to the right side of the
tool. The center position of the lever is the
"Lock-OFF" position.
Do not change direction of
rotation until the tool comes
to a complete stop. Shifting during rotation of
the chuck can cause damage to the tool.
BELT CLIP
Your tool is equipped with a belt clip that
allows you to conveniently attach your driver to
your belt. This feature will allow you to have
both hands free when climbing a ladder or
moving to another work area.
!
WARNING
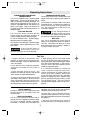
1. Support the tool so that steady, even
pressure is applied to the screwdriving bit.
Operate the trigger switch by depressing with
one or two fingers.
2. Lock the tool on for continuous operation.
The bit will not rotate until the clutch is
engaged.
3. Place a drywall screw on the bit. The
magnetic bit holder will hold any steel drywall
screw without any additional assistance.
4. Press the screw point against the drywall
with steady even pressure. At this point, the
clutch will engage, driving the screw to the
pre-set depth. Once the screw bottoms out, a
ratcheting sound will be heard for a second.
5. When properly set, the screw head should
pull into the drywall paper without cracking or
tearing the paper, then release slightly below
flush with the drywall board. In this manner,
minimum work is left when spackling screw
heads and taping the seams.
6. If it becomes necessary to remove the
screw, remove the snap off nose piece,
reverse the direction of rotation (when the
motor is in the "OFF" position.) Place the bit
tip into the screw, switch tool "ON" and apply
pressure to engage the clutch. Replace nose
piece by pushing and slightly twisting to seat
into the depth gauge. Set lever back to
forward while the trigger switch is in the “OFF”
position.
!
CAUTION
Tool Tips
DEPTH CONTROL
The depth control should be adjusted so that
the drywall screw is set slightly below the
drywall surface.
DEPTH ADJUSTMENT
Your driver will continue to drive as long as
enough pressure is applied to the bit to keep
the clutch engaged. Models 1420VSR,
1420VSRL, 1421VSR, and 1422VSRQ are
equipped with a quiet clutch that eliminates
ratcheting noise and prolongs clutch life.
The nose piece, upon contacting the work,
prevents further pressure on the bit. Driving
then stops regardless of pressure continued by
the operator.
1. Pull firmly on the locking ring, moving it
forward and away from the spline section of
BM 3609929656 10/03 10/17/03 12:13 PM Page 7