


-8-
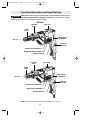
the clutch housing. Then turn it until the nose
piece reaches the predetermined position.
2. Each 1/2 turn of the locking ring equals 1/32
inch change in depth. Once the desired depth
setting is obtained, push the locking ring back
toward the gear housing and turn slightly to
match the splines, then push in firmly to lock it
into place.
3. Before beginning, always test-drive a
sample screw into a piece of scrap installation
material to check desired depth setting.
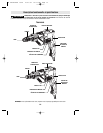
REPLACING BIT TIPS AND
BIT TIP HOLDERS
1. Remove the plastic nose piece by grasping
firmly WITH FINGERS and pulling straight out.
DO NOT USE PLIERS.
2. Remove the bit tip by grasping firmly and
pulling straight out. If the bit tip holder comes
out with the bit, separate them. If you are
replacing the bit tip holder too, grasp it firmly
and pull it straight out. If you cannot remove
the bit tip or the bit tip holder using fingers
only, you may use pliers on these two parts
only. DO NOT USE PLIERS ON NOSE PIECE.
Reverse the process to the point of installing
nose piece. Then WITH YOUR FINGERS,
install nose piece by pushing inward. Twist if
necessary to seat properly and lock in place.
CAPACITIES
Model Nominal Capacity
1404* All available sharp point drywall
1420* screws in 20 - 25 gauge studs
1405 All available sharp point screws in
1421 20 - 25 gauge studs. All available
drill point drywall screws in 14 - 20
gauge studs.
1422 5/16" (8mm) drill pt.
1423
* Not recommended for 14 - 20 gauge studs
and multiple board layers using drill point
drywall screws. The high speed can burn drill
points.
The use of any accessory or
attachment other than those
recommended in this instruction manual or the
BOSCH Catalog for this tool - may create a
hazard.
!
WARNING
BM 3609929656 10/03 10/17/03 12:13 PM Page 8