


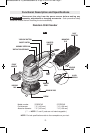


"LOCK-ON" BUTTON
The "Lock-ON" button, located near the trigger
allows for continuous operation at maximum
OPM without holding the trigger (Fig. 1).
TO LOCK TRIGGER "ON": squeeze trigger,
depress button and release trigger.
TO UNLOCK THE TRIGGER: squeeze trigger
and release it without depressing the "Lock-
ON" button.
If the “Lock-ON” button is
continuously being depressed,
the trigger can not be released.
VARIABLE SPEED WITH DIAL SETTING
Your sander is also equipped with a variable
speed dial. The sander's orbital pad speed can
be preset from zero to maximum nameplate
OPM by rotating the dial in the housing. The
dial may be set on or between any of six
positions (1=low through 6=high). The "Lock-
ON" button may also be used with any setting
of the dial.
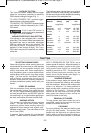
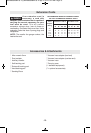
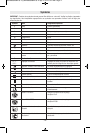
The following table may be used as a general
guide for abrasive and backing pad selection,
but the best results will be obtained by sanding
a test sample of the workpiece first.
Switch Backing Grit
Material setting pad size
rough/finish rough/finish
woods:
softwoods 4 / 6 extra soft 60 / 240
hardwoods 4 / 6 soft 60 / 180
veneers 4 soft 240 / 320
metals:
steel 4 soft 60 / 240
stainless 4 soft 120 / 240
aluminum 4/ 6 soft 80 / 240
rust spots 6 extra soft 60 / 120
paintwork:
sanding 2 / 3 soft 180 / 400
scratches 4 / 6 hard 120 / 240
stripping 4 soft 40/60 /80
SELECTING SANDING DISCS
Open-coat aluminum oxide sanding discs are
recommended for most wood or metal sanding
applications, as this synthetic material cuts
quickly and wears well. Some applications,
such as plastics, glass, or stone require silicon
carbide discs, which have a very sharp cutting
edge. For best results, use Bosch sanding
and polishing accessories, which are of
superior quality and are carefully selected to
produce professional quality results with your
sander.
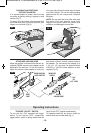
START OF SANDING
With the workpiece firmly secured, place the
pad on the work surface, then switch the tool
on. DO NOT apply excessive pressure as this
will slow the pad action, and DO NOT start the
tool and bring it up to speed before applying to
the work; swirl marks will result in either case.
SANDING ACTION
This sander has optimized random sanding
action. The pad orbits and rotates freely,
duplicating natural hand sanding action for
aggressive stock removal and smooth, well-
blended surface finish. The orbit offset for this
tool is 2 mm (5/64")
In general, higher speeds will give the best
results. If faster removal is desired, DO NOT
APPLY PRESSURE ON THE TOOL; use a
coarser grade of abrasive. Move the sander in
long sweeping strokes, parallel to the grain
using some lateral motion to overlap the
strokes by as much as 75%. The random orbit
action allows cross-grain sanding, but be
careful not to tilt the sander near edges, or
undesirable rounding may result.
SANDING SEQUENCE
If the surface is rough, begin with coarser grits
and then complete the surfacing with medium
and fine abrasives. Because the random orbit
action is so effective, it is often possible to
begin sanding with a medium grit disc and go
directly to fine finishing. To avoid uneven
results, do not skip more than one grit size
when going from coarser to finer, and do not
sand in one area for too long.
REMOVAL OF SANDER
To help prevent swirl marks when the job is
completed, gently lift the tool from the work
surface, then switch the tool off.
POLISHING
For most polishing, the extra-soft backing pad
will give the best results. The random orbit
sander may be fitted with an optional foam
buffing pad or polishing bonnet to polish or
remove scratches from painted or finished
Tool Tips
!
WARNING
-11-
BM 2609932842 03-12_BM 2609932842 03-12.qxp 3/12/12 9:21 AM Page 11