


-7-
1. Connect this saw to a 120V, 15-amp branch cir-
cuit with a 15-amp time delay fuse or circuit
breaker. Using the wrong size fuse can damage
the motor.
2. Fuses may “blow” or circuit breakers may trip fre-
quently if motor is overloaded. Overloading can
occur if you feed the blade into the workpiece too
rapidly or start and stop too often in a short time.
3. Most motor troubles may be traced to loose or in-
correct connections, overload, low voltage (such
as small size wire in the supply circuit or too
overly long supply circuit wire). Always check the
connections, the load and the supply circuit when-
ever motor does not work well.
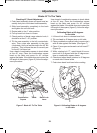
;42CA82A0:4
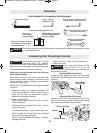
Your saw is equipped with an automatic electric
brake which is designed to stop the blade from spin-
ning in about five (5) seconds after you release the
trigger switch. It is useful when making certain cuts
in wood where a coasting blade would result in a
wide, imprecise cut.
When electrical power is lost due to
blown fuse or other causes, the
motor will gradually slow down and the braking action
is initiated ONLY by the release of the trigger switch.
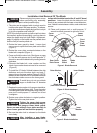
The electric blade brake of your miter saw has been
designed for highest degree of reliability, but unex-
pected circumstances such as contamination on the
commutator and brushes or failure of motor’s com-
ponents can cause the brake not to activate. If this
condition occurs, turn the saw “ON” and “OFF” four
to five times without contacting the workpiece. If the
tool operates but the brake does not consistently
stop the blade in about five (5) seconds, DO NOT
use saw and have it serviced immediately.
The brake action of this saw is not
intended as a safety feature. Re-
member to let the saw blade come to a complete
stop before raising the blade from the workpiece. As
always the guard system is your best protection
against unintentional contact with a spinning saw
blade. NEVER wedge open or defeat the closing
action of the lower guard.
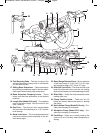
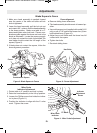
;42CA820;'4@D8A4<4=CB
4CC8=6)> =>F.>DA"8C4A(0F(44?064
To avoid injury from accidental
starting, remove plug from power
source outlet before making any adjustments.
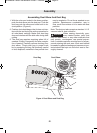
(F8C27 !>2:$55 '4;40B4 DCC>= – One of
these two buttons must be pressed before the
power switch can be pressed.
%>F4A(F8C27 – The power switch used with the
“Lock-OFF” button energizes the unit.
"08=0=3;4 – This handle contains the power
switch. Pulling this handle down lowers the
blade into the workpiece.
ADB7 0?B – These caps keep the motor
brushes in position and provide easy access for
inspecting and replacing brushes.
!>F4A;034D0A3!>F4AD0A3!8? – The
lower blade guard helps protect your hands from
the spinning blade. It retracts as the blade is
lowered. Lip can be used to raise the lower
guard when guard becomes jammed on a work-
piece.
;034 – Use only 12" blades with 1" arbor hole.
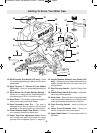
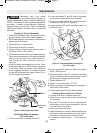
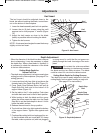
(;838=64=24 – Supports the workpiece. The
fence has a cast in scale to make repetitive cuts
easy. The fence also has holes to secure an
auxiliary fence if desired.
4A5=B4ACB – Kerf inserts can be adjusted to
different blade widths to minimize workpiece
tear-out.
"8C4A4C4=C$E4AA834 – Allows detent action to
be locked out allowing for micro adjustments to
any miter angle.
"8C4A(20;4"8C4A=6;4=3820C>A – This scale
is cast in on the base of the saw. Indicator is fas-
tened to the table.
"8C4A4C4=CB – There are ten (10) miter detent
slots for fast and accurate miter cuts of common
miter angles.
"8C4A4C4=C!4E4A – The lever releases the
table from the detent.
"8C4A!>2: =>1 – The miter lock knob locks
the miter saw table at any desired miter angle.
)01;4 – Sits in base, provides workpiece sup-
port, rotates for desired miter cuts and rotates
the head assembly. The front extended part of
the table is called the miter arm.
0B4 – Provides working surface to support
workpiece.
!
WARNING
!
WARNING
!
WARNING
2610009642 10/09 E:2610009642 10/09 E 10/20/09 3:16 PM Page 7