


English - 3
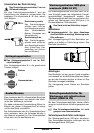
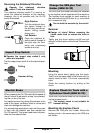
■ Operate the machine only with the auxiliary
handle 10.
Loosen the handle by turning to the left. Rotate
the auxiliary handle 10 and adapt to the working
position. Make sure that the clamping band 11 of
the auxiliary handle remains in the groove.
Afterwards tighten the handle again by turn-
ing in clockwise direction.
The drilling depth can be set with the depth
stop 3.
For this, press the push-button for the depth-stop
adjustment 4, adjust the required drilling depth X
and release the push-button for the depth-stop
adjustment 4 again.
The ribbing on depth stop 3 must point upwards.
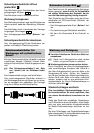
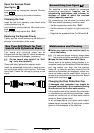
■ Before any work on the machine itself, re-
move the battery.
With the SDS-plus tool holder, simpler and easier
tool changing is possible without additional aids.
☞
Grease the shank end of the tool regu-
larly.
The dust protection cap 1 largely prevents the
entry of drilling dust during operation. When in-
serting the tool, take care that the dust protection
cap 1 is not damaged.
A damaged dust protection cap should be
changed immediately. We recommend having
this carried out by an after-sales service.
☞
As a requirement of the system, the
SDS-plus tool must rotate freely. At no-load
speed, this leads to a certain amount of ra-
dial run-out.
This does not affect the accuracy of the drill
hole, as the bit is automatically centred dur-
ing drilling.
Inserting (see figure )
Clean and grease the shank end of the tool.
Insert the tool in a twisting manner into the tool
holder until it locks. Check if it has locked by pull-
ing the tool.
Removing (see figure )
Push back the locking sleeve 2 of the tool holder
and remove the tool.
Inserting the Battery
Set the rotational direction switch 7 to the centre
position (lock-off). Insert the charged battery 8
into the handle until it can be felt to engage and
is seated flush on the machine.
Switching On and Off
To start the machine, press the On/Off switch 6
and keep it depressed.
The machine runs with variable
speed between 0 and maximum,
depending on the pressure applied
to the On/Off switch 6. Light pres-
sure on the On/Off switch 6 results
in low rotational speed, thus allow-
ing drilling to begin in a smooth,
controlled manner. Further pres-
sure on the switch results in an in-
crease in speed.
To switch off the machine, release the On/Off
switch 6.
Do not strain the machine so heavily that it comes
to a standstill.
■ The machine is not suitable for stationary op-
eration, e. g., in a drill stand.
Overload Clutch
If the drill bit jams or edges, the drive to the
drill spindle is interrupted.
Due to the arising forces always hold the
machine firmly with both hands and
provide for a secure stance.
Before pulling out a stuck tool insert, first remove
the machine from it.
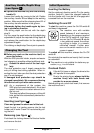
Auxiliary Handle/Depth Stop
(see figure )
Changing the Tool
C
A
B
Initial Operation
14 • 1 619 929 596 • 02.12