


4
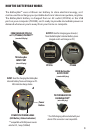
Step 1 (Model PP2016): Connect USB cable to micro-USB INPUT port (A) from
the USB port on the supplied AC charger (pg. 2), and plug it into a wall outlet
(100-240v).
Step 1 (Model PP2008): Connect USB cable to micro-USB INPUT port (A) from
a USB port on a computer. Avoid connecting to unpowered USB hubs and
USB ports located on keyboards, etc. to ensure you get full power from the
computer. Make sure the computer is powered from an AC outlet.
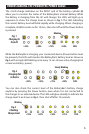
Step 2 (PP2016/PP2008): Press the Power button on the BatteryBar. All
four LEDs on the Power Gauge (Fig. 1) will light up (for 10 min.) when the
BatteryBar’s internal battery has been fully charged (you may leave it
connected to the charger overnight without risk of overcharging), and you’re
ready to connect and charge your device.
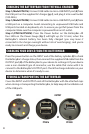
Press the power button on the INPUT end of the battery cylinder (A) to check
the BatteryBar’s charge status, then connect the supplied USB cable from the
OUTPUT port (B) of the BatteryBar to your device to recharge it. If your device
uses a non-standard type of connector, use the cable that came with it to
connect to the BatteryBar’s OUTPUT port. Check the charge indicator on your
device to determine when it’s ready to use.
Cover the INPUT and OUTPUT ends of the BatteryBar with the attached caps
when storing or transporting the BatteryBar, to help keep dirt and debris out
of the USB ports.
A
B
PP2016 PP2008
CHARGING THE BATTERYBAR FROM THE WALL CHARGER
CHARGING YOUR DEVICE FROM THE BATTERYBAR
STORING & TRANSPORTING THE BATTERYBAR
OUTPUTINPUT