


11
Operating Instructions and Parts Manual
www.chpower.com
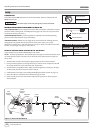
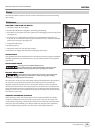
LOADING / UNLOADING THE NAILER
Always disconnect the tool from the air supply before loading / unloading fasteners.
Choose which type of fastener you want to use for you project. Additional fasteners can
be found at major home centers.
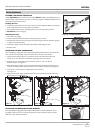
Loading the Tool
1. Load strips of fasteners into the slot in the rear of the magazine. Make sure that the
nails are placed into tool at the proper orientation.
2. Press pusher bypass button and drag pusher over nail clip. Release pusher.
3. Reconnect tool to air supply.
Unloading the Tool
1. Disconnect air supply.
2. Always unload all fasteners before removing tool from service.
3. Pull pusher back away from nail clip. Press pusher bypass button and allow pusher
to ride over remaining nails.
4. Hold tool upright so nails will slide backwards toward magazine slot.
5. Remove nails.
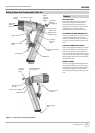
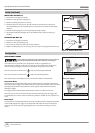
ADJUSTING THE NAIL PENETRATION
The CHN70900 is equipped with an adjustable depth of drive feature. This allows the
user to determine how deep a fastener will be driven into the work surface.
1. Adjust the operating pressure to a pressure which will consistently drive the
fasteners. Do not exceed the maximum operating pressure of 120 psi.
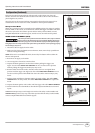
2. Pull red pin out. Twist Work Contact Element (WCE) 1/4 turn as shown.
Release red pin. See Figure 11.
3. Move WCE back and forth to the extent desired. Move the WCE toward the tool to
increase nail depth. Move WCE away from tool to reduce nail depth. See Figure 12.
4. Twist WCE 1/4 turn back to its original position as shown.
See Figure 13.
5. Make sure that the trigger and WCE move freely up and down without binding or
sticking after each adjustment.
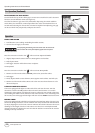
ADJUSTING THE DIRECTION OF THE EXHAUST
The CHN70900 is equipped with an adjustable direction exhaust deflector. This is
intended to allow the user to change the direction of the exhaust. Simply twist the
deflector to any direction desired.
Set-Up (Continued)
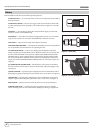
Figure 9 - Loading the Nailer
Figure 14 - Exhaust Adjustment
Figure 10 - Nail Depth Adjust
CHN70900
Figure 11
Figure 13
Figure 12