


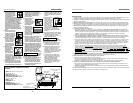


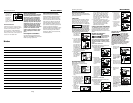

6. Rotate door back
into the closed
position.
7. Extend the wire
latch and place
over the hooks
on the nose.
8. Close the latch
by pushing the
latch up and in
until the latch
snaps into place.
9. Make sure the
trigger and work
contact element
(WCE) move
freely up and
down without
sticking or binding.
TECHNICAL SUPPORT
Please call our Nailer hotline at 1-800-
543-6400 with any questions regarding
the operation or repair of this nailer.
If calling from Ohio or outside of the
continental United States, please call,
1-513-367-1182.
Fasteners and Replacement
Parts
Use only genuine
Campbell Hausfeld
18 gauge fasteners (or equivalent - See
"Fastener Interchange Information"). Use
only genuine Campbell Hausfeld replace-
ment parts. Never substitute parts. Do
not use modified parts or parts which will
not provide equivalent performance to
the original equipment. Tool perfor-
mance, safety, and durability could be
reduced. When ordering parts or fasten-
ers, specify by part number.
Nailer Repair
Nailer repairs must be performed by a
qualified service person or an authorized
service center
Assembly Procedure For Seals
When repairing a nailer, the internal
parts must be cleaned and lubricated.
Parker O-lube or equivalent must be used
on all o-rings. Each o-ring must be coat-
ed with O-lube before assembling. A
small amount of oil must be used on all
moving surfaces and pivots. After
reassembling, a few drops of 30W non-
detergent oil or equivalent, must be
added through the air line before
testing.
Unloading is the reverse of loading,
except always disconnect the air
supply before unloading.
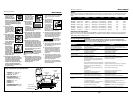
ADJUSTING THE NAIL PENETRATION
1. Regulate the air pressure to 70 psi
at the nailer.
2. Connect the
air supply
and test for
penetration
by driving
nails into a
sample piece of wood. If the nails
do not achieve the desired penetra-
tion, adjust the air pressure to a
higher setting until the desired pen-
etration is achieved. Do not exceed
110 psi at the nailer or durability of
the nailer will be reduced.
ADJUSTING THE DIRECTION OF THE
EXHAUST
The NB0040 is
equipped with an
adjustable direc-
tion exhaust
deflector. This is
intended to allow
the user to change the direction of the
exhaust. Simply twist the deflector to
any direction desired.
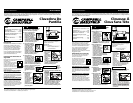
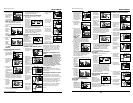
CLEARING A JAM FROM THE NAILER
1. Disconnect the
air supply from
the nailer.
2. Remove all
nails from the
magazine (see
"Loading/
Unloading The
Nailer").
Failure to do
so will cause the nails to eject from
the front of the nailer.
3. Undo latch by
pulling out
and down. The
wire latch will
disengage
from the
hooks on the
nose.
4. The door can
now be rotat-
ed exposing
the jammed
fastener.
5. Remove the
jammed fas-
tener, using
pliers or a
screwdriver if
required.
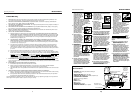
6. Remove nailer
from work sur-
face. The Work
Contact Element
(WCE) must
return to its
original down
position. Pull the trigger. The nailer
MUST NOT OPERATE. Do not use the
tool if it operates while lifted from
the work surface. Personal injury may
result.
7. Pull the trig-
ger and
depress the
Work
Contact
Element
(WCE) against the work surface. The
nailer MUST OPERATE.
8. Depress the
Work
Contact
Element
(WCE)
against
work surface. Pull the trigger. The
nailer MUST
OPERATE.
LOADING/UNLOADING THE NAILER
1. Always connect
the tool to the
air supply before
loading fasten-
ers.
2. Press down on
latch and pull
back on the
magazine
cover.
3. Insert a stick of
Campbell
Hausfeld nails
or equivalent
(see
"Fasteners" sec-
tion) into the magazine. Make sure
the pointed ends of the nails are
resting on the bottom ledge of the
magazine when loading. Make sure
the nails are not dirty or damaged.
4. Push the
magazine
cover for-
ward until
the latch
catches.
5. Always unload all fasteners before
removing tool from service.
Model NB0040
Operating Instructions
4
70
0
200
100
70
0
100
200
Rotate
www.campbellhausfeld.com
1
2
1
2
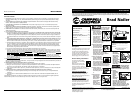
QUE HACER CUANDO LA CLAVADO-
RA TENGA UN CLAVO ATASCADO
1. Desconecte la
clavadora de la
fuente de sum-
inistro de aire.
2. Remueva todos
los clavos del
depósito (vea
Carga /
Descarga). De
lo contrario, los
clavos serán expulsados de la parte
delantera de la herramienta.
3. Abra el pestillo
tirándolo hacia
afuera y abajo.
El pestillo de
alambre se sal-
drá de los gan-
chos en la
boquilla.
4. Ahora se
puede rotar la
puerta, dejan-
do el sujetador
atascado
expuesto.
5. Saque el clavo
atascado con
un alicate o
destornillador,
si es necesario.
6
Rote la puerta
hacia atrás a la
posición cerrada.
7. Extienda el pestil-
lo de alambre y
colóquelo sobre
los ganchos de la
boquilla.
8. Cierre el pestillo
empujándolo
hacia adentro
hasta que ajuste
en su posición.
2. Presione el
pestillo de
alivio hacia
abajo. Tire la
tapa del car-
gador hacia
atrás.
3. Coloque una
serie de clavos
Campbell
Hausfeld o
equivalentes
(Vea la sección
de clavos) en el
cargador. Cerciórese de que los
extremos puntiagudos de los clavos
estén hacia la parte inferior del car-
gador. Cerciórese de que los clavos
no estén sucios ni dañados.
4. Tire la tapa
del cargador
hacia ade-
lante hasta
que calce el
pestillo.
5.
Siempre descargue el sujetador antes
de remover la herramienta de servi-
cio. La descarga se hace siguiendo
el proceso inverso de la carga; sin
embargo, siempre se tiene que
desconectar la manguera de aire
antes de descargarla.
PARA AJUSTAR LA PENETRACION DE
LOS CLAVOS
1. Regule la presión de aire en la
clavadora a 4,83 bar.
2. Conecte las
mangueras
de aire y
pruebe la
penetración
clavando
unos clavos en un pedazo de
madera. Si éstos no penetran hasta
el nivel deseado, aumente la presión
de aire y pruebe una vez más, con-
mtinue haciendolo hasta lograr los
resultados deseados. La presión de
la clavadora no debe exceder 7,58
bar ya que ésto reduciría la durabili-
dad de la clavadora.
PARA AJUSTAR LA DIRECCION DEL
TUBO DE ESCAPE
La clavadora
NB0040 está
equipada con un
deflector ajustable
de la dirección del
tubo de escape.
Éste le permite al usuario cambiar la
dirección del tubo de escape.
Simplemente mueva el deflector hacia
la dirección deseada.
3. Asegúrese de que
el gatillo y el ele-
mento de contac-
to de trabajo
(WCE) se muevan
fácilmente hacia
arriba y hacia
abajo sin pegarse
o atracarse.
4. Reconectar el
abastecimiento
de aire a la
clavadora.
5. Presione el ele-
mento de con-
tacto de trabajo
(WCE) contra la
superficie de tra-
bajo sin tirar del
gatillo. La
clavadora NO
DEBE FUN-
CIONAR. No
utilice la herramienta si ésta fun-
ciona sin haber tirado del gatillo.
Puede causar lesiones personales.
6. Retire la clavadora de la superficie
de trabajo. El
elemento de
contacto de tra-
bajo (WCE)
debe regresar a
su posición
inferior origi-
nal. Tire del
gatillo. La
clavadora NO DEBE FUNCIONAR.
No utilice la herramienta si ésta fun-
ciona cuando se levanta de la super-
ficie de trabajo. Puede causar
lesiones personales.
7. Tire del gatillo y presione el elemen-
to de con-
tacto de
trabajo
(WCE) con-
tra la
superficie
de trabajo.
La clavado-
ra DEBE FUNCIONAR.
8. Presione el
elemento
de contac-
to de tra-
bajo (WCE)
contra la
superficie
de trabajo. Tire del gatillo. La
clavadora DEBE FUNCIONAR.
PARA CARGAR Y DESCARGAR LA
CLAVADORA
1. Siempre
conecte la her-
ramienta a la
fuente de sum-
insitro de aire
antes de colo-
carle los clavos.
Modelo NB0040
Manual de Instrucciones
4 Sp
70
0
200
100
70
0
100
200
Rotate
1
2
1
2
Gire