


CONEXION RECOMENDADA
Por favor vea las instrucciones al
respecto en Instrucciones para Conectar
la Herramienta Neumática
(IN170102AV).
1.
El compresor de
aire debe tener
la capacidad de
suministrar un
mínimo de
3,45 bar cuan-
do la clavadora esté en uso. Si el
suministro de aire es inadecuado
podría haber pérdida de potencia y
falta de consistencia en el fun-
cionamiento.
2. Puede utilizar un
lubricador para
lubricar la clavadora.
Igualmente, puede
utilizar un filtro para
remover las
impurezas líquidas y sólidas que
podrían oxidar u obstruir las partes
internas de la clavadora.
3. Use man-
gueras de
aire de
9,5mm
(3/8”) dis-
eñadas para presiones mínimas de
trabajo de 10,34 bar. Use
mangueras de aire de 12,7 mm
(1/2”) si la longitud de las mismas es
de 15m ó más. Para un mejor
rendimiento, instalele a la clavadora
un conector rápido de 9,5mm(3/8”)
(roscas de 6,4mm (1/4”) NPT) cuyo
diámetro interno sea de 8mm
(0,315") y un acoplador rápido de
9,5mm(3/8”) a la manguera de aire.
4. Use un regulador de presión (de 0-
8,27 bar) en el compresor. Se necesi-
ta un regulador de presión para
controlar la presión de operación de
la clavadora entre 3,45 y 8,62 bar.
Servicio Técnico
Si desea hacer alguna pregunta refer-
ente a la reparación u operación de las
clavadoras, sírvase llamar al 1-800-543-
6400. Si llama desde Ohio o fuera de los
Estados Unidos continentales,
comuníquese con nosotros al
1-513-3678-1182.
Repuestos
Use sólo
repuestos
legítimos Campbell Hausfeld. Nunca
substituya las piezas de repuesto. No
use piezas modificadas o piezas que no
garanticen el funconamiento adecuado
de la herramienta. El hacerlo podría
reducir el rendimiento, la seguridad y
durabilidad. Al ordenar repuestos
especifique el número de la pieza.
Para Reparar la Clavadora
Las reparaciones de la clavadora las
debe hacer SOLAMENTE un técnico cali-
ficado que tenga experiencia.
Para Colocarle los Sellos
Cada vez que repare una clavadora
deberá limpiarle y lubricarle las partes
internas. Le recomendamos que use
Parker O-lube o un lubricante equiva-
lente en todos los anillos en O. A cada
anillo en O se le debe aplicar un poco
de lubricante para anillos antes de insta-
larlos. Igualmente, deberá ponerle un
poco de aceite a todas las piezas que se
mueven y muñones. Finalmente,
después de haberla ensamblado y antes
de probar la herramienta deberá poner-
le unas cuantas gotas de aceite sin
detergente 30W u otro aceite similar, en
las líneas de aire.
Para Clavar
1. Sostenga la her-
ramienta con la
boquilla apuntada
a la superficie
donde desea
clavar.
2. Alinee el clavo y la
herramienta en el
sitio donde desea
clavar.
3. Presione ligera-
mente la cabeza
del clavo .
4. Continue presion-
ando el clavo
hasta que esté completamente
clavado o haya alcanzado la pene-
tración deseada.
Para Ajustar la Penetración
del Clavo
La penetración de los clavos se puede
ajustar en la clavadora PN0090 con sólo
instalarle o quitarle separadores
(Repuesto Campbell Hausfeld número
SV348700AV, vendido por separado) en
la boquilla de la herramienta. Al añadir
o eliminar cada separador la pene-
tración del clavo varía en 0,80 mm
(1/32”). No debe instalar más de tres
separadores.
1. Desconecte la her-
ramienta de la fuente
de suministro de aire.
2. Desconecte la boquil-
la de la herramienta.
3. Desconecte el ensam-
blaje de la guía y el
resorte de la her-
ramienta.
4. Agregue o elimine
separadores para
alcanzar la pene-
tración deseada.
5. Reinstale el ensam-
blaje de la guía y el
resorte en la her-
ramienta.
6. Reinstale la boquilla
sobre la guía de
clavos y asegúrela
bien. Antes de insta-
lar la boquilla debe
aplicarle un poco de pegamento
para roscas.
3-Sp
3,45 bar
Min.
8,62 bar
Max.
Modelo PN0090
Manual de Instrucciones
150 PSI WP
150 PSI WP
3/8" I.D.
3/8" I.D.
9,5mm I.D.
10,34 bar WP
!
ADVERTENCI
A
2
has been dropped or thrown, exam-
ine the tool closely for bent, cracked
or broken parts and air leaks. STOP
and repair before using or serious
injury could occur.
● Avoid long extended periods of
work with the nailer. Stop using the
nailer if you feel pain in hands or
arms.
Caution indicates a
potentially haz-
ardous situation which, if not avoided,
MAY result in minor or moderate
injury.
● Do not modify or alter the nailer or
any nailer parts. Do not use the nailer
if any shields or guards are removed
or altered. Do not use the nailer as a
hammer. Personal injury or tool
damage may occur.
● Do not use a check
valve or any other
fitting which allows
air to remain in the
nailer. Personal injury
may occur.
● Never place hands or
any other body parts
in the nail discharge
area of the nailer.
Use caution when
placing a nail in the
nail guide. The nailer could eject the
fastener causing personal injury.
●
Never use the nailer as a toy. Do not
engage in horseplay. Always keep
others at a safe distance from the
work area. Never point the nailer at
anyone. Accidental triggering of the
nailer could result in personal injury.
● Never leave the nailer unattended or
connected to an air compressor when
!
CAUTION
not in use. Personal injury can occur
if someone picks up and uses the
nailer without knowing the correct
way to operate the nailer.
Notice indicates
important infor-
mation, that if not followed, MAY
cause damage to equipment.
● Inspect the tool daily
for loose or broken
parts. Do not use the
tool until all parts
have been tightened
or replaced.
● Clean and check all air supply hoses
and fittings before connecting the
nailer to an air supply. Replace any
damaged or worn hoses or fittings.
Tool performance or durability may
be reduced.
● Air compressors providing air to the
nailer should follow the require-
ments established by the American
National Standards Institute
Standard B19.3-1991; Safety
Standard for Compressors for
Process Industries. Contact your air
compressor manufacturer for
information.
Operating the Nailer
Read this manual and understand
all safety warnings and instruc-
tions before operating the nailer.
LUBRICATION
This nailer requires lubrication before
using the nailer for the first time and
before each use. If an inline oiler is
used, manual lubrication through the
air inlet is not required on a daily basis.
NOTICE
The work surface
can become dam-
aged by excessive lubrication. Proper
lubrication is the owner’s responsibil-
ity. Failure to lubricate the nailer prop-
erly will dramatically shorten the life
of the nailer and void the warranty.
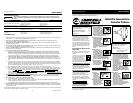
1. Disconnect the
air supply from
the nailer to
add lubricant.
2. Turn the nailer so
the air inlet is facing
up. Place 4-5 drops
of 30 W non-deter-
gent oil into air inlet.
Do not use deter-
gent oils, oil addi-
tives, or air tool oils. Air tool oils
contain solvents which will damage
the nailer's internal
components.
3. After adding oil, run
nailer briefly. Wipe
off any excess oil
from the exhaust.
NOTICE
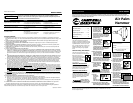
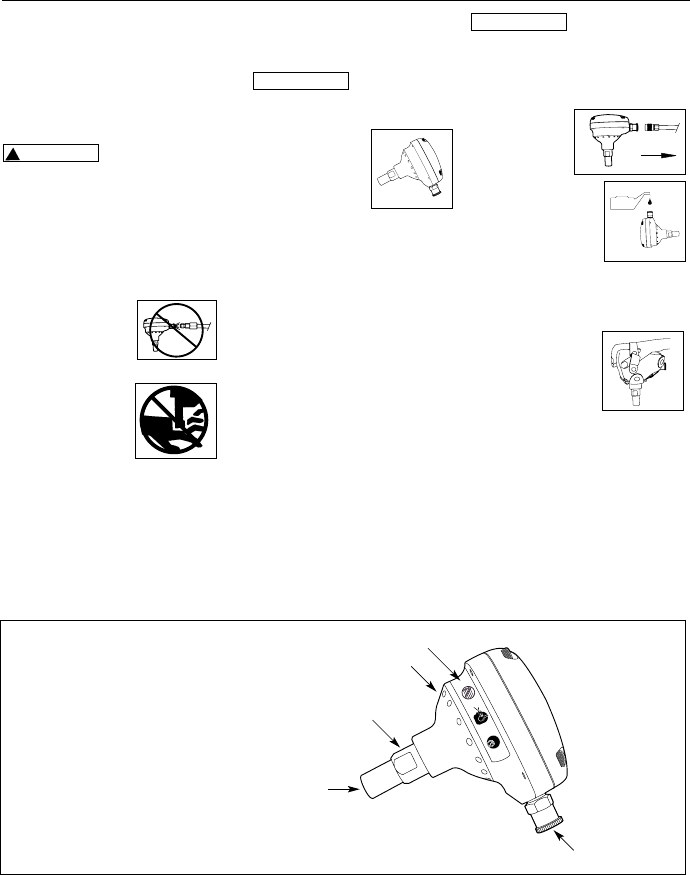
Nailer Components and Specifications
Model PN0090
Operating Instructions
• REQUIRES: 3.6 SCFM @ 90 psi
• AIR INLET: 1/4” NPT
• NAIL SIZE RANGE: 6d to 60d*
• WEIGHT: 2 lbs., 14 oz.
• LENGTH: 4.5”
• HEIGHT: 5”
• WIDTH: 3.5”
• MAXIMUM PRESSURE: 125 psi
• PRESSURE RANGE: 50 - 125 psi
* Optional accessories are available for finishing nails and larger framing nails.
OIL
OIL
Nail guide
Nose
Exhaust
Danger decal
Air inlet