


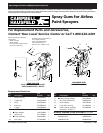


Spray Guns for Airless Paint Sprayers
3
Spraying Instructions
Professional looking results can be
obtained by following the spray tips
below.
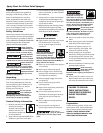
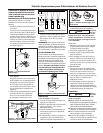
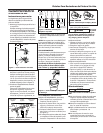
1. Keep the gun perpendicular to the
surface.
Always hold the gun perpendicular
to the surface with the tip approxi-
mately 12” from the surface. If held
at an angle (up and down or side to
side), paint will build up unevenly,
leave the work splotchy, and cause
excessive overspray (See Figure 1).
2. Move with a smooth arm stroke
Move the gun at a steady, even
pace while keeping the gun per-
pendicular to the surface (See
Figures 1 & 2). Do not fan the gun.
Fanning the gun will cause exces-
sive overspray and uneven coverage
(See Figure 2).
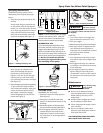
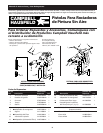
3. Start moving the gun before triggering
To get a smooth overlap and pre-
vent initial paint buildup, start your
stroke movement before pulling
the trigger. Release the trigger
before stopping at the end of the
stroke (See Figure 3).
NOTE: To assure uniform paint coverage,
overlap each stroke by 20% - 30% and
use two coats with a cross pattern (one
coat horizontal, second coat vertical).
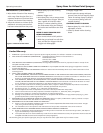
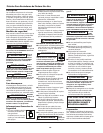
INTERMITTENT USE
If you are spraying and decide to stop
for several minutes, lock the spray gun
trigger and submerge the tip in a con-
tainer of suitable solvent (See Figure 4).
This will prevent paint from hardening in
the tiny spray opening and clogging the
tip. Be sure to release the pressure
by turning the bypass knob to prime
and switching off the pump.
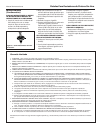
CLEARING CLOGS
REVERSIBLE TIP: (Included)
1. Rotate the tip to the clean position
(See Figure 5).
2. Point gun in a safe direction and
spray. This should clear the tip of any
blockage.
3. Rotate the tip back to the spray posi-
tion and continue spraying (See Fig. 5).
4. If the clogging continues, clean or
replace the gun filter and see the
Preparation section of this manual
for instruction on straining and thin-
ning paint.
Equipment damage
can occur if a nee-
dle or sharp object is used to clean the
tip. Tungsten carbide is brittle and can
be chipped.
FIXED TIP:
1. Turn off the motor and trigger the
gun to relieve the pressure in unit.
2. Lock gun trigger.
3. Remove tip and tip guard from the gun.
4. Soak tip in water or appropriate sol-
vent and brush away old paint or
impurities with a toothbrush until the
tip orifice has been cleared.
ADJUSTABLE TIP:
1. Turn adjustment knob fully counter-
clockwise to open tip to largest spray
pattern.
2. Pull trigger and spray into a bucket
or container. This should clear the tip
of any blockage.
3. If the clogging continues, clean or
replace the gun filter and see the
“Preparation” section of this manual
for instructions on straining and thin-
ning paint.
Maintenance
Pump damage may
occur if these
instructions are not followed.
● Do not use oil based solvents to
clean equipment after using latex
based coatings. Use only warm
soapy water.
● Always replace clogged gun filters,
do not attempt to clean them.
● Follow cleaning and storage instruc-
tions carefully.
● Do not use metal or other hard
objects to pick dried paint material
from Spray Tip Orifice.
FOLLOW INSTRUCTIONS INCLUDED
WITH YOUR PAINT SPRAYER.
!
NOTICE
!
NOTICE
SOLVENT
12”
Figure 1 - Holding the Spray Gun
Thin Coat
Thin Coat
Heavy
Coat
Over-
spray
Over-
spray
Figure 2 - Result of Flexing Wrist
While Spraying
INCORRECT
Approx.
10-12”
Start
Stroke
Pull
Trigger
Release
Trigger
End
Stroke
Figure 3 - Proper Way to
Trigger Spray Gun
CLEAN
SPRAY
Figure 5 - Clean and Spray Position
Figure 4 - Prevent Clogged Tip