


21 Sp
Cómo usar la
grapadora (Continuación)
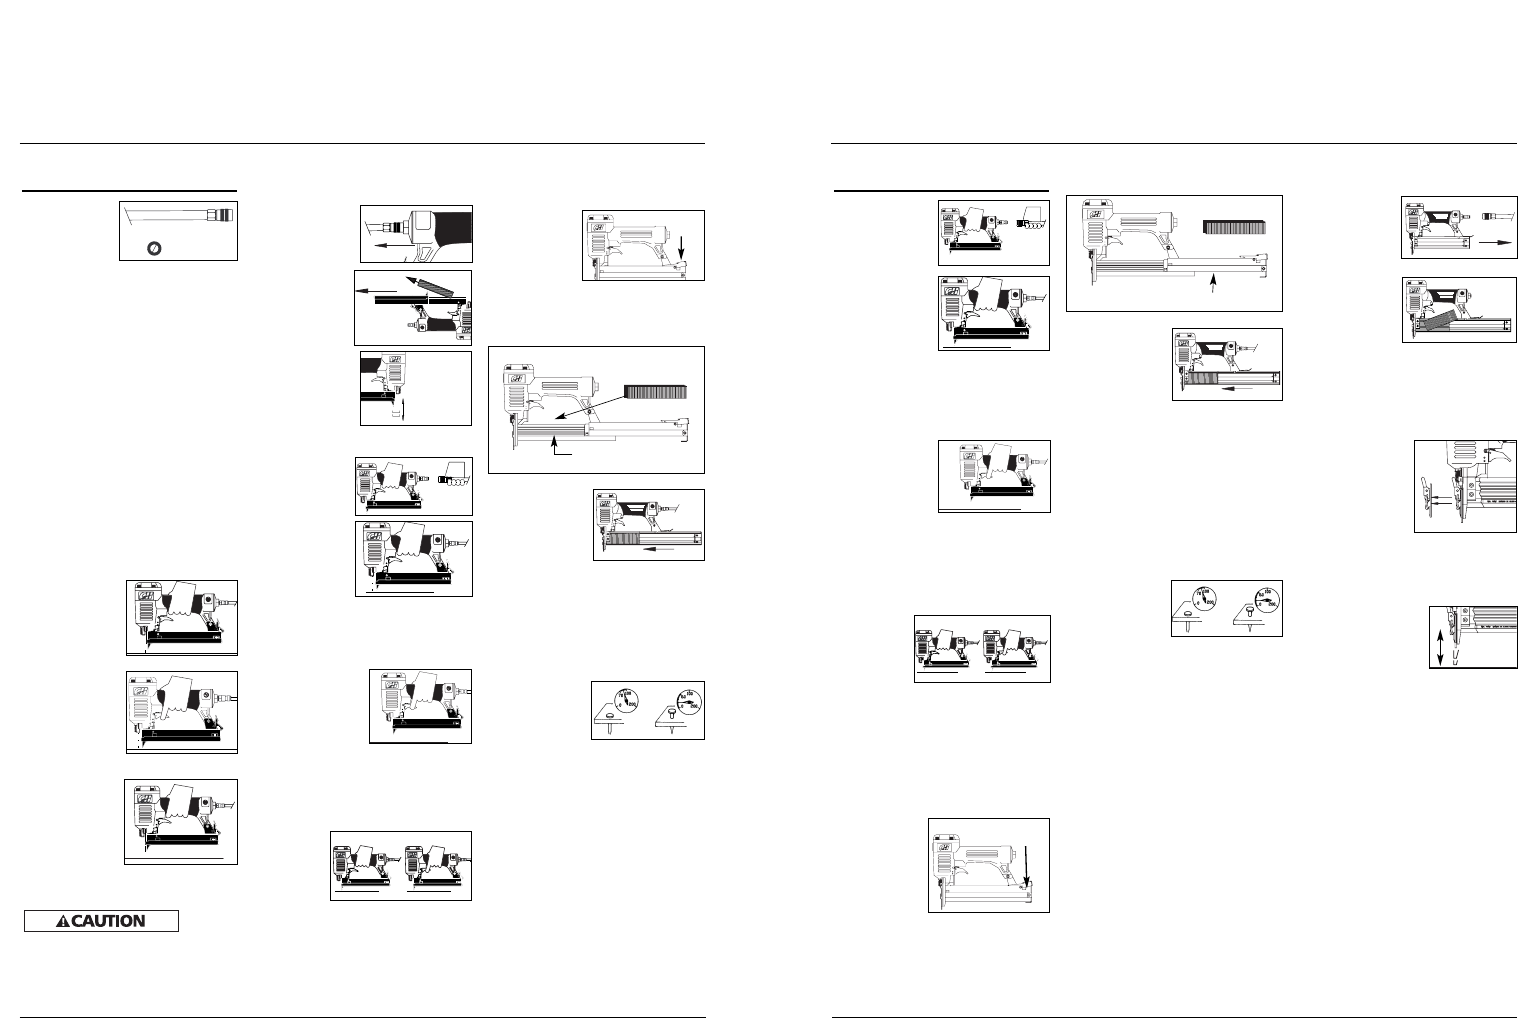
4.
Reconecte la
grapadora a la
fuente de su-
ministro de aire.
5. Presione el
Elemento de
Contacto de
Trabajo contra
la superficie de
trabajo sin
apretar el gatillo. La grapadora NO
DEBE OPERAR. No use la
herramienta si opera sin apretar el
gatillo. Se pueden producir lesiones
personales.
6. Remueva la
grapadora de
la superficie
de trabajo. El
Elemento de
Contacto de
Trabajo tiene que volver a su
posición original. La grapadora NO
DEBE OPERAR. No use la
herramienta si opera mientras está
levantada de la superficie de
trabajo.
7. Apriete el
gatillo y
presione
el
Elemento
de Contacto de Trabajo contra la
superficie de trabajo. La grapadora
DEBE OPERAR.
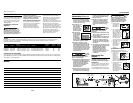
PARA CARGAR Y DESCARGAR LA
GRAPADORA
1. Siempre conectela herramienta a
la fuente de suminsitro de aire
antes de colocarle los sujetadores.
2. Empuje hacia
abajo sobre
el boton del
seguro.
Mueva la
tapa del
cargador
hacia atrás.
3. Para grapas, cargue una tira de
grapas con las coronas montadas
sobre el riel del cargador.
4. Empuje la tapa
del cargador
hacia delante
hasta que el
botón del
seguro salte
hacia arriba.
5. Siempre descargue el sujetador
antes de remover la herramienta de
servicio. La descarga se hace
siguiendo el proceso inverso de la
carga; sin embargo, siempre se
tiene que desconectar la manguera
de aire antes de descargarla.
PARA AJUSTAR LA PENETRACION DE
LAS GRAPAS
1. Regule la
presión de
aire en la
grapadora a
4,14 bar.
2. Conecte las mangueras de aire y
pruebe la penetración clavando
unas grapas en un pedazo de
madera. Si éstos no penetran hasta
el nivel deseado, aumente la
presión de aire y pruebe una vez
más, conmtinue haciendolo hasta
lograr los resultados deseados. La
presión de la grapadora no debe
exceder 690 bar ya que ésto
reduciría la durabilidad de la
grapadora.
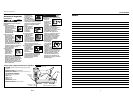
QUE HACER CUANDO LA
GRAPADORA TENGA UNA GRAPA
ATASCADA
1.
Desconecte la
clavadora de
la fuente de
suministro de
aire.
2. Remueva
todos los
clavos del
depósito (vea
Para Cargar /
Descargar la Clavadora). De lo
contrario, hará que los clavos se
expulsen desde la parte delantera
de la clavadora cuando se remueve
el conjunto de la boca.
3. Hale hacía
adelante la
lengüeta roja de
la boquilla de
desatasco
rápido. Aleje la
portezuela para
exponer y desatascar el sujetador
atascado.
4. Vuelva a colocar la boquilla
revertiendo la secuencia del paso 3.
5. Asegúrese que el
gatillo funciona y
que el Elemento
de Contacto de
Trabajo se mueve
libremente hacia arriba y hacia
abajo sin atascarse o pegarse.
Modelo SN268K00
Carril del cargador
Botón del
seguro
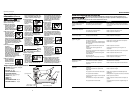
Operating The
Stapler (Continued)
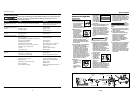
3. Use 3/8” air
hoses with a
minimum
working pres-
sure of 150
psi. Use 1/2”
air hoses for 50’ run or longer. For
better performance, install a 3/8”
quick plug (1/4” NPT threads) with
an inside diameter of .315" (8mm)
on the stapler and a 3/8” quick cou-
pler on the air hose.
4. Use a pressure regulator on the
compressor, with an operating pres-
sure of 0 - 125 psi. A pressure regu-
lator is required to control the oper-
ating pressure of the stapler
between 60 and 100 psi.
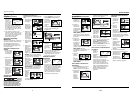
Sequential Trip Safety
Mechanism
This tool is equipped with a sequential
trip safety mechanism. When the oper-
ator depresses the Work Contact
Element (WCE) against the work sur-
face and then pulls the trigger, a fas-
tener will be driven.
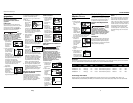
OPERATING A SEQUENTIAL TRIP
STAPLER
1. Release trigger
and place nose
of tool against
work surface.
2. Depress the
Work contact
element (WCE)
against the
work surface
and pull the
trigger to
drive a fastener.
3. Release the
trigger and
lift the tool
from the work
surface after
each fastener
is driven.
CHECKING THE WORK CONTACT
ELEMENT (WCE)
Check the
operation
of the Work Contact Element (WCE) trip
mechanism before each use. The WCE
must move freely without binding
through its entire travel distance. The
WCE spring must return the WCE to its
fully extended position after being
LOADING/UNLOADING THE STAPLER
1. Always connectthe tool to the air
supply before loading fasteners.
2. Push down
on the latch
button. Pull
back on the
magazine
cover.
3. For staples, load a clip of staples
with the crowns straddling the
magazine rail.
4. Push the
magazine
cover forward
until latch
button pops
up.
5. Always unload all fasteners before
removing tool from service.
Unloading is the reverse of loading,
except always disconnect the air
supply before unloading.
ADJUSTING THE STAPLE
PENETRATION
1. Regulate the
air pressure to
60 psi at the
stapler.
2. Connect the air supply and test for
penetration by driving staples into a
sample piece of wood. If the staples
do not achieve the desired penetra-
tion, adjust the air pressure to a
higher setting until the desired pen-
etration is achieved. Do not exceed
100 psi at the stapler or durability
of the stapler will be reduced.
depressed. Do not operate the stapler if
the WCE trip mechanism is not
operating properly. Personal injury may
occur.
1. Disconnect the
air supply from
the stapler.
2. Remove all
staples from
the magazine
(See Loading-
Unloading).
3. Make sure the
trigger and
Work Contact
Element (WCE)
move freely up
and down
without stick-
ing or binding.
4. Reconnect air
supply to the
stapler.
5. Depress the
work contact
element
(WCE) against
the work sur-
face without
pulling the
trigger. The stapler MUST NOT
OPERATE. Do not use the stapler if
it operates without pulling the trig-
ger. Personal injury may result.
6. Remove the
stapler from the
work surface.
The Work
Contact Element
(WCE) must
return to its original down position.
Pull the trigger. The stapler MUST
NOT OPERATE. Do not use the sta-
pler if it operates while lifted from
the work surface. Personal injury
may result.
7. Depress
the Work
Contact
Element
(WCE)
against
the work surface. Pull the trigger.
The stapler MUST operate.
Operating Instructions
4
movement
www.chpower.com
150 psi WP
3/8” I.D.
Latch
Button
Magazine rail
movemiento