


2
Operating Instructions
TL2402
Spray Gun Terms (Continued)
PAINT TANK – An auxiliary pressurized
paint reservoir that allows continuous
spraying of large amounts of paint
without stopping for refills as with a
canister. It also allows using the spray gun
at any angle or orientation.
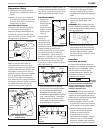
General Safety Information
1. Read all manuals included
with this product carefully.
Be thoroughly familiar
with the controls and the
proper use of the equipment.
2. Follow all local electrical and safety
codes as well as in the United States,
the National Electrical Codes (NEC)
and Occupational Safety and Health
Act (OSHA).
Use a face mask / respirator
and protective clothing when
spraying. Always spray in a
well ventilated area to prevent health
and fire hazards. Refer to Material
Safety Data Sheets (MSDS) of spray
material for details.
Never spray closer than 25
feet to the compressor! If
possible, locate compressor
in separate room. Never spray into the
compressor, compressor controls or the
motor.
3. Do not smoke or eat when spraying
paint, insecticides, or other
flammable substances.
Do not spray flammable
materials in vicinity of open
flame or near ignition sources.
Motors, electrical equipment and
controls can cause electrical arcs that will
ignite a flammable gas or vapor. Never
store flammable liquids or gases in the
vicinity of the compressor.
4. When spraying and cleaning, always
follow the instructions and safety
precautions provided by the material
manufacturer (Refer to MSDS).
Do not spray acids, corrosive
materials, toxic chemicals,
fertilizers or pesticides. Using
these materials could result in death or
serious injury.
5. Keep visitors away and NEVER allow
children or pets in the work area.
Never
aim or
spray at yourself or anyone else or
serious injury could occur.
6. Always work in a clean environment.
To avoid injury and damage to the
workpiece, do not aim the spray gun
at any dust or debris.
Do not use pressure that
exceeds operating pressure
of any of the parts (hoses,
fittings, etc.) in the painting system.
Keep
hose
away from sharp objects. Bursting air
hoses may cause injury. Examine air
hoses regularly and replace if damaged.
7. Always use a pressure regulator on
the air supply to the spray gun.
Failure
to install
appropriate water/oil removal equipment
may result in damage to machinery or
workpiece.
Do not
misuse
this product. Excessive exposure to
vibration, work in awkward positions,
and repetitive work motions can cause
injury to hands and arms. Stop using
any tool if discomfort, numbness,
tingling, or pain occur, and consult a
physician.
Introduction
The spray gun is a vital link in any
finishing application. In addition to
operating the spray gun properly,
techniques of surface preparation and
paint preparation must be understood.
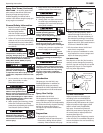
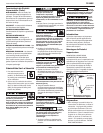
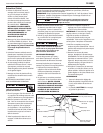
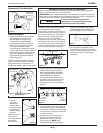
Spray Gun Set-Up
SIPHON FEED CUP SET-UP
The air pressure for atomization is
controlled by the regulator on the air
source. The amount of fluid is adjusted by
the fluid control knob, the paint viscosity,
and the air pressure (See Figure 1).
The siphon cup must be vented to the
atmosphere.
Preparation
1. Thoroughly mix the paint in
accordance with the manufacturer’s
instructions, adding thinner where
necessary. Most materials will spray
readily if thinned properly. Strain
material through cheese cloth or a
paint strainer. Test the consistency of
the material by making a few strokes
on a cardboard target. If material still
appears too thick, add a small amount
of thinner. THIN WITH CARE!!
2. Fill the canister about 3/4 full and
start the air compressor.
3. Set up a piece of cardboard or other
scrap material to use as a target and
adjust for best spray pattern.
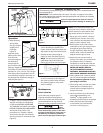
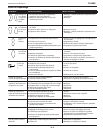
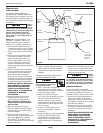
FAN DIRECTION
The direction of the fan (horizontal or
vertical) can be changed by loosening
the lock ring and turning the air cap 90
degrees (See Figure 2). Hand tighten
lock ring after adjustment.
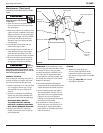
PATTERN ADJUSTMENT
Adjust air pressure to the spray gun
according to the recommendations
supplied with spray material. This air
pressure usually falls between 40 - 60 psi.
Adjust air pressure with trigger pulled
and air control knob (if applicable)
fully open. If reduced air pressure is
desired for some areas of spray job, use
air control knob to reduce pressure as
necessary (See Figure 3).
Before spraying the workpiece, practice
a few minutes on a cardboard target to
ensure the pattern size and consistency
are set correctly.
Figure 1 - Siphon Feed Cup Set-up
Filtered,
Regulated
Air Source
Fluid
Control
Knob
www.chpower.com
MANUAL
Figure 2
Horizontal Fan
Vertical Fan
Air Cap
Lock Ring