


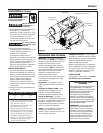


WX8019
5
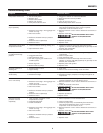
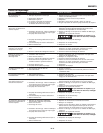
Troubleshooting Chart
Symptom Possible Cause(s) Corrective Action
1. No electrical power
2. Breaker open
3. Pressure switch bad
4. Motor over worked
5. Tank pressure above cut-in
1. Incorrect size fuse, circuit overloaded
2. Extension cord usage - wrong gauge wire
and/or too long.
3. Worn check valve
4. Defective unloader valve (on pressure
switch)
5. Defective motor capacitor(s)
6. Defective motor
1. Loose connections (fittings, tubing, etc.)
2. Open tank drain valve
1. Excessive air usage
2. Clogged intake filter
3. Open tank drain valve
4. Air leaks in piping (on machine or in
outside system)
5. Piston ring worn
6. Broken valve (in pump)
1. Excessive water in tank
2. High humidity
1. Defective pressure switch
2. Excessive air usage
1. Circuit overloaded
2. Extension cord usage - wrong gauge wire
and/or too long.
3. Loose electrical connections
4. Worn check valve
5. Defective unloader valve (on pressure
switch)
6. Defective motor capacitor(s)
7. Defective motor
1 Lack of proper ventilation / room
temperature too high
2. Clogged intake filter
3. Circuit overloaded
4. Extension cord usage - wrong gauge wire
and/or too long.
5. Worn check valve
6. Defective unloader valve (on pressure
switch)
7. Defective motor
1. Plugged in? Switch on? Check fuse/breaker
2. Reset, determine cause of problem
3. Replace
4. Turn off, let cool, turn on.
5. Bleed tank pressure down to cut-in.
1. Check for proper fuse, use time-delay fuse. Disconnect
other electrical appliances from circuit or operate
compressor on its own branch circuit
2. Remove extension cord or refer to Extension Cord Chart on
page 3
3. Replace check valve
Do not disassemble check valve
with air in tank; bleed tank
4. Replace unloader valve.
5. Replace capacitor(s)
6. Replace motor
1. Check all connections with soap and water solution.
Tighten; or remove and apply pipe dope or pipe tape to the
threads, then reassemble.
2. Close tank drain valve
1. Decrease air usage; compressor not large enough for air
requirement
2. Clean or replace filter
3. Close tank drain valve
4. Check all connections with soap and water solution.
Tighten; or remove and apply pipe dope or pipe tape to the
threads, then reassemble.
5. Replace piston and cylinder.
6. Replace valve
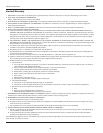
1. Drain tank
2. Move to area of less humidity; use air line filter
1. Replace switch
2. Decrease air usage; compressor not large enough for air
requirement
1. Disconnect other electrical appliances from circuit or
operate compressor on its own branch circuit
2. Remove extension cord or refer to Extension Cord Chart on
page 3
3. Check all electrical connections
4. Replace check valve
Do not disassemble check valve
with air in tank; bleed tank
5. Replace unloader valve
6. Replace capacitor(s)
7.Replace motor
1. Move compressor to well ventilated area
2. Clean or replace filter
3. Check for proper fuse, use time-delay fuse. Disconnect
other electrical appliances from circuit or operate
compressor on its own branch circuit
4. Remove extension cord or refer to Extension Cord Chart on
page 3
5. Replace check valve
Do not disassemble check valve
with air in tank; bleed tank
6. Replace unloader valve.
7. Replace motor
Compressor will not run
Fuses blow/circuit breaker
trips repeatedly
Tank pressure drops when
compressor shuts off
Air output lower than
normal/low discharge
pressure
Excessive moisture in
discharge air
Compressor runs
continuously
Motor hums but cannot
run or runs slowly
Thermal overload
protector cuts out
repeatedly